
Planet Python
Last update: May 04, 2024 09:43 PM UTC
May 04, 2024
Eli Bendersky
My favorite prime number generator
Many years ago I've re-posted a Stack Overflow answer with Python code for a terse prime sieve function that generates a potentially infinite sequence of prime numbers ("potentially" because it will run out of memory eventually). Since then, I've used this code many times - mostly because it's short and clear. In this post I will explain how this code works, where it comes from (I didn't come up with it), and some potential optimizations. If you want a teaser, here it is:
def gen_primes():
    """Generate an infinite sequence of prime numbers."""
    D = {}
    q = 2
    while True:
        if q not in D:
            D[q * q] = [q]
            yield q
        else:
            for p in D[q]:
                D.setdefault(p + q, []).append(p)
            del D[q]
        q += 1
The sieve of Eratosthenes
To understand what this code does, we should first start with the basic Sieve of Eratosthenes; if you're familiar with it, feel free to skip this section.
The Sieve of Eratosthenes is a well-known algorithm from ancient Greek times for finding all the primes below a certain number reasonably efficiently using a tabular representation. This animation from Wikipedia explains it pretty well:
Starting with the first prime (2) it marks all its multiples until the requested limit. It then takes the next unmarked number, assumes it's a prime (because it is not a multiple of a smaller prime), and marks its multiples, and so on until all the multiples below the limit are marked. The remaining unmarked numbers are primes.
Here's a well-commented, basic Python implementation:
def gen_primes_upto(n):
    """Generates a sequence of primes < n.

    Uses the full sieve of Eratosthenes with O(n) memory.
    """
    if n == 2:
        return

    # Initialize table; True means "prime", initially assuming all numbers
    # are prime.
    table = [True] * n
    sqrtn = int(math.ceil(math.sqrt(n)))

    # Starting with 2, for each True (prime) number I in the table, mark all
    # its multiples as composite (starting with I*I, since earlier multiples
    # should have already been marked as multiples of smaller primes).
    # At the end of this process, the remaining True items in the table are
    # primes, and the False items are composites.
    for i in range(2, sqrtn):
        if table[i]:
            for j in range(i * i, n, i):
                table[j] = False

    # Yield all the primes in the table.
    yield 2
    for i in range(3, n, 2):
        if table[i]:
            yield i
When we want a list of all the primes below some known limit, gen_primes_upto is great, and performs fairly well. There are two issues with it, though:
- We have to know what the limit is ahead of time; this isn't always possible or convenient.
- Its memory usage is high - O(n); this can be significantly optimized, however; see the bonus section at the end of the post for details.
The infinite prime generator
Back to the infinite prime generator that's in the focus of this post. Here is its code again, now with some comments:
def gen_primes():
    """Generate an infinite sequence of prime numbers."""
    # Maps composites to primes witnessing their compositeness.
    D = {}

    # The running integer that's checked for primeness
    q = 2

    while True:
        if q not in D:
            # q is a new prime.
            # Yield it and mark its first multiple that isn't
            # already marked in previous iterations
            D[q * q] = [q]
            yield q
        else:
            # q is composite. D[q] holds some of the primes that
            # divide it. Since we've reached q, we no longer
            # need it in the map, but we'll mark the next
            # multiples of its witnesses to prepare for larger
            # numbers
            for p in D[q]:
                D.setdefault(p + q, []).append(p)
            del D[q]

        q += 1
The key to the algorithm is the map D. It holds all the primes encountered so far, but not as keys! Rather, they are stored as values, with the keys being the next composite number they divide. This lets the program avoid having to divide each number it encounters by all the primes known so far - it can simply look in the map. A number that's not in the map is a new prime, and the way the map updates is not unlike the sieve of Eratosthenes - when a composite is removed, we add the next composite multiple of the same prime(s). This is guaranteed to cover all the composite numbers, while prime numbers should never be keys in D.
I highly recommend instrumenting this function with some printouts and running through a sample invocation - it makes it easy to understand how the algorithm makes progress.
Compared to the full sieve gen_primes_upto, this function doesn't require us to know the limit ahead of time - it will keep producing prime numbers ad infinitum (but will run out of memory eventually). As for memory usage, the D map has all the primes in it somewhere, but each one appears only once. So its size is O(\pi(n)), where \pi(n) is the Prime-counting function, the number of primes smaller or equal to n. This can be approximated by O(\frac{n}{ln(n)}) [1].
I don't remember where I first saw this approach mentioned, but all the breadcrumbs lead to this ActiveState Recipe by David Eppstein from way back in 2002.
Optimizing the generator
I really like gen_primes; it's short, easy to understand and gives me as many primes as I need without forcing me to know what limit to use, and its memory usage is much more reasonable than the full-blown sieve of Eratosthenes. It is, however, also quite slow, over 5x slower than gen_primes_upto.
The aforementioned ActiveState Recipe thread has several optimization ideas; here's a version that incorporates ideas from Alex Martelli, Tim Hochberg and Wolfgang Beneicke:
def gen_primes_opt():
    yield 2
    D = {}
    for q in itertools.count(3, step=2):
        p = D.pop(q, None)
        if not p:
            D[q * q] = q
            yield q
        else:
            x = q + p + p  # get odd multiples
            while x in D:
                x += p + p
            D[x] = p
The optimizations are:
- Instead of holding a list as the value of D, just have a single number. In cases where we need more than one witness to a composite, find the next multiple of the witness and assign that instead (this is the while x in D inner loop in the else clause). This is a bit like using linear probing in a hash table instead of having a list per bucket.
- Skip even numbers by starting with 2 and then proceeding from 3 in steps of 2.
- The loop assigning the next multiple of witnesses may land on even numbers (when p and q are both odd). So instead jump to q + p + p directly, which is guaranteed to be odd.
With these in place, the function is more than 3x faster than before, and is now only within 40% or so of gen_primes_upto, while remaining short and reasonably clear.
There are even fancier algorithms that use interesting mathematical tricks to do less work. Here's an approach by Will Ness and Tim Peters (yes, that Tim Peters) that's reportedly faster. It uses the wheels idea from this paper by Sorenson. Some additional details on this approach are available here. This algorithm is both faster and consumes less memory; on the other hand, it's no longer short and simple.
To be honest, it always feels a bit odd to me to painfully optimize Python code, when switching languages provides vastly bigger benefits. For example, I threw together the same algorithms using Go and its experimental iterator support; it's 3x faster than the Python version, with very little effort (even though the new Go iterators and yield functions are still in the proposal stage and aren't optimized). I can't try to rewrite it in C++ or Rust for now, due to the lack of generator support; the yield statement is what makes this code so nice and elegant, and alternative idioms are much less convenient.
Bonus: segmented sieve of Eratosthenes
The Wikipedia article on the sieve of Eratosthenes mentions a segmented approach, which is also described in the Sorenson paper in section 5.
The main insight is that we only need the primes up to \sqrt{n} to be able to sieve a table all the way to N. This results in a sieve that uses only O(\sqrt{n}) memory. Here's a commented Python implementation:
def gen_primes_upto_segmented(n):
    """Generates a sequence of primes < n.

    Uses the segmented sieve or Eratosthenes algorithm with O(√n) memory.
    """
    # Simplify boundary cases by hard-coding some small primes.
    if n < 11:
        for p in [2, 3, 5, 7]:
            if p < n:
                yield p
        return

    # We break the range [0..n) into segments of size √n
    segsize = int(math.ceil(math.sqrt(n)))

    # Find the primes in the first segment by calling the basic sieve on that
    # segment (its memory usage will be O(√n)). We'll use these primes to
    # sieve all subsequent segments.
    baseprimes = list(gen_primes_upto(segsize))
    for bp in baseprimes:
        yield bp

    for segstart in range(segsize, n, segsize):
        # Create a new table of size √n for each segment; the old table
        # is thrown away, so the total memory use here is √n
        # seg[i] represents the number segstart+i
        seg = [True] * segsize

        for bp in baseprimes:
            # The first multiple of bp in this segment can be calculated using
            # modulo.
            first_multiple = (
                segstart if segstart % bp == 0 else segstart + bp - segstart % bp
            )
            # Mark all multiples of bp in the segment as composite.
            for q in range(first_multiple, segstart + segsize, bp):
                seg[q % len(seg)] = False

        # Sieving is done; yield all composites in the segment (iterating only
        # over the odd ones).
        start = 1 if segstart % 2 == 0 else 0
        for i in range(start, len(seg), 2):
            if seg[i]:
                if segstart + i >= n:
                    break
                yield segstart + i
Code
The full code for this post - along with tests and benchmarks - is available on GitHub.
| [1] | While this is a strong improvement over O(n) (e.g. for a billion primes, memory usage here is only 5% of the full sieve version), it still depends on the size of the input. In the unlikely event that you need to generate truly gigantic primes starting from 2, even the square-root-space solutions become infeasible. In this case, the whole approach should be changed; instead, one would just generate random huge numbers and use probabilistic primality testing to check for their primeness. This is what real libraries like Go's crypto/rand.Prime do. |
Faster XML stream processing in Go
XML processing was all the rage 15 years ago; while it's less prominent these days, it's still an important task in some application domains. In this post I'm going to compare the speed of stream-processing huge XML files in Go, Python and C and finish up with a new, minimal module that uses C to accelerate this task for Go. All the code shown throughout this post is available in this GitHub repository the new Go module is here.
What does XML stream processing mean?
First, let's define the problem at hand in more detail. Roughly speaking, there are two ways we can process data from a file:
- Read the whole file into memory at once, and then proces the data in memory.
- Read the file in chunks, process each chuck, without having the whole data in memory at any given time.
In many ways, (1) is more convenient because we can easily go back to any part of the file. However, in some situations (2) is essential; specifically, when the file is very large. This is where stream processing comes in. If our input file is 500 GiB, we're unlikely to be able to read it into memory and have to process it in parts. Even for smaller files that would theoretically fit into RAM, it's not always a good idea to read them wholly; this dramatically increases the active heap size and can cause performance issues in garbage-collected languages.
The task
For this benchmark, I'm using xmlgen to create a 230 MiB XML file [1]. A tiny fragment of the file may look like this:
<?xml version="1.0" standalone="yes"?>
<site>
  <regions>
    <asia>
      <item id="item0">
        <location>United States</location>
        <quantity>1</quantity>
        <name>duteous nine eighteen </name>
        <payment>Creditcard</payment>
        ...
      </item>
    </asia>
  </regions>
</site>
The task is to find how many times "Africa" appears in the data of the <location> tag throughout the document.
Baseline - using the Go standard library
Let's start with a baseline implementation - using the standard library's encoding/xml package. While the package's Unmarshal mode will parse the whole file in one go, it can also be used to process XML token by token and selectively parse interesting elements. Here is the code:
package main

import (
  "encoding/xml"
  "fmt"
  "io"
  "log"
  "os"
  "strings"
)

type location struct {
  Data string `xml:",chardata"`
}

func main() {
  f, err := os.Open(os.Args[1])
  if err != nil {
    log.Fatal(err)
  }
  defer f.Close()

  d := xml.NewDecoder(f)
  count := 0
  for {
    tok, err := d.Token()
    if tok == nil || err == io.EOF {
      // EOF means we're done.
      break
    } else if err != nil {
      log.Fatalf("Error decoding token: %s", err)
    }

    switch ty := tok.(type) {
    case xml.StartElement:
      if ty.Name.Local == "location" {
        // If this is a start element named "location", parse this element
        // fully.
        var loc location
        if err = d.DecodeElement(&loc, &ty); err != nil {
          log.Fatalf("Error decoding item: %s", err)
        }
        if strings.Contains(loc.Data, "Africa") {
          count++
        }
      }
    default:
    }
  }

  fmt.Println("count =", count)
}
I made sure to double check that the memory usage of this program stays bounded and low while processing a large file - the maximum RSS was under 7 MiB while processing our 230 MiB input file. I'm verifying this for all the programs presented in this post using /usr/bin/time -v on Linux.
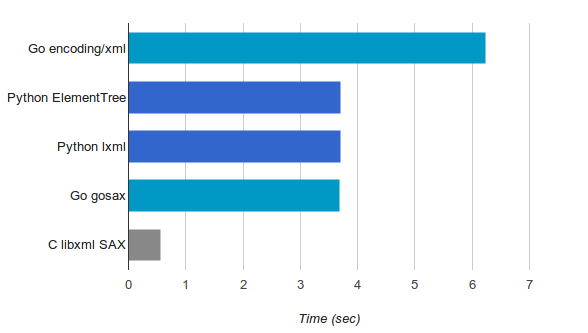
This program takes 6.24 seconds to process the whole file and print out the result.
Python implementation
The first Python implementation uses the xml.etree.ElementTree module from the standard library:
import sys
import xml.etree.ElementTree as ET

count = 0
for event, elem in ET.iterparse(sys.argv[1], events=("end",)):
    if event == "end":
        if elem.tag == 'location' and elem.text and 'Africa' in elem.text:
            count += 1
        elem.clear()

print('count =', count)
The key here is the elem.clear() call. It ensures that each element gets discarded afer parsing it fully, so the memory usage won't grow linearly with the size of the file (unless the file is pathological). This program takes 3.7 seconds to process the whole file - much faster than our Go program. Why is that?
While the Go program uses 100% Go code for the task (encoding/xml is implemented entirely in Go), the Python program is using a C extension (most of ElementTree is written in C) wrapping a fast XML parser in C - libexpat. The bulk of the work here is done in C, which is faster than Go. The performance of encoding/xml is further discussed in this issue, though it's an old one and the performance has been somewhat optimized since then.
An alternative XML parsing library for Python is lxml, which uses libxml underneath. Here's a Python version using lxml:
import sys
from lxml import etree

count = 0
for event, elem in etree.iterparse(sys.argv[1], events=("end",)):
    if event == "end":
        if elem.tag == 'location' and elem.text and 'Africa' in elem.text:
            count += 1
        elem.clear()

print('count =', count)
This looks very similar to the previous version, and that's on purpose. lxml has an etree-compatible API to make transition from the standard library smoother. This version also takes around 3.7 seconds for our 230 MiB file.
The reason I'm including lxml here is that it will run faster than xml.etree.ElementTree when slurping the whole file, for our particular file size. I want to highlight that this is outside of the scope for my experiment, because I only care about streaming processing. The only way (that I'm aware of!) to successfully process a 500 GiB file with lxml would be by using iterparse.
How fast can it run?
Based on the measurements presented here, Go is about 68% slower than Python for parsing a large XML file in a streaming fashion. While Go usually compiles to a much faster code than pure Python, the Python implementations have the backing of efficient C libraries with which it's difficult to compete. I was curious to know how fast it could be, in theory [2].
To answer this question, I implemented the same program using pure C with libxml, which has a SAX API. I won't paste it wholly here because it's longer, but you can find the full source code on GitHub. It takes just 0.56 seconds to process our 230 MiB input file, which is very impressive given the other results, but also not very surprising. This is C, after all.
You may wonder - if lxml uses libxml underneath, why is it so much slower than the pure C version? The answer is Python call overhead. The lxml version calls back into Python for every parsed element, which incurs a significant cost [3]. Another reason is that my C implementation doesn't actually parse an element - it's just a simple event-based state machine, so there's less extra work being done.
Using libxml from Go
To recap where we are so far:
- Python libraries based on underlying C implementations are faster than pure Go.
- Pure C is much faster still.
We have two options: we can either try to optimize Go's encoding/xml package, or we can try to wrap a fast C library with Go. While the former is a worthy goal, it involves a large effort and should be a topic for a separate post. Here, I'll go for the latter.
Seaching around the web, I found a few wrappers around libxml. Two that seemed moderately popular and maintained are https://github.com/lestrrat-go/libxml2 and https://github.com/moovweb/gokogiri. Unfortunately, neither of these (or the other bindings I found) are exposing the SAX API of libxml; instead, they focus on the DOM API, where the whole document is parsed by the underlying library and a tree is returned. As mentioned above, we need the SAX interface to process huge files.
gosax
It's time to roll our own :-) I wrote the gosax module, which uses Cgo to call into libxml and exposes a SAX interface [4]. Implementing it was an interesting exercise in Cgo, because it requires some non-trivial concepts like registering Go callbacks with C.
Here's a version of our program using gosax:
package main

import (
  "fmt"
  "os"
  "strings"

  "github.com/eliben/gosax"
)

func main() {
  counter := 0
  inLocation := false

  scb := gosax.SaxCallbacks{
    StartElement: func(name string, attrs []string) {
      if name == "location" {
        inLocation = true
      } else {
        inLocation = false
      }
    },

    EndElement: func(name string) {
      inLocation = false
    },

    Characters: func(contents string) {
      if inLocation && strings.Contains(contents, "Africa") {
        counter++
      }
    },
  }

  err := gosax.ParseFile(os.Args[1], scb)
  if err != nil {
    panic(err)
  }

  fmt.Println("counter =", counter)
}
As you can see, it implements a state machine that remembers being inside a location element, where the character data is checked. This program takes 4.03 seconds to process our input file. Not bad! But we can do a bit better, and with a couple of optimizations I managed to bring it down to 3.68 seconds - about the same speed as the Python implementations!
IMHO the roughly similar run times here are a coincidence, because the Python programs are different from my approach in that they expose a higher-level API than pure SAX. Recall that iterparse returns a parsed element, and we can access its text attribute, etc. In gosax, we have to do this much more manually. Since the the cost of calls between Cgo and Go is rather high, there is an optimization opportunity here for gosax. We could do more work in C - parsing a full element, and returning it wholly to Go. This would move work from the Go side to the C side, as well as reduce the number of cross-language calls. But this is a task for another day.
Conclusion
Well, this was fun :-) There are 5 different implementations of the same simple task described here, in 3 different programming languages. Here is a summary of the speed measurements we got:
Python's performance story has always been - "it's probably fast enough, and in the rare cases where it isn't, use a C extension". In Go the narrative is somewhat different: in most cases, the Go compiler produces fairly fast code. Pure Go code is significantly faster than Python and often faster than Java. Even so, every once in a while it may be useful to dip into C or C++ for performance, and in these cases Cgo is a good approach.
It's obvious that encoding/xml needs some work w.r.t. performance, but until that happens - there are good alternatives! Leveraging the speed of libxml has been possible for the DOM API, and now is possible for the SAX API as well. In the long run, I believe that serious performance work on encoding/xml can make it go faster than the libxml wrappers because it would elimitate the high cost of C-to-Go calls.
| [1] | This size will easily fit in RAM, but it's good enough to provide a meaningful benchmarking duration. |
| [2] | When working on optimizations, it's often useful to know "the speed of light" of some computation. Say we want to optimize some function in our program. It's worth asking - how much faster will the program be if this function takes 0 time? If the overall change is tiny, the function is not worth optimizing, most likely. This is just a practical application of Amdahl's law. |
| [3] | We can test this hypothesis by timing how long it takes the non-streaming API in lxml to parse the same file. Since it parses the whole XML file in C before returning the parsed structure to Python, we expect the Python call overhead to be much smaller. Indeed, for files that fit into memory this is faster. But once again, in this post we return our attention to streaming APIs - assuming this is our only choice for gigantic files. |
| [4] | gosax is very minimal, only providing the most common SAX callbacks. The decision to create a new module was just for convenience and speed; the more correct thing would have likely been to contribute to one of the existing libxml wrappers. I don't see gosax as production-quality at this stage - I just hacked it together to be able to experiment for this post. |
Type inference
Type inference is a major feature of several programming languages, most notably languages from the ML family like Haskell. In this post I want to provide a brief overview of type inference, along with a simple Python implementation for a toy ML-like language.
Uni-directional type inference
While static typing is very useful, one of its potential downsides is verbosity. The programmer has to annotate values with types throughout the code, which results in more effort and clutter. What's really annoying, though, is that in many cases these annotations feel superfluous. Consider this classical C++ example from pre-C++11 times:
std::vector<Blob*> blobs;
std::vector<Blob*>::iterator iter = blobs.begin();
Clearly when the compiler sees blobs.begin(), it knows the type of blobs, so it also knows the type of the begin() method invoked on it because it is familiar with the declaration of begin. Why should the programmer be burdened with spelling out the type of the iterator? Indeed, one of the most welcome changes in C++11 was lifting this burden by repurposing auto for basic type inference:
std::vector<Blob*> blobs;
auto iter = blobs.begin();
Go has a similar capability with the := syntax. Given some function:
func parseThing(...) (Node, error) {
}
We can simply write:
node, err := parseThing(...)
Without having to explicitly declare that node has type Node and err has type error.
These features are certainly useful, and they involve some degree of type inference from the compiler. Some functional programming proponents say this is not real type inference, but I think the difference is just a matter of degree. There's certainly some inference going on here, with the compiler calculating and assigning the right types for expressions without the programmer's help. Since this calculation flows in one direction (from the declaration of the vector::begin method to the auto assignment), I'll call it uni-directional type inference [1].
Bi-directional type inference (Hindley-Milner)
If we define a new map function in Haskell to map a function over a list, we can do it as follows:
mymap f [] = []
mymap f (first:rest) = f first : mymap f rest
Note that we did not specify the types for either the arguments of mymap, or its return value. The Haskell compiler can infer them on its own, using the definition provided:
> :t Main.mymap
Main.mymap :: (t1 -> t) -> [t1] -> [t]
The compiler has determined that the first argument of mymap is a generic function, assigning its argument the type t1 and its return value the type t. The second argument of mymap has the type [t1], which means "list of t1"; then the return value of mymap has the type "list of t". How was this accomplished?
Let's start with the second argument. From the [] = [] variant, and also from the (first:rest) deconstruction, the compiler infers it has a list type. But there's nothing else in the code constraining the element type, so the compiler chooses a generic type specifier - t1. f first applies f to an element of this list, so f has to take t1; nothing constrains its return value type, so it gets the generic t. The result is f has type (t1 -> t), which in Haskell parlance means "a function from t1 to t".
Here is another example, written in a toy language I put together for the sake of this post. The language is called microml, and its implementation is described at the end of the post:
foo f g x = if f(x == 1) then g(x) else 20
Here foo is declared as a function with three arguments. What is its type? Let's try to run type inference manually. First, note that the body of the function consists of an if expresssion. As is common in programming languages, this one has some strict typing rules in microml; namely, the type of the condition is boolean (Bool), and the types of the then and else clauses must match.
So we know that f(x == 1) has to return a Bool. Moreover, since x is compared to an integer, x is an Int. What is the type of g? Well, it has an Int argument, and it return value must match the type of the else clause, which is an Int as well.
To summarize:
- The type of x is Int
- The type of f is Bool -> Bool
- The type of g is Int -> Int
So the overall type of foo is:
((Bool -> Bool), (Int -> Int), Int) -> Int
It takes three arguments, the types of which we have determined, and returns an Int.
Note how this type inference process is not just going in one direction, but seems to be "jumping around" the body of the function figuring out known types due to typing rules. This is why I call it bi-directional type inference, but it's much better known as Hindley-Milner type inference, since it was independently discovered by Roger Hindley in 1969 and Robin Milner in 1978.
How Hindley-Milner type inference works
We've seen a couple of examples of manually running type inference on some code above. Now let's see how to translate it to an implementable algorithm. I'm going to present the process in several separate stages, for simplicity. Some other presentations of the algorithm combine several of these stages, but seeing them separately is more educational, IMHO.
The stages are:
- Assign symbolic type names (like t1, t2, ...) to all subexpressions.
- Using the language's typing rules, write a list of type equations (or constraints) in terms of these type names.
- Solve the list of type equations using unification.
Let's use this example again:
foo f g x = if f(x == 1) then g(x) else 20
Starting with stage 1, we'll list all subexpressions in this declaration (starting with the declaration itself) and assign unique type names to them:
foo                                       t0
f                                         t1
g                                         t2
x                                         t3
if f(x == 1) then g(x) else 20            t4
f(x == 1)                                 t5
x == 1                                    t6
x                                         t3
g(x)                                      t7
20                                        Int
Note that every subexpression gets a type, and we de-duplicate them (e.g. x is encountered twice and gets the same type name assigned). Constant nodes get known types.
In stage 2, we'll use the language's typing rules to write down equations involving these type names. Usually books and papers use slightly scary formal notation for typing rules; for example, for if:
\[\frac{\Gamma \vdash e_0 : Bool, \Gamma \vdash e_1 : T, \Gamma \vdash e_2 : T}{\Gamma \vdash if\: e_0\: then\: e_1\: else\: e_2 : T}\]All this means is the intuitive typing of if we've described above: the condition is expected to be boolean, and the types of the then and else clauses are expected to match, and their type becomes the type of the whole expression.
To unravel the notation, prepend "given that" to the expression above the line and "we can derive" to the expression below the line; \Gamma \vdash e_0 : Bool means that e_0 is typed to Bool in the set of typing assumptions called \Gamma.
Similarly, a typing rule for single-argument function application would be:
\[\frac{\Gamma \vdash e_0 : T, \Gamma \vdash f : T \rightarrow U}{\Gamma \vdash f(e_0) : U}\]The real trick of type inference is running these typing rules in reverse. The rule tells us how to assign types to the whole expression given its constituent types, but we can also use it as an equation that works both ways and lets us infer constituent types from the whole expression's type.
Let's see what equations we can come up with, looking at the code:
From f(x == 1) we infer t1 = (t6 -> t5), because t1 is the type of f, t6 is the type of x == 1, and t5 is the type of f(x == 1). Note that we're using the typing rules for function application here. Moreover, we can infer that t3 is Int and t6 is Bool because of the typing rule of the == operator.
Similarly, from g(x) we infer t2 = (t3 -> t7).
From the if expression, we infer that t6 is Bool (since it's the condition of the if) and that t4 = Int, because the then and else clauses must match.
Now we have a list of equations, and our task is to find the most general solution, treating the equations as constraints. This is done by using the unification algorithm which I described in detail in the previous post. The solution we're seeking here is precisely the most general unifier.
For our expression, the algorithm will find the type of foo to be:
((Bool -> Bool), (Int -> Int), Int) -> Int)
As expected.
If we make a slight modification to the expression to remove the comparison of x with 1:
foo f g x = if f(x) then g(x) else 20
Then we can no longer constrain the type of x, since all we know about it is that it's passed into functions f and g, and nothing else constrains the arguments of these functions. The type inference process will thus calculate this type for foo:
((a -> Bool), (a -> Int), a) -> Int
It assigns x the generic type name a, and uses it for the arguments of f and g as well.
The implementation
An implementation of microml is available here, as a self-contained Python program that parses a microml declaration and infers its type. The best starting point is main.py, which spells out the stages of type inference:
code = 'foo f g x = if f(x == 1) then g(x) else 20'
print('Code', '----', code, '', sep='\n')

# Parse the microml code snippet into an AST.
p = parser.Parser()
e = p.parse_decl(code)
print('Parsed AST', '----', e, '', sep='\n')

# Stage 1: Assign symbolic typenames
typing.assign_typenames(e.expr)
print('Typename assignment', '----',
      typing.show_type_assignment(e.expr), '', sep='\n')

# Stage 2: Generate a list of type equations
equations = []
typing.generate_equations(e.expr, equations)
print('Equations', '----', sep='\n')
for eq in equations:
    print('{:15} {:20} | {}'.format(str(eq.left), str(eq.right), eq.orig_node))

# Stage 3: Solve equations using unification
unifier = typing.unify_all_equations(equations)
print('', 'Inferred type', '----',
      typing.get_expression_type(e.expr, unifier, rename_types=True),
      sep='\n')
This will print out:
Code
----
foo f g x = if f(x == 1) then g(x) else 20

Parsed AST
----
Decl(foo, Lambda([f, g, x], If(App(f, [(x == 1)]), App(g, [x]), 20)))

Typename assignment
----
Lambda([f, g, x], If(App(f, [(x == 1)]), App(g, [x]), 20))   t0
If(App(f, [(x == 1)]), App(g, [x]), 20)                      t4
App(f, [(x == 1)])                                           t5
f                                                            t1
(x == 1)                                                     t6
x                                                            t3
1                                                            Int
App(g, [x])                                                  t7
g                                                            t2
x                                                            t3
20                                                           Int

Equations
----
Int             Int                  | 1
t3              Int                  | (x == 1)
Int             Int                  | (x == 1)
t6              Bool                 | (x == 1)
t1              (t6 -> t5)           | App(f, [(x == 1)])
t2              (t3 -> t7)           | App(g, [x])
Int             Int                  | 20
t5              Bool                 | If(App(f, [(x == 1)]), App(g, [x]), 20)
t4              t7                   | If(App(f, [(x == 1)]), App(g, [x]), 20)
t4              Int                  | If(App(f, [(x == 1)]), App(g, [x]), 20)
t0              ((t1, t2, t3) -> t4) | Lambda([f, g, x], If(App(f, [(x == 1)]), App(g, [x]), 20))

Inferred type
----
(((Bool -> Bool), (Int -> Int), Int) -> Int)
There are many more examples of type-inferred microml code snippets in the test file test_typing.py. Here's another example which is interesting:
> foo f x = if x then lambda t -> f(t) else lambda j -> f(x)
((Bool -> a), Bool) -> (Bool -> a)
The actual inference is implemented in typing.py, which is fairly well commented and should be easy to understand after reading this post. The trickiest part is probably the unification algorithm, but that one is just a slight adaptation of the algorithm presented in the previous post.
| [1] | After this post was published, it was pointed out that another type checking / inference technique is already called bi-directional (see this paper for example); while it's related to Hindley-Milner (HM), it's a distinct method. Therefore, my terminology here can create a confusion. I'll emphasize that my only use of the term "bi-directional" is to distinguish what HM does from the simpler "uni-directional" inference described at the beginning. |
Unification
In logic and computer science, unification is a process of automatically solving equations between symbolic terms. Unification has several interesting applications, notably in logic programming and type inference. In this post I want to present the basic unification algorithm with a complete implementation.
Let's start with some terminology. We'll be using terms built from constants, variables and function applications:
- A lowercase letter represents a constant (could be any kind of constant, like an integer or a string)
- An uppercase letter represents a variable
- f(...) is an application of function f to some parameters, which are terms themselves
This representation is borrowed from first-order logic and is also used in the Prolog programming language. Some examples:
- V: a single variable term
- foo(V, k): function foo applied to variable V and constant k
- foo(bar(k), baz(V)): a nested function application
Pattern matching
Unification can be seen as a generalization of pattern matching, so let's start with that first.
We're given a constant term and a pattern term. The pattern term has variables. Pattern matching is the problem of finding a variable assignment that will make the two terms match. For example:
- Constant term: f(a, b, bar(t))
- Pattern term: f(a, V, X)
Trivially, the assignment V=b and X=bar(t) works here. Another name to call such an assignment is a substitution, which maps variables to their assigned values. In a less trivial case, variables can appear multiple times in a pattern:
- Constant term: f(top(a), a, g(top(a)), t)
- Pattern term: f(V, a, g(V), t)
Here the right substitution is V=top(a).
Sometimes, no valid substitutions exist. If we change the constant term in the latest example to f(top(b), a, g(top(a)), t), then there is no valid substitution becase V would have to match top(b) and top(a) simultaneously, which is not possible.
Unification
Unification is just like pattern matching, except that both terms can contain variables. So we can no longer say one is the pattern term and the other the constant term. For example:
- First term: f(a, V, bar(D))
- Second term f(D, k, bar(a))
Given two such terms, finding a variable substitution that will make them equivalent is called unification. In this case the substitution is {D=a, V=k}.
Note that there is an infinite number of possible unifiers for some solvable unification problem. For example, given:
- First term: f(X, Y)
- Second term: f(Z, g(X))
We have the substitution {X=Z, Y=g(X)} but also something like {X=K, Z=K, Y=g(K)} and {X=j(K), Z=j(K), Y=g(j(K))} and so on. The first substitution is the simplest one, and also the most general. It's called the most general unifier or mgu. Intuitively, the mgu can be turned into any other unifier by performing another substitution. For example {X=Z, Y=g(X)} can be turned into {X=j(K), Z=j(K), Y=g(j(K))} by applying the substitution {Z=j(K)} to it. Note that the reverse doesn't work, as we can't turn the second into the first by using a substitution. So we say that {X=Z, Y=g(X)} is the most general unifier for the two given terms, and it's the mgu we want to find.
An algorithm for unification
Solving unification problems may seem simple, but there are a number of subtle corner cases to be aware of. In his 1991 paper Correcting a Widespread Error in Unification Algorithms, Peter Norvig noted a common error that exists in many books presenting the algorithm, including SICP.
The correct algorithm is based on J.A. Robinson's 1965 paper "A machine-oriented logic based on the resolution principle". More efficient algorithms have been developed over time since it was first published, but our focus here will be on correctness and simplicity rather than performance.
The following implementation is based on Norvig's, and the full code (with tests) is available on GitHub. This implementation uses Python 3, while Norvig's original is in Common Lisp. There's a slight difference in representations too, as Norvig uses the Lisp-y (f X Y) syntax to denote an application of function f. The two representations are isomorphic, and I'm picking the more classical one which is used in most papers on the subject. In any case, if you're interested in the more Lisp-y version, I have some Clojure code online that ports Norvig's implementation more directly.
We'll start by defining the data structure for terms:
class Term:
    pass

class App(Term):
    def __init__(self, fname, args=()):
       self.fname = fname
       self.args = args

    # Not shown here: __str__ and __eq__, see full code for the details...


class Var(Term):
    def __init__(self, name):
        self.name = name


class Const(Term):
    def __init__(self, value):
        self.value = value
An App represents the application of function fname to a sequence of arguments.
def unify(x, y, subst):
    """Unifies term x and y with initial subst.

    Returns a subst (map of name->term) that unifies x and y, or None if
    they can't be unified. Pass subst={} if no subst are initially
    known. Note that {} means valid (but empty) subst.
    """
    if subst is None:
        return None
    elif x == y:
        return subst
    elif isinstance(x, Var):
        return unify_variable(x, y, subst)
    elif isinstance(y, Var):
        return unify_variable(y, x, subst)
    elif isinstance(x, App) and isinstance(y, App):
        if x.fname != y.fname or len(x.args) != len(y.args):
            return None
        else:
            for i in range(len(x.args)):
                subst = unify(x.args[i], y.args[i], subst)
            return subst
    else:
        return None
unify is the main function driving the algorithm. It looks for a substitution, which is a Python dict mapping variable names to terms. When either side is a variable, it calls unify_variable which is shown next. Otherwise, if both sides are function applications, it ensures they apply the same function (otherwise there's no match) and then unifies their arguments one by one, carefully carrying the updated substitution throughout the process.
def unify_variable(v, x, subst):
    """Unifies variable v with term x, using subst.

    Returns updated subst or None on failure.
    """
    assert isinstance(v, Var)
    if v.name in subst:
        return unify(subst[v.name], x, subst)
    elif isinstance(x, Var) and x.name in subst:
        return unify(v, subst[x.name], subst)
    elif occurs_check(v, x, subst):
        return None
    else:
        # v is not yet in subst and can't simplify x. Extend subst.
        return {**subst, v.name: x}
The key idea here is recursive unification. If v is bound in the substitution, we try to unify its definition with x to guarantee consistency throughout the unification process (and vice versa when x is a variable). There's another function being used here - occurs_check; I'm retaining its classical name from early presentations of unification. Its goal is to guarantee that we don't have self-referential variable bindings like X=f(X) that would lead to potentially infinite unifiers.
def occurs_check(v, term, subst):
    """Does the variable v occur anywhere inside term?

    Variables in term are looked up in subst and the check is applied
    recursively.
    """
    assert isinstance(v, Var)
    if v == term:
        return True
    elif isinstance(term, Var) and term.name in subst:
        return occurs_check(v, subst[term.name], subst)
    elif isinstance(term, App):
        return any(occurs_check(v, arg, subst) for arg in term.args)
    else:
        return False
Let's see how this code handles some of the unification examples discussed earlier in the post. Starting with the pattern matching example, where variables are just one one side:
>>> unify(parse_term('f(a, b, bar(t))'), parse_term('f(a, V, X)'), {})
{'V': b, 'X': bar(t)}
Now the examples from the Unification section:
>>> unify(parse_term('f(a, V, bar(D))'), parse_term('f(D, k, bar(a))'), {})
{'D': a, 'V': k}
>>> unify(parse_term('f(X, Y)'), parse_term('f(Z, g(X))'), {})
{'X': Z, 'Y': g(X)}
Finally, let's try one where unification will fail due to two conflicting definitions of variable X.
>>> unify(parse_term('f(X, Y, X)'), parse_term('f(r, g(X), p)'), {})
None
Lastly, it's instructive to trace through the execution of the algorithm for a non-trivial unification to see how it works. Let's unify the terms f(X,h(X),Y,g(Y)) and f(g(Z),W,Z,X):
- unify is called, sees the root is an App of function f and loops
over the arguments.
- unify(X, g(Z)) invokes unify_variable because X is a variable, and the result is augmenting subst with X=g(Z)
- unify(h(X), W) invokes unify_variable because W is a variable, so the subst grows to {X=g(Z), W=h(X)}
- unify(Y, Z) invokes unify_variable; since neither Y nor Z are in subst yet, the subst grows to {X=g(Z), W=h(X), Y=Z} (note that the binding between two variables is arbitrary; Z=Y would be equivalent)
- unify(g(Y), X) invokes unify_variable; here things get more
interesting, because X is already in the subst, so now we call
unify on g(Y) and g(Z) (what X is bound to)
- The functions match for both terms (g), so there's another loop over arguments, this time only for unifying Y and Z
- unify_variable for Y and Z leads to lookup of Y in the subst and then unify(Z, Z), which returns the unmodified subst; the result is that nothing new is added to the subst, but the unification of g(Y) and g(Z) succeeds, because it agrees with the existing bindings in subst
- The final result is {X=g(Z), W=h(X), Y=Z}
Efficiency
The algorithm presented here is not particularly efficient, and when dealing with large unification problems it's wise to consider more advanced options. It does too much copying around of subst, and also too much work is repeated because we don't try to cache terms that have already been unified.
For a good overview of the efficiency of unification algorithms, I recommend checking out two papers:
- "An Efficient Unificaiton algorithm" by Martelli and Montanari
- "Unification: A Multidisciplinary survey" by Kevin Knight
Elegant Python code for a Markov chain text generator
While preparing the post on minimal char-based RNNs, I coded a simple Markov chain text generator to serve as a comparison for the quality of the RNN model. That code turned out to be concise and quite elegant (IMHO!), so it seemed like I should write a few words about it.
It's so short I'm just going to paste it here in its entirety, but this link should have it in a Python file with some extra debugging information for tinkering, along with a sample input file.
from collections import defaultdict, Counter
import random
import sys

# This is the length of the "state" the current character is predicted from.
# For Markov chains with memory, this is the "order" of the chain. For n-grams,
# n is STATE_LEN+1 since it includes the predicted character as well.
STATE_LEN = 4

data = sys.stdin.read()
model = defaultdict(Counter)

print('Learning model...')
for i in range(len(data) - STATE_LEN):
    state = data[i:i + STATE_LEN]
    next = data[i + STATE_LEN]
    model[state][next] += 1

print('Sampling...')
state = random.choice(list(model))
out = list(state)
for i in range(400):
    out.extend(random.choices(list(model[state]), model[state].values()))
    state = state[1:] + out[-1]
print(''.join(out))
Without going into too much details, a Markov Chain is a model describing the probabilities of events based on the current state only (without having to recall all past states). It's very easy to implement and "train".
In the code shown above, the most important part to grok is the data structure model. It's a dictionary mapping a string state to the probabilities of characters following this state. The size of that string is configurable, but let's just assume it's 4 for the rest of the discussion. This is the order of the Markov chain. For every string seen in the input, we look at the character following it and increment a counter for that character; the end result is a dictionary mapping the alphabet to integers. For example, we may find that for the state "foob", 'a' appeared 75 times right after it, 'b' appeared 25 times, 'e' 44 times and so on.
The learning process is simply sliding a "window" of 4 characters over the input, recording these appearances:
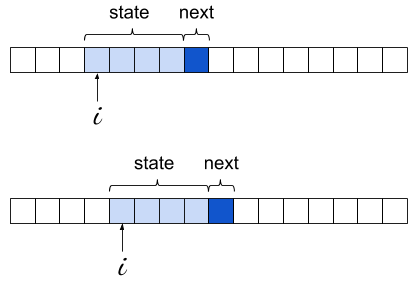
The learning loop is extremely concise; this is made possible by the right choice of Python data structures. First, we use a defaultdict for the model itself; this lets us avoid existence checks or try for states that don't appear in the model at all.
Second, the objects contained inside model are of type Counter, which is a subclass of dict with some special sauce. In its most basic usage, a counter is meant to store an integer count for its keys - exactly what we need here. So a lot of power is packed into this simple statement:
model[state][next] += 1
If you try to rewrite it with model being a dict of dicts, it will become much more complicated to keep track of the corner cases.
With the learning loop completed, we have in model every 4-letter string encountered in the text, mapped to its Counter of occurrences for the character immediately following it. We're ready to generate text, or "sample from the model".
We start by picking a random state that was seen in the training text. Then, we loop for an arbitrary bound and at every step we randomly select the following character, and update the current state. The following character is selected using weighted random selection - precisely the right idiom here, as we already have in each counter the "weights" - the more often some char was observed after a given state, the higher the chance to select it for sampling will be.
Starting with Python 3.6, the standard library has random.choices to implement weighted random selection. Before Python 3.6 we'd have to write that function on our own (Counter has the most_common() method that would make it easier to write an efficient version).
Trey Hunner
Installing a custom Python build with pyenv
I am so excited about the new Python REPL that will likely land in Python 3.13. I’ve been following this CPython pull request since I heard Pablo and Łukasz announce their work on the new Python REPL in episode 1 of their new core.py podcast.
Github notifications? 🤔
That pull request was quiet for many months, but in the last couple weeks, I started seeing email notifications in my inbox about it. I’ve never fancied myself a competent C developer and I try to steer clear from understanding TTY magic, so I have no idea what most of the commits do. But seeing activity on this pull request rejuvenated my excitement about this upcoming feature!
I also remember reading that the Python 3.13 feature freeze is coming up soon, so I’ve been silently cheering for that PR to make the cut before the deadline.
In the last few days, I decided that I should try committing to use this new REPL locally as my default Python environment.
When I type python on my machine, I want to live in this new shiny REPL.
I figure this will make it easier to spot bugs that might not have been noticed yet… though honestly it’ll mostly just allow me to try out this fancy new REPL first-hand.
Installing a custom CPython build in pyenv
I use pyenv to manage the many Python versions I have installed on my machine. I wondered whether it was possible to install a custom build of CPython with pyenv.
Instead of going to the pyenv documentation to figure out an answer, I argued with an AI until it gave me a working answer. I tried a few AI systems at first, but Claude seemed to give me the most promising-looking answer so it was the one I argued with for 5-10 minutes until I got a working solution.
First, I created this ~/.pyenv/plugins/python-build/share/python-build/3.13.0-pyrepl file:
1 2 3 | |
Then I ran this command, which took a couple minutes:
1
| |
After that, pyenv versions showed a new 3.13.0-pyrepl version:
1 2 3 4 5 6 7 8 | |
I then added 3.13.0-pyrepl to the top of my ~/.pyenv/version file to make this my default Python:
1 2 3 4 5 6 | |
And it worked!
Tying python showed the new colorful prompt.
Is is a bad idea to make this not-even-beta version of CPython the default Python on my machine? I have no idea. Everything’s been fine for the last 10 hours at least… 🤷
If you ever need to try installing a custom CPython build with pyenv, maybe the above instructions will work. They’re mostly generated by a large language model that didn’t give me a working answer until the third response… so feel free to let me know if it’s all wrong (or all right?).
After this adventure, I checked my podcast feed this evening only to realize that there’s a new core.py episode all about exactly this feature! If you’d like to hear some core developers nerd out about CPython development, give core.py a listen. You don’t need to understand how CPython development works to enjoy their enthusiasm. 💖
scikit-learn
Note on Inline Authorship Information in scikit-learn
 Author:
 Adrin Jalali
Historically, scikit-learn’s files have included authorship information similar to the following format:
# Authors: Author1, Author2, ...
# License: BSD 3 clause
However, after a series of discussions which you can see in detail in this issue, we could list the following caveats to the status quo:
- Authorship information was not up-to-date and in most cases, but not always, reflect the original authors of the file;
- It was unfair to all other contributors who have been contributing to the code-base;
- One can check the real authors and the history of the authors of any part of
the code-base using
git blameand othergittools.
Therefore we came to the conclusion to standardize all authorship information to mention “The scikit-learn developers”, and have the license notice as:
# Authors: The scikit-learn developers
# License: BSD-3-Clause
The change is to happen gradually in the coming months after April 2024.
May 03, 2024
Python Engineering at Microsoft
Python in Visual Studio Code – May 2024 Release
We’re excited to announce the May 2024 release of the Python and Jupyter extensions for Visual Studio Code!
This release includes the following announcements:
- “Implement all inherited abstract classes” code action
- New auto indentation setting
- Debugpy removed from the Python extension in favor of the Python Debugger extension
- Socket disablement now possible during testing
- Pylance performance updates
If you’re interested, you can check the full list of improvements in our changelogs for the Python, Jupyter and Pylance extensions.
“Implement all inherited abstract classes” Code Action
Abstract classes serve as “blueprints” for other classes and help build modular, reusable code by promoting clear structure and requirements for subclasses to adhere to. To define an abstract class in Python, you can create a class that inherits from the ABC class in the abc module, and annotate its methods with the @abstractmethod decorator. Then, you can create new classes that inherit from this abstract class, and define an implementation for the base methods. Implementing these classes is easier with the latest Pylance pre-release! When defining a new class that inherits from an abstract one, you can now use the “Implement all inherited abstract classes” Code Action to automatically implement all abstract methods and properties from the parent class:
New auto indentation setting
Previously, Pylance’s auto indentation behavior was controlled through the editor.formatOnType setting, which used to be problematic if one would want to disable auto indentation, but enable format on type through other supported tools. To solve this problem, Pylance’s latest pre-release now has its own setting to control auto indentation behavior, python.analysis.autoIndent, which is enabled by default.

Debugpy removed from the Python extension in favor of the Python Debugger extension
In our February 2024 release blog, we announced moving all debugging functionality to the Python Debugger extension, which is installed by default alongside the Python extension. In this release, we have removed duplicate debugging code from the Python extension, which helps to decrease the extension download size. As part of this change, "type": "python" and "type": "debugpy" specified in your launch.json configuration file are both interpreted as references to the Python Debugger extension path. This ensures a seamless transition without requiring any modifications to existing configuration files to run and debug effectively. Moving forward, we recommend using "type": "debugpy" as this directly corresponds to the Python Debugger extension which provides support for both legacy and modern Python versions.
Socket disablement now possible during testing
You can now run tests with socket disablement from the testing UI. This is made possible by a switch in the communication between the Python extension and the test run subprocess to now use named-pipes as opposed to numbered ports. This feature is available on the Python Testing Rewrite, which is rolled out to all users by default and will soon be fully adopted in the Python extension.
Pylance Performance
The Pylance team has been receiving feedback that Pylance’s performance has degraded over the past few releases. As a result, we have made several smaller improvements to memory consumption and indexing including:
- Improved performance for third-party packages indexing
- Skipped Python files from workspace
.condaenvironments from being scanned (@pylance-release#5191) - Skipped index on unnecessary
py.typedfile checks (@pyright#7652) - Reduced memory consumption by refactoring tokenizer and parser output (@pyright#7602)
- Improved memory consumption for token creation (@pyright#7434)
For those who may still be experiencing performance issues with Pylance, we are kindly requesting for issues to be filed through the Pylance: Report Issue command from the Command Palette, ideally with logs, code samples and/or the packages that are installed in the working environment.
Additionally, we have added a couple of features in the latest Pylance pre-release version to help identify potential performance issues and gather additional information about issues you are facing. There is a new notification that prompts you to file an issue in the Pylance repo when the extension detects there may be a performance issue. Moreover, Pylance now provides a profiling command Pylance: Start Profiling that generates cpuprofile for all worker threads. This file is generated after starting and stopping profiling by triggering the Pylance: Start Profiling and Pylance: Stop Profiling commands and can be provided as additional data in an issue.
With these smaller improvements and additional ways to report performance issues, we hope to continue to make improvements to performance. We greatly appreciate the feedback and collaboration as we work to address issues!
Other Changes and Enhancements
We have also added small enhancements and fixed issues requested by users that should improve your experience working with Python and Jupyter Notebooks in Visual Studio Code. Some notable changes include:
- Test Explorer displays projects using
testscenarioswith unittest and parameterized tests inside nested classes correctly (@vscode-python#22870). - Test Explorer now handles tests in workspaces with symlinks, specifically workspace roots which are children of symlink-ed paths, which is particularly helpful in WSL scenarios (@vscode-python#22658).
We would also like to extend special thanks to this month’s contributors:
- @DetachHead Support experiment configuration in workspace settings in @vscode-python#23267
- @DavidArchibald Fix debugger attach to process when running on WSL in @vscode-python-debugger#267
Call for Community Feedback
As we are planning and prioritizing future work, we value your feedback! Below are a few issues we would love feedback on:
- Design proposal for test coverage in (@vscode-python#22827)
Try out these new improvements by downloading the Python extension and the Jupyter extension from the Marketplace, or install them directly from the extensions view in Visual Studio Code (Ctrl + Shift + X or ⌘ + ⇧ + X). You can learn more about Python support in Visual Studio Code in the documentation. If you run into any problems or have suggestions, please file an issue on the Python VS Code GitHub page.
The post Python in Visual Studio Code – May 2024 Release appeared first on Python.
Real Python
The Real Python Podcast – Episode #203: Embarking on a Relaxed and Friendly Python Coding Journey
Do you get stressed while trying to learn Python? Do you prefer to build small programs or projects as you continue your coding journey? This week on the show, Real Python author Stephen Gruppetta is here to talk about his new book, "The Python Coding Book."
[ Improve Your Python With 🐍 Python Tricks 💌 – Get a short & sweet Python Trick delivered to your inbox every couple of days. >> Click here to learn more and see examples ]
Python Software Foundation
The PSF's 2023 Annual Impact Report is here!

2023 was an exciting year of growth for the Python Software Foundation! We’ve captured some of the key numbers, details, and information in our latest Annual Impact Report. Some highlights of what you’ll find in the report include:
- A letter from our Executive Director, Deb Nicholson
- Notes from Our PyCon US Chair, Marietta Wijaya, and PSF Board of Director Chair, Dawn Wages
- Updates on the achievements and activities of a couple of our Developers-in-Residence, Łukasz Langa and Seth Larson—and announcing more members of the DiR team!
- An overview of what our PyPI Safety & Security Engineer, Mike Fiedler, has accomplished- as well as some eye-watering PyPI stats!
- A celebration and summary of PyCon US 2023, the event’s 20th anniversary, and the theme for 2023’s report cover
- A highlight of our Fiscal Sponsorees (we brought on 7 new organizations this year!)
- Sponsors who generously supported our work and the Python ecosystem
- An overview of PSF Financials, including a consolidated financial statement and grants data
We hope you check out the report, share it with your Python friends, and let us know what you think! You can comment here, find us on social media (Mastodon, X, LinkedIn), or share your thoughts on our forum.
Programiz
Getting Started with Python
In this tutorial, you will learn to write your first Python program.
May 02, 2024
TestDriven.io
Building Reusable Components in Django
This tutorial looks at how to build server-side UI components in Django.
Django Weblog
June 2024 marks 10 incredible years of Django Girls magic! 🥳✨
June 2024 marks 10 incredible years of Django Girls magic! 🥳✨
We couldn't have reached this milestone without YOU! Whether you attended a workshop, volunteered, financially supported us, or cheered us on, you've been vital. From the bottom of our hearts, thank you for being part of the Django Girls community. 💕
To celebrate, we're reflecting on our impact and want to hear from YOU! Share your stories in a short survey courtesy of JetBrains and PyCharm. Your feedback will help us improve and reach more people.
The Theme for our 10th anniversary is “The Django Girls Glow Up!” ✨💃
We want to celebrate your positive transformations over the years!
In the survey, please share a photo 📸 or video and tell us how Django Girls has impacted your life. As a thank you, you could win a $100 Amazon gift card or a 1-year JetBrains All Products Pack subscription. Plus, everyone gets a three-month PyCharm Professional trial!
Ready to join the celebration? Click the link to complete the survey and let your Django Girl glow shine! ✨
Take the Survey Now: https://surveys.jetbrains.com/s3/dn-django-girls-survey-2024
When you’ve finished the survey, head over to our socials, and let’s continue celebrating there. Use the #DjangoGirlsGlowUp hashtag to share your photos and stories, and let's spread the love! 🚀💖
Find us on our socials:
- https://twitter.com/djangogirls
- https://fosstodon.org/@djangogirls
- https://www.linkedin.com/company/django-girls
Thank you for being part of our journey. Here's to another 10 years of glowing up together! 🌟💫
Python Morsels
Variables are pointers in Python
Python's variables are not buckets that contain objects; they're pointers. Assignment statements don't copy: they point a variable to a value (and multiple variables can "point" to the same value).

Table of contents
Changing two lists at once...?
Here we have a variable a that points to a list:
>>> a = [2, 1, 3, 4]
Let's make a new variable b and assign it to a:
>>> a = [2, 1, 3, 4]
>>> b = a
If we append a new item to b, what will its length be?
>>> b.append(7)
>>> len(b)
Initially, the b list had four items, so now it should have five items.
And it does:
>>> len(b)
5
How many items do you think a has?
What's your guess?
>>> len(a)
Is it five, the same as b?
Or is it still four, as it was before?
The a list also has five items:
>>> len(a)
5
What's going on here?
Well, the variables a and b, both point to the same list.
If we look up the unique ID for the object that each of these variables points to, we'll see that they both point to the same object:
>>> id(a)
140534104117312
>>> id(b)
140534104117312
This is possible because variables in Python are not buckets, but pointers.
Variables are separate from objects
Let's say we've made three …
Read the full article: https://www.pythonmorsels.com/variables-are-pointers/
Mike Driscoll
The Python Show Podcast Ep 39 – Buttondown – A Python SaaS with Justin Duke
In this episode, we invite the founder of Buttondown, a Python-based Software as a Service (SaaS) application for creating and managing newsletters.
Mike Driscoll, the host of the show, chats with Justin about the following topics:
- Why he created a SaaS with Python
- Favorite Python packages or modules
- Python web frameworks
- Entrepreneurship
- AI and programming
- and more!

The post The Python Show Podcast Ep 39 – Buttondown – A Python SaaS with Justin Duke appeared first on Mouse Vs Python.
Real Python
Quiz: The Python calendar Module
In this quiz, you’ll test your understanding of creating calendars in Python using the calendar module.
By working through this quiz, you’ll revisit the fundamental functions and methods provided by the calendar module.
[ Improve Your Python With 🐍 Python Tricks 💌 – Get a short & sweet Python Trick delivered to your inbox every couple of days. >> Click here to learn more and see examples ]
Talk Python to Me
#460: Dropbase: Build Internal Tools with Python
Do you find yourself or your team building internal apps frequently for your company? Are you familiar with the term "forms over data"? They are super empowering for your org but they can be pretty repetitive and you might find yourself spending more time than you'd like working on them rather than core products and services. I invited Jimmy Chan from Dropbase to tell us about their service who's tagline is "Build internal web apps with just Python." It's a cool service and a fun conversation.<br/> <br/> <strong>Episode sponsors</strong><br/> <br/> <a href='https://talkpython.fm/mailtrap'>Mailtrap</a><br> <a href='https://talkpython.fm/training'>Talk Python Courses</a><br/> <br/> <strong>Links from the show</strong><br/> <br/> <div><b>Build internal web apps with just Python.</b>: <a href="https://www.dropbase.io" target="_blank" rel="noopener">dropbase.io</a><br/> <b>Dropbase on Github</b>: <a href="https://github.com/DropbaseHQ/dropbase" target="_blank" rel="noopener">github.com</a><br/> <b>Dropbase @ LinkedIn</b>: <a href="https://www.linkedin.com/company/dropbase" target="_blank" rel="noopener">linkedin.com</a><br/> <b>Dropbase on Twitter</b>: <a href="https://twitter.com/dropbasehq" target="_blank" rel="noopener">twitter.com</a><br/> <b>Jimmy Chan</b>: <a href="https://www.linkedin.com/in/jimmyechan/" target="_blank" rel="noopener">linkedin.com</a><br/> <b>Jimmy on Twitter</b>: <a href="https://twitter.com/jimmyechan" target="_blank" rel="noopener">twitter.com</a><br/> <b>Dropbase Docs</b>: <a href="https://docs.dropbase.io" target="_blank" rel="noopener">docs.dropbase.io</a><br/> <b>Dropbase</b>: <a href="https://dropbase.io" target="_blank" rel="noopener">dropbase.io</a><br/> <b>Watch this episode on YouTube</b>: <a href="https://www.youtube.com/watch?v=0VULU3g8wqU" target="_blank" rel="noopener">youtube.com</a><br/> <b>Episode transcripts</b>: <a href="https://talkpython.fm/episodes/transcript/460/dropbase-build-internal-tools-with-python" target="_blank" rel="noopener">talkpython.fm</a><br/> <br/> <b>--- Stay in touch with us ---</b><br/> <b>Subscribe to us on YouTube</b>: <a href="https://talkpython.fm/youtube" target="_blank" rel="noopener">youtube.com</a><br/> <b>Follow Talk Python on Mastodon</b>: <a href="https://fosstodon.org/web/@talkpython" target="_blank" rel="noopener"><i class="fa-brands fa-mastodon"></i>talkpython</a><br/> <b>Follow Michael on Mastodon</b>: <a href="https://fosstodon.org/web/@mkennedy" target="_blank" rel="noopener"><i class="fa-brands fa-mastodon"></i>mkennedy</a><br/></div>
The Python Show
39 - Buttondown - A Python SaaS with Justin Duke
In this episode, we invite the founder of Buttondown, a Python-based Software as a Service (SaaS) application for creating and managing newsletters.
Mike Driscoll, the host of the show, chats with Justin about the following topics:
Why he created a SaaS with Python
Favorite Python packages or modules
Python web frameworks
Entrepreneurship
AI and programming
and more!
Wingware
Wing Python IDE Version 10.0.4 - May 3, 2024
Wing 10.0.4 improves performance of the Python 3.12+ debugger, fixes debugging the Python Shell with Python 3.12, and makes several other improvements.
See the change log for details.
Download Wing 10 Now: Wing Pro | Wing Personal | Wing 101 | Compare Products
 What's New in Wing 10
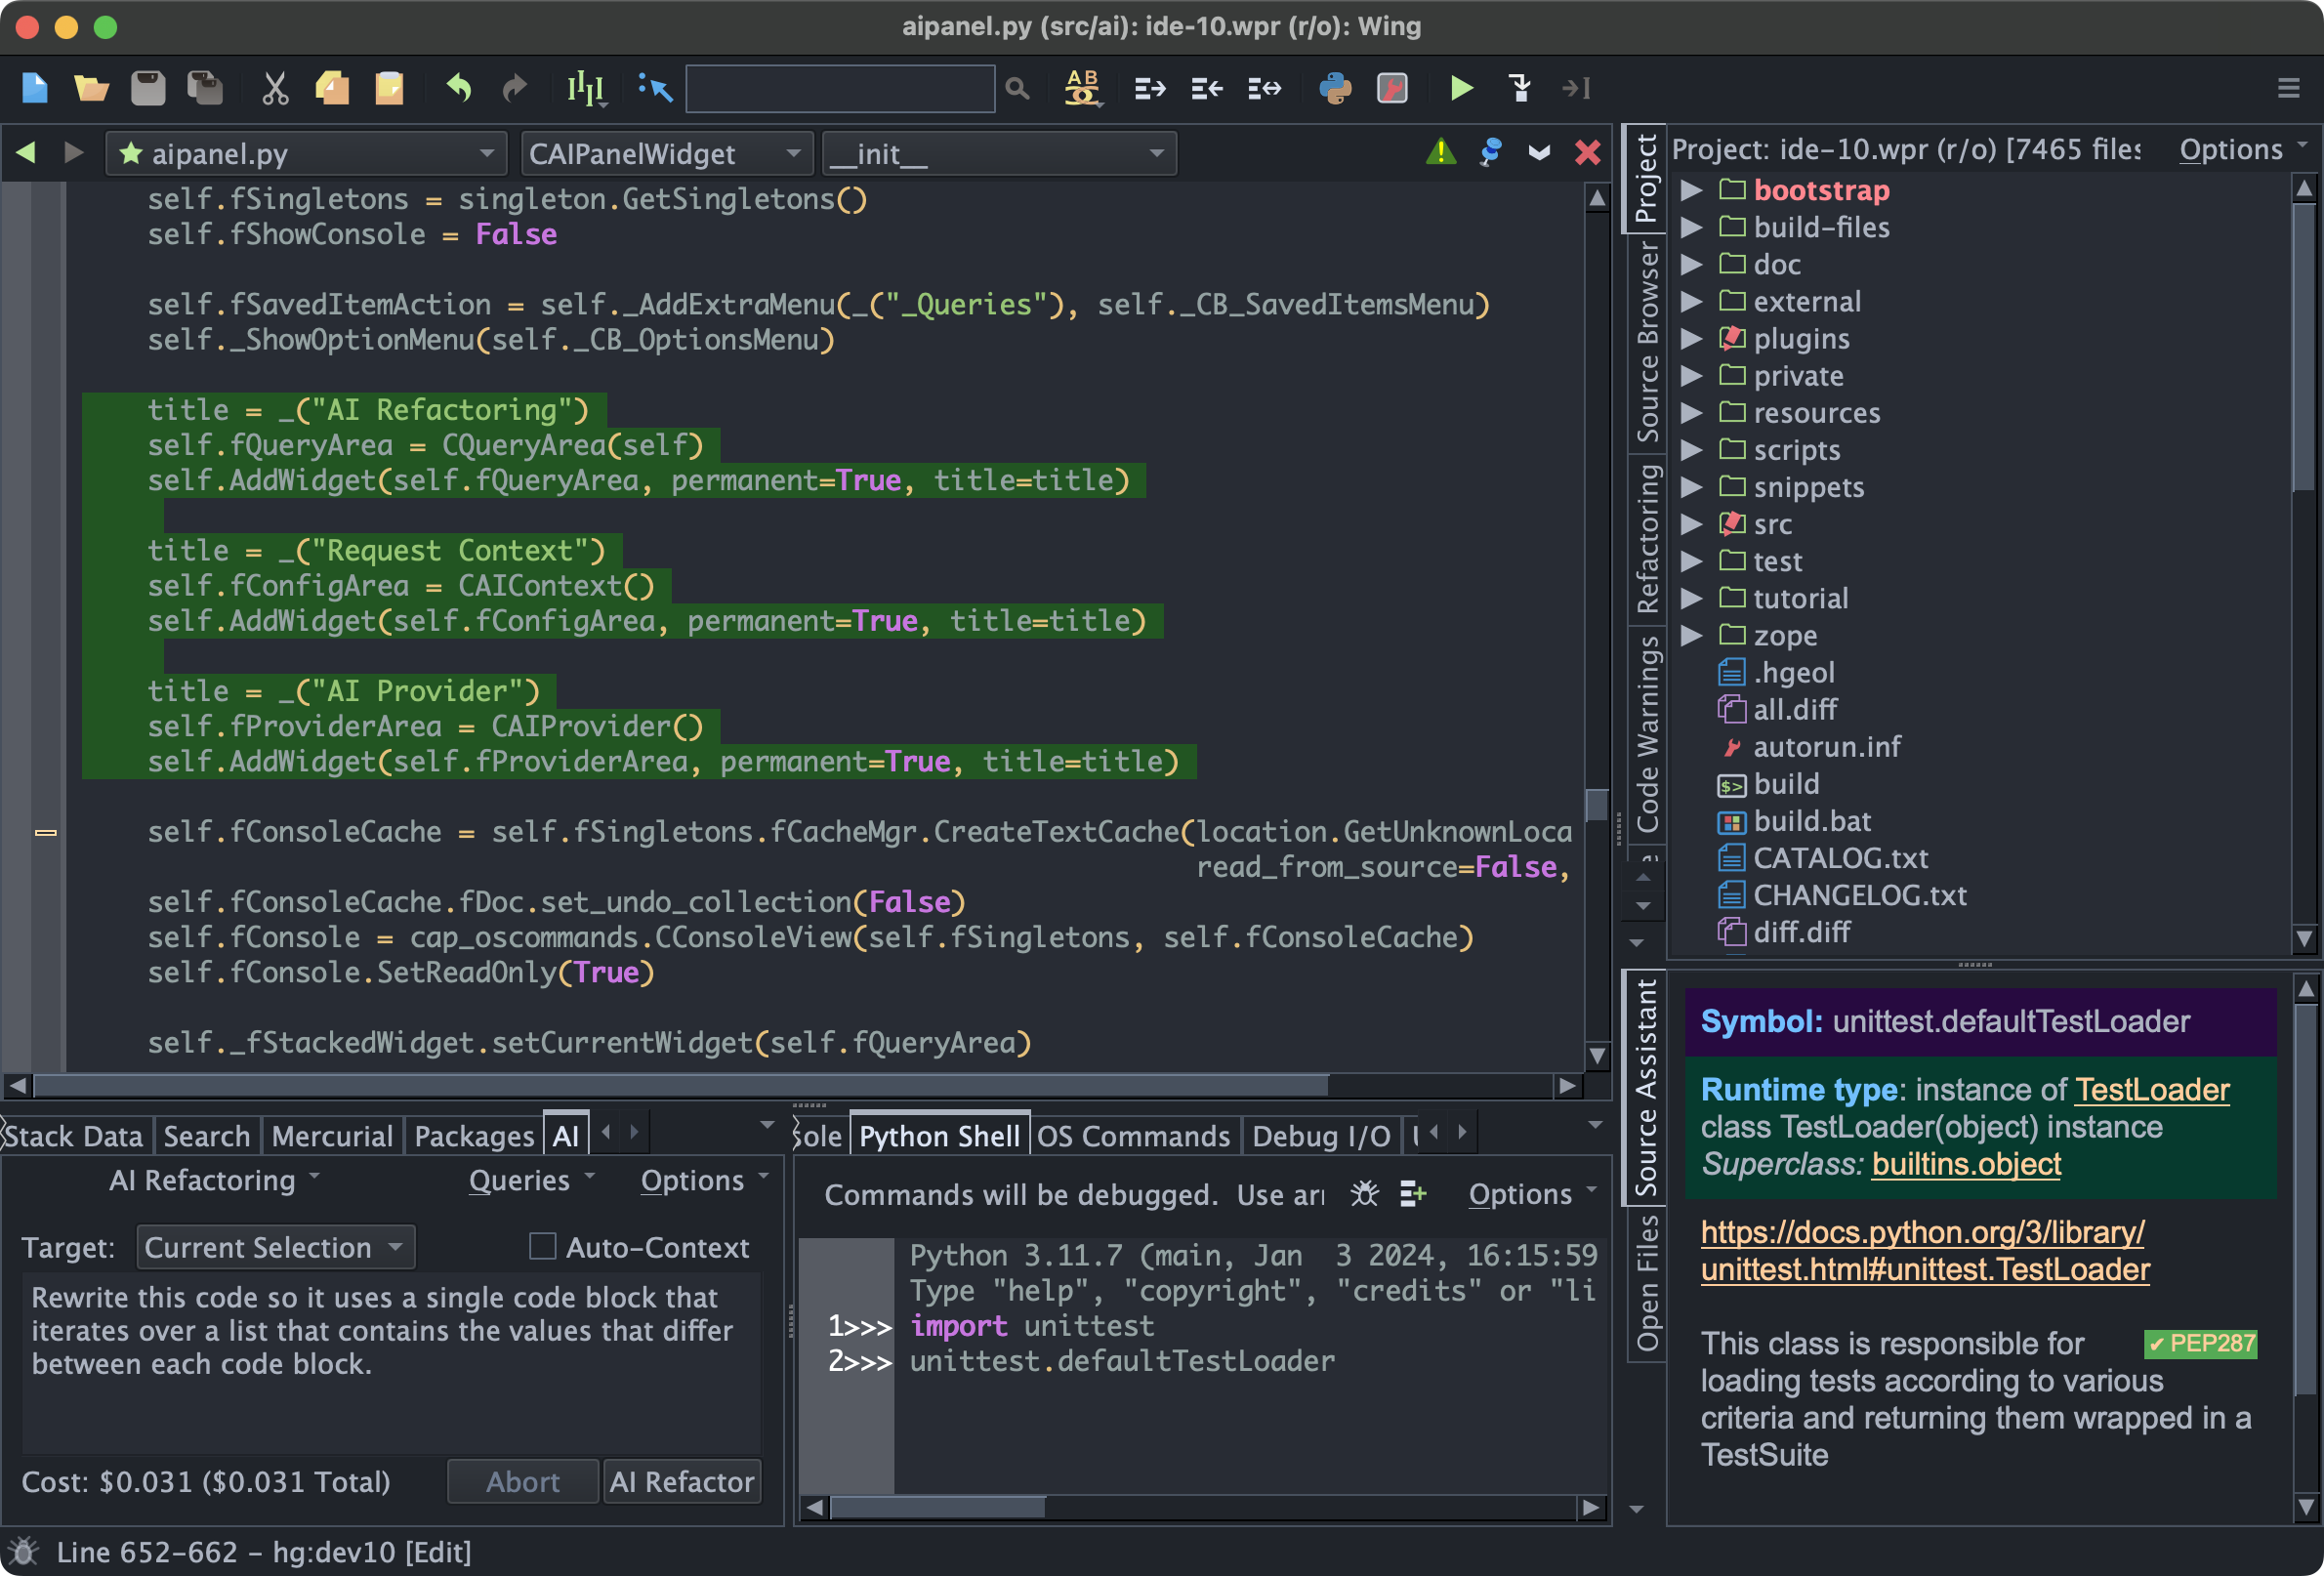
AI Assisted Development
Wing Pro 10 takes advantage of recent advances in the capabilities of generative AI to provide powerful AI assisted development, including AI code suggestion, AI driven code refactoring, description-driven development, and AI chat. You can ask Wing to use AI to (1) implement missing code at the current input position, (2) refactor, enhance, or extend existing code by describing the changes that you want to make, (3) write new code from a description of its functionality and design, or (4) chat in order to work through understanding and making changes to code.
Examples of requests you can make include:
"Add a docstring to this method"
"Create unit tests for class SearchEngine"
"Add a phone number field to the Person class"
"Clean up this code"
"Convert this into a Python generator"
"Create an RPC server that exposes all the public methods in class BuildingManager"
"Change this method to wait asynchronously for data and return the result with a callback"
"Rewrite this threaded code to instead run asynchronously"
Yes, really!
Your role changes to one of directing an intelligent assistant capable of completing a wide range of programming tasks in relatively short periods of time. Instead of typing out code by hand every step of the way, you are essentially directing someone else to work through the details of manageable steps in the software development process.
Support for Python 3.12
Wing 10 adds support for Python 3.12, including (1) faster debugging with PEP 669 low impact monitoring API, (2) PEP 695 parameterized classes, functions and methods, (3) PEP 695 type statements, and (4) PEP 701 style f-strings.
Poetry Package Management
Wing Pro 10 adds support for Poetry package management in the New Project dialog and the Packages tool in the Tools menu. Poetry is an easy-to-use cross-platform dependency and package manager for Python, similar to pipenv.
Ruff Code Warnings & Reformatting
Wing Pro 10 adds support for Ruff as an external code checker in the Code Warnings tool, accessed from the Tools menu. Ruff can also be used as a code reformatter in the Source > Reformatting menu group. Ruff is an incredibly fast Python code checker that can replace or supplement flake8, pylint, pep8, and mypy.
Try Wing 10 Now!
Wing 10 is a ground-breaking new release in Wingware's Python IDE product line. Find out how Wing 10 can turbocharge your Python development by trying it today.
Downloads: Wing Pro | Wing Personal | Wing 101 | Compare Products
See Upgrading for details on upgrading from Wing 9 and earlier, and Migrating from Older Versions for a list of compatibility notes.
Seth Michael Larson
Isolating risk in the CPython release process
Isolating risk in the CPython release process
This critical role would not be possible without funding from the Alpha-Omega project. Massive thank-you to Alpha-Omega for investing in the security of the Python ecosystem!
The first stage of the CPython release process produces source and docs artifacts. In terms of "supply chain integrity", the source artifacts are the most important artifact produced by this process. These tarballs are what propagates down into containers, pyenv, and operating system distributions, so reducing the risk that these artifacts are modified in-flight is critical.
A few weeks ago I published that CPythons' release process for source and docs artifacts was moved from developers machines onto GitHub Actions, which provides an isolated build environment.
This already reduces risk of artifacts being accidentally or maliciously modified during the release process. The layout of the build and release process before used a build script which built the software from source, built the docs, and then ran tests all in the same isolated job. This was totally fine on a developers' machine where there isn't any isolation possible between different stages.
Code
Code
Before and after splitting up build stages
With GitHub Actions we can isolate each stage from the others and remove the need to install all dependencies for all jobs into the same stage. This drastically reduces the number of dependencies, each representing a small amount of risk, for the stages that are critical for supply chain security of CPython (specifically the building of source artifacts).
Above you can see on the left the previous process which pulls all dependencies into the same job (represented as a gray box) and the right being the new process having split up the builds and testing and the source and docs builds.
After doing this split the "Build Source" task only needs ~170 dependencies instead of over 800 dependencies (mostly for documentation LaTeX and PDFs) and all of those dependencies either come with the operating system and thus can't be reduced further or are pinned in a lock file.
The testing stage still has access to the source artifacts, but only after they've been uploaded to GitHub Action Artifacts and aren't able to modify them.
I plan to write a separate in-depth article about dependencies, pinning, and related topics, stay tuned for that.
SOSS Community Day 2024 recordings
The recordings for my talk and the OpenSSF tabletop session have been published to YouTube:
Embrace the Differences: Securing open source software ecosystems where they are
In the talk I discuss the technical and also social aspects of why it's sometimes difficult to adopt security changes into an open source ecosystem. Ecosystem-agnostic work (think memory safety, provenance, reproducible builds, vulnerabilities) tends to operate at a much higher level than the individual ecosystems where the work ends up being applied.
OpenSSF Tabletop Session
The tabletop session had many contributors representing all the different aspects of discovering, debugging, disclosing, fixing, and patching a zero-day vulnerability in an open source component that's affecting production systems.
Tabletop Session moderated by Dana Wang
Mentoring for Google Summer of Code
Google Summer of Code 2024 recently published its program and among the projects and contributors accepted was CPython's project for adopting the Hardened Compiler Options Guide for C/C++. I'm mentoring the contributor through the process of contributing to CPython and hopefully being successful in adopting hardened compiler options.
Other items
- Windows artifacts on python.org will have Software Bill-of-Materials documents after the next CPython release. Final step of uploading the documents to python.org has been merged.
- SBOM generation has been added to the Windows build scripts for core developers using Windows.
- Working on PyCon US 2024 talk slides with Michael Winser.
- Co-authoring the "Trusted Publishing for All Package Repositories" guide for the OpenSSF Securing Software Repos WG.
- Submitted a few bugfixes and released Truststore v0.9.0, upgraded pip's vendored copy.
- Created the April report for Alpha-Omega
That's all for this week! 👋 If you're interested in more you can read last week's report.
Thanks for reading! ♡ Did you find this article helpful and want more content like it? Get notified of new posts by subscribing to the RSS feed or the email newsletter.
This work is licensed under CC BY-SA 4.0 ![]()
![]()
![]()
May 01, 2024
Tryton News
Tryton Release 7.2

We are proud to announce the 7.2 release of Tryton.
This release provides many bug fixes, performance improvements and some fine tuning. It also adds 5 new modules.
You can give it a try on the demo server, use the docker image or download it here.
As usual upgrading from previous series is fully supported but some manual steps are needed to update from 7.0 to 7.2.
Here is a list of the most noticeable changes:
Changes for the User
Clients
You can now request to reset your password from the login dialog. Doing this sends a temporary password to your email address.
The PYSON widgets display the value using operators which are more user-friendly.
Web Client
The binary and image widgets now support drag and drop to set their value.
Desktop Client
On list and tree views, there is now a contextual menu that allows you to copy the contents of a cell or a column.
Accounting
It is now possible to modify the dates of a period even if it contains posted moves as long as the existing moves stay inside the new period dates. This useful to correct mistakes or even extend a period.
A warning is now raised when you validate an invoice for which some lines do not have the expected default taxes. This helps to detect mistakes.
When an invoice in another currency is paid, the currency exchange amount is now booked automatically into a configured account.
You can now enter the amount of the transaction in a second currency on statements. This makes it easier to do the reconciliation between the statement and invoices based on a second currency.
Company
Employees are now automatically deactivated once their end date has passed.
It is now possible to use some placeholders in the header and footer of company reports like the company name, phone, website etc.
Marketing
Some reports are now available on marketing scenario and activities. They calculate and display the open, click and click-through rates.
UTM parameters can be added to marketing emails so you can follow their results.
Product
You can now store the Manufacturer Part Number and brand as a product identifier.
Tryton now supports to adding images to product categories.
You can now use non-square images on products. The module resizes the images to fit the requested size but keeps the aspect ratio.
Production
The production number is now only set when the order progresses to waiting. This prevents the supply module from consuming number for production request that are subsequently deleted.
Purchase
It is now possible to remove ignored invoices and stock moves from purchases. This is useful when you have ignored the invoice or shipping exception by mistake and need to correct it.
Sale
It is now possible to remove the ignored invoices and stock moves from sales. This is useful when you have ignored the invoice or shipping exception by mistake and need to correct it.
The product on sale opportunity lines can be omitted, a description and a note can be used instead.
Stock
The drop shipment (like the other shipments) can now be split. This is useful to match exactly how the supplier shipped the products.
The shipment numbers are now only set when it progresses to a waiting state. This prevents consuming sequences numbers for requests that are going to be deleted.
The lot trace now optionally displays the source and destination locations. This can be useful when investigating the traceability of a lot.
Web Shop
It is now possible to limit a web shop by country.
The web shop supports price lists to calculate the sale price and the non sale price.
New Modules
Stock Product Location Place
The Stock Product Location Place Module allows defining the place where each product is stored within each location.
Account SYSCOHADA
The Account SYSCOHADA Module provides templates for the chart of account for OHADA countries.
Account Export
The Account Export Module provides the basis to allow accounting moves to be exported to external accounting software.
Account Export WinBooks
The Account Export WinBooks Module adds support to export accounting data to WinBooks.
Web Shop Product Data Feed
The Web Shop Product Data Feed Module exposes web shop products as a data feed for Google Merchant and Meta for business.
Changes for the System Administrator
Server
It is now possible to update the database without updating the indexes or to create the indexes concurrently. These are useful options when updating busy system.
It is possible to define a timeout for some RPC calls. This helps preventing users from overloading the system with expensive requests.
Changes for the Developer
Server
We added send_message methods to simplify sending emails using python’s Message.
A new kind of field fmany2one is now available, which is a type of many2one field but stores a different field to the id. It is used mainly in the infrastructure to create foreign keys based on a model or field name.
The read-only relational fields are no longer copied by default. This was source of various bugs as developers often forgot to disable these from the copy.
Clients
The clients read the xxx2many fields using dotted notation. This avoids making multiple requests when displaying a form with these fields.
The XML ID of a record is now displayed in the log window.
Script
It is possible to configure the scripting client to skip any warning.
Product
It is now possible to generate barcodes for a product using a different type than the one on the identifier.
Stock
The done buttons have been renamed to do.
Location name fields have been added to stock moves. This is useful to customize the information displayed in reports about the source and destination locations.
4 posts - 3 participants
Anarcat
Tor migrates from Gitolite/GitWeb to GitLab
Note: I've been awfully silent here for the past ... (checks notes) oh dear, 3 months! But that's not because I've been idle, quite the contrary, I've been very busy but just didn't have time to write about anything. So I've taken it upon myself to write something about my work this week, and published this post on the Tor blog which I copy here for a broader audience. Let me know if you like this or not.
Tor has finally completed a long migration from legacy Git infrastructure (Gitolite and GitWeb) to our self-hosted GitLab server.
Git repository addresses have therefore changed. Many of you probably have made the switch already, but if not, you will need to change:
https://git.torproject.org/
to:
https://gitlab.torproject.org/
In your Git configuration.
The GitWeb front page is now an archived listing of all the
repositories before the migration. Inactive git repositories were
archived in GitLab legacy/gitolite namespace and the
gitweb.torproject.org and git.torproject.org web sites now
redirect to GitLab.
Best effort was made to reproduce the original gitolite repositories faithfully and also avoid duplicating too much data in the migration. But it's possible that some data present in Gitolite has not migrated to GitLab.
User repositories are particularly at risk, because they were massively migrated, and they were "re-forked" from their upstreams, to avoid wasting disk space. If a user had a project with a matching name it was assumed to have the right data, which might be inaccurate.
The two virtual machines responsible for the legacy service (cupani
for git-rw.torproject.org and vineale for git.torproject.org and
gitweb.torproject.org) have been shutdown. Their disks will remain
for 3 months (until the end of July 2024) and their backups for
another year after that (until the end of July 2025), after which
point all the data from those hosts will be destroyed, with only the
GitLab archives remaining.
The rest of this article expands on how this was done and what kind of problems we faced during the migration.
Where is the code?
Normally, nothing should be lost. All repositories in gitolite have been either explicitly migrated by their owners, forcibly migrated by the sysadmin team (TPA), or explicitly destroyed at their owner's request.
An exhaustive rewrite map translates gitolite projects to GitLab projects. Some of those projects actually redirect to their parent in cases of empty repositories that were obvious forks. Destroyed repositories redirect to the GitLab front page.
Because the migration happened progressively, it's technically possible that commits pushed to gitolite were lost after the migration. We took great care to avoid that scenario. First, we adopted a proposal (TPA-RFC-36) in June 2023 to announce the transition. Then, in March 2024, we locked down all repositories from any further changes. Around that time, only a handful of repositories had changes made after the adoption date, and we examined each repository carefully to make sure nothing was lost.
Still, we built a diff of all the changes in the git references that archivists can peruse to check for data loss. It's large (6MiB+) because a lot of repositories were migrated before the mass migration and then kept evolving in GitLab. Many other repositories were rebuilt in GitLab from parent to rebuild a fork relationship which added extra references to those clones.
A note to amateur archivists out there, it's probably too late for one last crawl now. The Git repositories now all redirect to GitLab and are effectively unavailable in their original form.
That said, the GitWeb site was crawled into the Internet Archive in February 2024, so at least some copy of it is available in the Wayback Machine. At that point, however, many developers had already migrated their projects to GitLab, so the copies there were already possibly out of date compared with the repositories in GitLab.
Software Heritage also has a copy of all repositories hosted on
Gitolite since June 2023 and have continuously kept mirroring the
repositories, where they will be kept hopefully in eternity. There's
an issue where the main website can't find the repositories when
you search for gitweb.torproject.org, instead search for
git.torproject.org.
In any case, if you believe data is missing, please do let us know by opening an issue with TPA.
Why?
This is an old project in the making. The first discussion about migrating from gitolite to GitLab started in 2020 (almost 4 years ago). But going further back, the first GitLab experiment was in 2016, almost a decade ago.
The current GitLab server dates from 2019, replacing Trac for issue tracking in 2020. It was originally supposed to host only mirrors for merge requests and issue trackers but, naturally, one thing led to another and eventually, GitLab had grown a container registry, continuous integration (CI) runners, GitLab Pages, and, of course, hosted most Git repositories.
There were hesitations at moving to GitLab for code hosting. We had discussions about the increased attack surface and ways to mitigate that, but, ultimately, it seems the issues were not that serious and the community embraced GitLab.
TPA actually migrated its most critical repositories out of shared hosting entirely, into specific servers (e.g. the Puppet Git repository is just on the Puppet server now), leveraging Git's decentralized nature and removing an entire attack surface from our infrastructure. Some of those repositories are mirrored back into GitLab, but the authoritative copy is not on GitLab.
In any case, the proposal to migrate from Gitolite to GitLab was effectively just formalizing a fait accompli.
How to migrate from Gitolite / cgit to GitLab
The progressive migration was a challenge. If you intend to migrate between hosting platforms, we strongly recommend to make a "flag day" during which you migrate all repositories at once. This ensures a smoother transition and avoids elaborate rewrite rules.
When Gitolite access was shutdown, we had repositories on both GitLab
and Gitolite, without a clear relationship between the two. A priori,
the plan then was to import all the remaining Gitolite repositories
into the legacy/gitolite namespace, but that seemed wasteful,
particularly for large repositories like Tor Browser which uses
nearly a gigabyte of disk space. So we took special care to avoid
duplicating repositories.
When the mass migration started, only 71 of the 538 Gitolite
repositories were Migrated to GitLab in the gitolite.conf
file. So, given that we had hundreds of repositories to migrate:, we
developed some automation to "save time". We already automate
similar ad-hoc tasks with Fabric, so we used that framework here
as well. (Our normal configuration management tool is Puppet,
which is a poor fit here.)
So a relatively large amount of Python code was produced to basically do the following:
- check if all on-disk repositories are listed in
gitolite.conf(and vice versa) and either add missing repositories or delete them from disk if garbage - for each repository in
gitolite.conf, if its category is markedMigrated to GitLab, skip, otherwise; - find a matching GitLab project by name, prompt the user for multiple matches
- if a match is found, redirect if the repository is non-empty
- we have GitLab projects that look like the real thing, but are only present to host migrated Trac issues
- in such cases we cloned the Gitolite project locally and pushed to the existing repository instead
- otherwise, a new repository is created in the
legacy/gitolitenamespace, using the "import" mechanism in GitLab to automatically import the repository from Gitolite, creating redirections and updatinggitolite.confto document the change
User repositories (those under the user/ directory in Gitolite) were
handled specially. First, the existing redirection map was checked to
see if a similarly named project was migrated (so that,
e.g. user/dgoulet/tor is properly treated as a fork of
tpo/core/tor). Then the parent project was forked in GitLab and the
Gitolite project force-pushed to the fork. This allows us to show the
fork relationship in GitLab and, more importantly, benefit from the
"pool" feature in GitLab which deduplicates disk usage between forks.
Sometimes, we found no such relationships. Then we simply imported
multiple repositories with similar names in the legacy/gitolite
namespace, sometimes creating forks between user repositories, on a
first-come-first-served basis from the gitolite.conf order.
The code used in this migration is now available publicly. We encourage other groups planning to migrate from Gitolite/GitWeb to GitLab to use (and contribute to) our fabric-tasks repository, even though it does have its fair share of hard-coded assertions.
The main entry point is the gitolite.mass-repos-migration task. A
typical migration job looked like:
anarcat@angela:fabric-tasks$ fab -H cupani.torproject.org gitolite.mass-repos-migration
[...]
INFO: skipping project project/help/infra in category Migrated to GitLab
INFO: skipping project project/help/wiki in category Migrated to GitLab
INFO: skipping project project/jenkins/jobs in category Migrated to GitLab
INFO: skipping project project/jenkins/tools in category Migrated to GitLab
INFO: searching for projects matching fastlane
INFO: Successfully connected to https://gitlab.torproject.org
import gitolite project project/tor-browser/fastlane into gitlab legacy/gitolite/project/tor-browser/fastlane with desc 'Tor Browser app store and deployment configuration for Fastlane'? [Y/n]
INFO: importing gitolite project project/tor-browser/fastlane into gitlab legacy/gitolite/project/tor-browser/fastlane with desc 'Tor Browser app store and deployment configuration for Fastlane'
INFO: building a new connect to cupani
INFO: defaulting name to fastlane
INFO: importing project into GitLab
INFO: Successfully connected to https://gitlab.torproject.org
INFO: loading group legacy/gitolite/project/tor-browser
INFO: archiving project
INFO: creating repository fastlane (fastlane) in namespace legacy/gitolite/project/tor-browser from https://git.torproject.org/project/tor-browser/fastlane into https://gitlab.torproject.org/legacy/gitolite/project/tor-browser/fastlane
INFO: migrating Gitolite repository project/tor-browser/fastlane to GitLab project legacy/gitolite/project/tor-browser/fastlane
INFO: uploading 399 bytes to /srv/git.torproject.org/repositories/project/tor-browser/fastlane.git/hooks/pre-receive
INFO: making /srv/git.torproject.org/repositories/project/tor-browser/fastlane.git/hooks/pre-receive executable
INFO: adding entry to rewrite_map /home/anarcat/src/tor/tor-puppet/modules/profile/files/git/gitolite2gitlab.txt
INFO: modifying gitolite.conf to add: "config gitweb.category = Migrated to GitLab"
INFO: rewriting gitolite config /home/anarcat/src/tor/gitolite-admin/conf/gitolite.conf to change project project/tor-browser/fastlane to category Migrated to GitLab
INFO: skipping project project/bridges/bridgedb-admin in category Migrated to GitLab
[...]
In the above, you can see migrated repositories skipped then the fastlane project being archived into GitLab. Another example with a later version of the script, processing only user repositories and showing the interactive prompt and a force-push into a fork:
$ fab -H cupani.torproject.org  gitolite.mass-repos-migration --include 'user/.*' --exclude '.*tor-?browser.*'
INFO: skipping project user/aagbsn/bridgedb in category Migrated to GitLab
[...]
INFO: skipping project user/phw/atlas in category Migrated to GitLab
INFO: processing project user/phw/obfsproxy (Philipp's obfsproxy repository) in category Users' development repositories (Attic)
INFO: Successfully connected to https://gitlab.torproject.org
INFO: user repository detected, trying to find fork phw/obfsproxy
WARNING: no existing fork found, entering user fork subroutine
INFO: found 6 GitLab projects matching 'obfsproxy' (https://gitweb.torproject.org/user/phw/obfsproxy.git)
0 legacy/gitolite/debian/obfsproxy
1 legacy/gitolite/debian/obfsproxy-legacy
2 legacy/gitolite/user/asn/obfsproxy
3 legacy/gitolite/user/ioerror/obfsproxy
4 tpo/anti-censorship/pluggable-transports/obfsproxy
5 tpo/anti-censorship/pluggable-transports/obfsproxy-legacy
select parent to fork from, or enter to abort: ^G4
INFO: repository is not empty: in-pack: 2104, packs: 1, size-pack: 414
fork project tpo/anti-censorship/pluggable-transports/obfsproxy into legacy/gitolite/user/phw/obfsproxy^G [Y/n]
INFO: loading project tpo/anti-censorship/pluggable-transports/obfsproxy
INFO: forking project user/phw/obfsproxy into namespace legacy/gitolite/user/phw
INFO: waiting for fork to complete...
INFO: fork status: started, sleeping...
INFO: fork finished
INFO: cloning and force pushing from user/phw/obfsproxy to legacy/gitolite/user/phw/obfsproxy
INFO: deleting branch protection: <class 'gitlab.v4.objects.branches.ProjectProtectedBranch'> => {'id': 2723, 'name': 'master', 'push_access_levels': [{'id': 2864, 'access_level': 40, 'access_level_description': 'Maintainers', 'deploy_key_id': None}], 'merge_access_levels': [{'id': 2753, 'access_level': 40, 'access_level_description': 'Maintainers'}], 'allow_force_push': False}
INFO: cloning repository git-rw.torproject.org:/srv/git.torproject.org/repositories/user/phw/obfsproxy.git in /tmp/tmp6orvjggy/user/phw/obfsproxy
Cloning into bare repository '/tmp/tmp6orvjggy/user/phw/obfsproxy'...
INFO: pushing to GitLab: https://gitlab.torproject.org/legacy/gitolite/user/phw/obfsproxy
remote:
remote: To create a merge request for bug_10887, visit:
remote:   https://gitlab.torproject.org/legacy/gitolite/user/phw/obfsproxy/-/merge_requests/new?merge_request%5Bsource_branch%5D=bug_10887
remote:
[...]
To ssh://gitlab.torproject.org/legacy/gitolite/user/phw/obfsproxy
 + 2bf9d09...a8e54d5 master -> master (forced update)
 * [new branch]      bug_10887 -> bug_10887
[...]
INFO: migrating repo
INFO: migrating Gitolite repository https://gitweb.torproject.org/user/phw/obfsproxy.git to GitLab project https://gitlab.torproject.org/legacy/gitolite/user/phw/obfsproxy
INFO: adding entry to rewrite_map /home/anarcat/src/tor/tor-puppet/modules/profile/files/git/gitolite2gitlab.txt
INFO: modifying gitolite.conf to add: "config gitweb.category = Migrated to GitLab"
INFO: rewriting gitolite config /home/anarcat/src/tor/gitolite-admin/conf/gitolite.conf to change project user/phw/obfsproxy to category Migrated to GitLab
INFO: processing project user/phw/scramblesuit (Philipp's ScrambleSuit repository) in category Users' development repositories (Attic)
INFO: user repository detected, trying to find fork phw/scramblesuit
WARNING: no existing fork found, entering user fork subroutine
WARNING: no matching gitlab project found for user/phw/scramblesuit
INFO: user fork subroutine failed, resuming normal procedure
INFO: searching for projects matching scramblesuit
import gitolite project user/phw/scramblesuit into gitlab legacy/gitolite/user/phw/scramblesuit with desc 'Philipp's ScrambleSuit repository'?^G [Y/n]
INFO: checking if remote repo https://git.torproject.org/user/phw/scramblesuit exists
INFO: importing gitolite project user/phw/scramblesuit into gitlab legacy/gitolite/user/phw/scramblesuit with desc 'Philipp's ScrambleSuit repository'
INFO: importing project into GitLab
INFO: Successfully connected to https://gitlab.torproject.org
INFO: loading group legacy/gitolite/user/phw
INFO: creating repository scramblesuit (scramblesuit) in namespace legacy/gitolite/user/phw from https://git.torproject.org/user/phw/scramblesuit into https://gitlab.torproject.org/legacy/gitolite/user/phw/scramblesuit
INFO: archiving project
INFO: migrating Gitolite repository https://gitweb.torproject.org/user/phw/scramblesuit.git to GitLab project https://gitlab.torproject.org/legacy/gitolite/user/phw/scramblesuit
INFO: adding entry to rewrite_map /home/anarcat/src/tor/tor-puppet/modules/profile/files/git/gitolite2gitlab.txt
INFO: modifying gitolite.conf to add: "config gitweb.category = Migrated to GitLab"
INFO: rewriting gitolite config /home/anarcat/src/tor/gitolite-admin/conf/gitolite.conf to change project user/phw/scramblesuit to category Migrated to GitLab
[...]
Acute eyes will notice the bell used as a notification mechanism as well in this transcript.
A lot of the code is now useless for us, but some, like "commit and
push" or is-repo-empty live on in the git module and, of
course, the gitlab module has grown some legs along the
way. We've also found fun bugs, like a file descriptor exhaustion in
bash, among other oddities. The retirement milestone and
issue 41215 has a detailed log of the migration, for those
curious.
This was a challenging project, but it feels nice to have this behind us. This gets rid of 2 of the 4 remaining machines running Debian "old-old-stable", which moves a bit further ahead in our late bullseye upgrades milestone.
Full transparency: we tested GPT-3.5, GPT-4, and other large language models to see if they could answer the question "write a set of rewrite rules to redirect GitWeb to GitLab". This has become a standard LLM test for your faithful writer to figure out how good a LLM is at technical responses. None of them gave an accurate, complete, and functional response, for the record.
The actual rewrite rules as of this writing follow, for humans that actually like working answers provided by expert humans instead of artificial intelligence which currently seem to be, glorified, mansplaining interns.
git.torproject.org rewrite rules
Those rules are relatively simple in that they rewrite a single URL to its equivalent GitLab counterpart in a 1:1 fashion. It relies on the rewrite map mentioned above, of course.
RewriteEngine on
# this RewriteMap connects the gitweb projects to their GitLab
# equivalent
RewriteMap gitolite2gitlab "txt:/etc/apache2/gitolite2gitlab.txt"
# if this becomes a performance bottleneck, convert to a DBM map with:
#
#  $ httxt2dbm -i mapfile.txt -o mapfile.map
#
# and:
#
# RewriteMap mapname "dbm:/etc/apache/mapfile.map"
#
# according to reports lavamind found online, we hit such a
# performance bottleneck only around millions of entries, which is not our case

# those two rules can go away once all the projects are
# migrated to GitLab
#
# this matches the request URI so we can check the RewriteMap
# for a match next
#
# WARNING: this won't match URLs without .git in them, which
# *do* work now. one possibility would be to match the request
# URI (without query string!) with:
#
# /git/(.*)(.git)?/(((branches|hooks|info|objects/).*)|git-.*|upload-pack|receive-pack|HEAD|config|description)?.
#
# I haven't been able to figure out the actual structure of
# those URLs, so it's really hard to figure out the boundaries
# of the project name here. I stopped after pouring around the
# http-backend.c code in git
# itself. https://www.git-scm.com/docs/http-protocol is also
# kind of incomplete and unsatisfying.
RewriteCond %{REQUEST_URI} ^/(git/)?(.*).git/.*$
# this makes the RewriteRule match only if there's a match in
# the rewrite map
RewriteCond ${gitolite2gitlab:%2|NOT_FOUND} !NOT_FOUND
RewriteRule ^/(git/)?(.*).git/(.*)$ https://gitlab.torproject.org/${gitolite2gitlab:$2}.git/$3 [R=302,L]

# Fallback everything else to GitLab
RewriteRule (.*) https://gitlab.torproject.org [R=302,L]
gitweb.torproject.org rewrite rules
Those are the vastly more complicated GitWeb to GitLab rewrite rules.
Note that we say "GitWeb" but we were actually not running GitWeb but cgit, as the former didn't actually scale for us.
RewriteEngine on
# this RewriteMap connects the gitweb projects to their GitLab
# equivalent
RewriteMap gitolite2gitlab "txt:/etc/apache2/gitolite2gitlab.txt"

# special rule to process targets of the old spec.tpo site and
# bring them to the right redirect on the new spec.tpo site. that should turn, for example:
#
# https://gitweb.torproject.org/torspec.git/tree/address-spec.txt
#
# into:
#
# https://spec.torproject.org/address-spec
RewriteRule ^/torspec.git/tree/(.*).txt$ https://spec.torproject.org/$1 [R=302]

# list of endpoints taken from cgit's cmd.c

# those two RewriteCond are necessary because we don't move
# all repositories at once. once the migration is completed,
# they can be removed.
#
# and yes, they are copied all over the place below
#
# create a match for the project name to check if the project
# has been moved to GitLab
RewriteCond %{REQUEST_URI} ^/(.*).git(/.*)?$
# this makes the RewriteRule match only if there's a match in
# the rewrite map
RewriteCond ${gitolite2gitlab:%1|NOT_FOUND} !NOT_FOUND
# main project page, like summary below
RewriteRule ^/(.*).git/?$ https://gitlab.torproject.org/${gitolite2gitlab:$1}/ [R=302,L]

# summary
RewriteCond %{REQUEST_URI} ^/(.*).git/.*$
RewriteCond ${gitolite2gitlab:%1|NOT_FOUND} !NOT_FOUND
RewriteRule ^/(.*).git/summary/?$ https://gitlab.torproject.org/${gitolite2gitlab:$1}/ [R=302,L]

# about
RewriteCond %{REQUEST_URI} ^/(.*).git/.*$
RewriteCond ${gitolite2gitlab:%1|NOT_FOUND} !NOT_FOUND
RewriteRule ^/(.*).git/about/?$ https://gitlab.torproject.org/${gitolite2gitlab:$1}/ [R=302,L]

# commit
RewriteCond %{REQUEST_URI} ^/(.*).git/.*$
RewriteCond ${gitolite2gitlab:%1|NOT_FOUND} !NOT_FOUND
RewriteCond "%{QUERY_STRING}" "(.*(?:^|&))id=([^&]*)(&.*)?$"
RewriteRule ^/(.*).git/commit/? https://gitlab.torproject.org/${gitolite2gitlab:$1}/-/commit/%2 [R=302,L,QSD]
RewriteCond %{REQUEST_URI} ^/(.*).git/.*$
RewriteCond ${gitolite2gitlab:%1|NOT_FOUND} !NOT_FOUND
RewriteRule ^/(.*).git/commit/? https://gitlab.torproject.org/${gitolite2gitlab:$1}/-/commits/HEAD [R=302,L]

# diff, incomplete because can diff arbitrary refs and files in cgit but not in GitLab, hard to parse
RewriteCond %{REQUEST_URI} ^/(.*).git/.*$
RewriteCond ${gitolite2gitlab:%1|NOT_FOUND} !NOT_FOUND
RewriteCond %{QUERY_STRING} id=([^&]*)
RewriteRule ^/(.*).git/diff/? https://gitlab.torproject.org/${gitolite2gitlab:$1}/-/commit/%1 [R=302,L,QSD]

# patch
RewriteCond %{REQUEST_URI} ^/(.*).git/.*$
RewriteCond ${gitolite2gitlab:%1|NOT_FOUND} !NOT_FOUND
RewriteCond %{QUERY_STRING} id=([^&]*)
RewriteRule ^/(.*).git/patch/? https://gitlab.torproject.org/${gitolite2gitlab:$1}/-/commit/%1.patch [R=302,L,QSD]

# rawdiff, incomplete because can show only one file diff, which GitLab cannot
RewriteCond %{REQUEST_URI} ^/(.*).git/.*$
RewriteCond ${gitolite2gitlab:%1|NOT_FOUND} !NOT_FOUND
RewriteCond %{QUERY_STRING} id=([^&]*)
RewriteRule ^/(.*).git/rawdiff/?$ https://gitlab.torproject.org/${gitolite2gitlab:$1}/-/commit/%1.diff [R=302,L,QSD]

# log
RewriteCond %{REQUEST_URI} ^/(.*).git/.*$
RewriteCond ${gitolite2gitlab:%1|NOT_FOUND} !NOT_FOUND
RewriteCond %{QUERY_STRING} h=([^&]*)
RewriteRule ^/(.*).git/log/?$ https://gitlab.torproject.org/${gitolite2gitlab:$1}/-/commits/%1 [R=302,L,QSD]
RewriteCond %{REQUEST_URI} ^/(.*).git/.*$
RewriteCond ${gitolite2gitlab:%1|NOT_FOUND} !NOT_FOUND
RewriteRule ^/(.*).git/log/?$ https://gitlab.torproject.org/${gitolite2gitlab:$1}/-/commits/HEAD [R=302,L]
RewriteCond %{REQUEST_URI} ^/(.*).git/.*$
RewriteCond ${gitolite2gitlab:%1|NOT_FOUND} !NOT_FOUND
RewriteRule ^/(.*).git/log(/?.*)$ https://gitlab.torproject.org/${gitolite2gitlab:$1}/-/commits/HEAD$2 [R=302,L]

# atom
RewriteCond %{REQUEST_URI} ^/(.*).git/.*$
RewriteCond ${gitolite2gitlab:%1|NOT_FOUND} !NOT_FOUND
RewriteCond %{QUERY_STRING} h=([^&]*)
RewriteRule ^/(.*).git/atom/?$ https://gitlab.torproject.org/${gitolite2gitlab:$1}/-/commits/%1 [R=302,L,QSD]
RewriteCond %{REQUEST_URI} ^/(.*).git/.*$
RewriteCond ${gitolite2gitlab:%1|NOT_FOUND} !NOT_FOUND
RewriteRule ^/(.*).git/atom/?$ https://gitlab.torproject.org/${gitolite2gitlab:$1}/-/commits/HEAD [R=302,L,QSD]

# refs, incomplete because two pages in GitLab, defaulting to "tags"
RewriteCond %{REQUEST_URI} ^/(.*).git/.*$
RewriteCond ${gitolite2gitlab:%1|NOT_FOUND} !NOT_FOUND
RewriteRule ^/(.*).git/refs/?$ https://gitlab.torproject.org/${gitolite2gitlab:$1}/-/tags [R=302,L]
RewriteCond %{REQUEST_URI} ^/(.*).git/.*$
RewriteCond ${gitolite2gitlab:%1|NOT_FOUND} !NOT_FOUND
RewriteCond %{QUERY_STRING} h=([^&]*)
RewriteRule ^/(.*).git/tag/? https://gitlab.torproject.org/${gitolite2gitlab:$1}/-/tags/%1 [R=302,L,QSD]

# tree
RewriteCond %{REQUEST_URI} ^/(.*).git/.*$
RewriteCond ${gitolite2gitlab:%1|NOT_FOUND} !NOT_FOUND
RewriteCond %{QUERY_STRING} id=([^&]*)
RewriteRule ^/(.*).git/tree(/?.*)$ https://gitlab.torproject.org/${gitolite2gitlab:$1}/-/tree/%1$2 [R=302,L,QSD]
RewriteCond %{REQUEST_URI} ^/(.*).git/.*$
RewriteCond ${gitolite2gitlab:%1|NOT_FOUND} !NOT_FOUND
RewriteRule ^/(.*).git/tree(/?.*)$ https://gitlab.torproject.org/${gitolite2gitlab:$1}/-/tree/HEAD$2 [R=302,L]

# /-/tree has no good default in GitLab, revert to HEAD which is a good
# approximation (we can't assume "master" here anymore)
RewriteCond %{REQUEST_URI} ^/(.*).git/.*$
RewriteCond ${gitolite2gitlab:%1|NOT_FOUND} !NOT_FOUND
RewriteRule ^/(.*).git/tree/?$ https://gitlab.torproject.org/${gitolite2gitlab:$1}/-/tree/HEAD [R=302,L]

# plain
RewriteCond %{REQUEST_URI} ^/(.*).git/.*$
RewriteCond ${gitolite2gitlab:%1|NOT_FOUND} !NOT_FOUND
RewriteCond %{QUERY_STRING} h=([^&]*)
RewriteRule ^/(.*).git/plain(/?.*)$ https://gitlab.torproject.org/${gitolite2gitlab:$1}/-/raw/%1$2 [R=302,L,QSD]
RewriteCond %{REQUEST_URI} ^/(.*).git/.*$
RewriteCond ${gitolite2gitlab:%1|NOT_FOUND} !NOT_FOUND
RewriteRule ^/(.*).git/plain(/?.*)$ https://gitlab.torproject.org/${gitolite2gitlab:$1}/-/raw/HEAD$2 [R=302,L]

# blame: disabled
#RewriteCond %{REQUEST_URI} ^/(.*).git/.*$
#RewriteCond ${gitolite2gitlab:%1|NOT_FOUND} !NOT_FOUND
#RewriteCond %{QUERY_STRING} h=([^&]*)
#RewriteRule ^/(.*).git/blame(/?.*)$ https://gitlab.torproject.org/${gitolite2gitlab:$1}/-/blame/%1$2 [R=302,L,QSD]
# same default as tree above
#RewriteCond %{REQUEST_URI} ^/(.*).git/.*$
#RewriteCond ${gitolite2gitlab:%1|NOT_FOUND} !NOT_FOUND
#RewriteRule ^/(.*).git/blame(/?.*)$ https://gitlab.torproject.org/${gitolite2gitlab:$1}/-/blame/HEAD/$2 [R=302,L]

# stats
RewriteCond %{REQUEST_URI} ^/(.*).git/.*$
RewriteCond ${gitolite2gitlab:%1|NOT_FOUND} !NOT_FOUND
RewriteRule ^/(.*).git/stats/?$ https://gitlab.torproject.org/${gitolite2gitlab:$1}/-/graphs/HEAD [R=302,L]

# still TODO:
# repolist: once migration is complete
#
# cannot be done:
# atom: needs a feed token, user must be logged in
# blob: no direct equivalent
# info: not working on main cgit website?
# ls_cache: not working, irrelevant?
# objects: undocumented?
# snapshot: pattern too hard to match on cgit's side

# special case, we keep a copy of the main index on the archive
RewriteRule ^/?$ https://archive.torproject.org/websites/gitweb.torproject.org.html [R=302,L]
# Fallback: everything else to GitLab
RewriteRule .* https://gitlab.torproject.org [R=302,L]
The reference copy of those is available in our (currently private) Puppet git repository.
Ed Crewe
Software Engineering Hiring and Firing

The jump in interest rates to the highest level in over 20 years that hit in summer 2023 for the US, UK and many other countries is still impacting the Software industry. Rates may be due to drop soon, but currently it has choked off investment, upped borrowing costs and lead to many software companies making engineers redundant to please the markets.
For the UK the estimate is around 8% of software industry jobs made redundant. Although strangely, the overall trend in vacancies for software engineers continues to march upwards, the initial surge after the pandemic dipped last summer but has now recovered.
But if you work in the industry you are bound to have colleagues and friends who have been made redundant, if you are lucky enough to have not been impacted personally.
Given recent history, I thought it may be worth reflecting on my personal experience of the whole hiring and firing process, in the tech industry. It is a UK centric view, but the companies I have worked for in the last 8 years are US software companies.
I have been fired, hired and conducted technical interviews to hire others. Giving me a few different perspectives.
This post is NOT about getting your first Software job
I first got a coding job in the public sector and it was as a self taught web developer in the 1990s, before web development was a thing you could get a degree in. So I initially got a job in IT support, volunteered to act up (ie no pay increase) and built some websites that were needed, then became a full time web developer through a portfolio of work, ie sites.
Today junior developers may have to prove themselves suitable by artificial measures. I skipped these, so I do not have any professional certifications, or any to recommend. I also don't know how to ace coding algorithm or personality profile assessments.
Only large companies are likely to subject you to them, and that is really out of fairness on the juniors who have to go through them, and to screen out dodgy applicants. Screening just needs to be passed, it will not have any input into whether you get the job. Hence Acing the coding interview as promoted by sites such as LeetCode is not even a thing, only passing coding exercise systems in order to start, or switch to, a career as a developer. I would recommend starting an open source project instead, to demonstrate you can actually code.
The majority of small to medium software companies and of job vacancies require experience and in effect have no vacancies for the most junior software grades with less than 3 years under their belt. So they tend not to use any of these filtering methods. They just want to see proof that you are already a developer, and usually base that on face to face interviews and examples of your code you provide them. So much like how I was originally hired back in the 1990s.
I have only been subject to a LeetCode style test once, which was for a generic job application, ie hiring for numbers of SREs of various seniority, for a FANNG.
F I R E D
In the majority of cases the firing process, or to be more polite, redundancy, is all about balancing the finances of the whole company or institution. As such it is very unlikely to be about you.
Of course people are also fired as individuals for various reasons, one of which is actually not being any good at their job, failing to get along with their manager, being a bad culture fit, jobs turning out not to be what was advertised, or expressing political views. Since unlike where I once worked, in the UK Education sector, where 50% of staff are union members, US software companies will have less than 1% membership, so don't tend to respond well to dissent.
Mostly this happens via failing probation, at around 15% then maybe another 5% annually for disciplinary / performance improvement failure.
If you want to try getting individually fired then go the overemployed route. Get two or three jobs at once and test how long it takes before the company notices you giving 110% is now only 40% and fire you. The rule of thumb is the larger the company, the longer it takes!
But this post's focus isn't about individual firing, its about organizational hiring and firing.
Firing Reasons
- A company may be doing badly in a slow long term way, so it has to chop as part of a restructure and downsize to attempt to fix that.
- Alternatively the company could be doing really well. So it gets the attention of a big investment company and is bought up and merged with its rival. To fix overlap and justify the merger - both companies lose 20% of staff.
- Maybe it needs to pivot towards a new area (currently likely to be AI) and so chop 20% of its staff so it can hire 15% experienced, and pricey, AI developers.
- Or it may just have had a one off external impacting event that hit it financially. So to balance the earnings for that year and keep its share price good, it chops a bunch of staff. It will rehire next year, when it suits the balance sheet. This is the example in which I was made redundant along with 5% of staff, it was a big company, so that was a few thousand people globally.
- Finally it may be an industry wide phenomenon as it is with the current redundancies in the software industry. A world clamp down on easy cheap loans means investment company driven industries such as tech. are no longer awash with spare cash. Cut backs look good right now, and keep the share price high.
Hence redundancies that are nothing to do with the industry itself or its future prospects.
That is mirrored in who is fired. Companies do not keep a log book of gold stars and black marks against each employee. They do not use organizational triggered rounds of redundancies to select individuals to fire. They certainly have not got the capability to accurately determine all the best employees and only fire the worst ones. You will be fired based on what part of the organization you are in, how much it is valued in the current strategy and how much you cost vs others who could do your job. If you are currently between teams / or in a new team or role which has yet to establish itself, when the music stops - like musical chairs, bad luck you are out.
The only personal element may be if a whole team is seen as under performing or difficult to manage it might be axed. No matter that it contains a star performer. Decisions may also be geographic. Lets axe the Greek office, save by withdrawing engineering from a country, which is again how I was made redundant, the rest of my team was in Greece.
Alternatively it may be, fire under 20 staff from each country, to avoid more burdensome regulation for bulk layoffs.
The organization could create an insecure / downturn atmosphere to encourage staff to leave. Because its a lot cheaper for people to leave than the company paying out redundancy settlements.
Redundancy keeps the average employees 😐
As a result in response to significant redundancies an organisation will tend to lose more of the best employees - since they are the most able to move, the most likely to get a big pay rise if they move and the least likely to want to stick around if they see negative organisational change. The software industry has very high staff turnover at almost 20%. Out weighing any nominal idea of removing less efficient staff.
If a company handles things well it may only lose a representative productivity range of staff from best to worst. But a bulk redundancy process is likely to lead to the biggest loss in the top talent, get rid of slightly more of the bottom dwellers and so result in maximising the mediocre!
In summary the answer to 'Why me?' in group redundancies is "because you were there" ... and you didn't have a personal friendship with the CEO 😉. Of course that is why new CEOs are often brought in to restructure - the first step of which is to take an axe to the current C-suite.
Some of the best software engineers I have worked with have been made redundant at some point in their career. Group redundancies are not about you or how well you do your job. But taking it personally and challenging the messenger, with why me?, as demonstrated by recent viral videos, is an understandable emotional response to rejection, and the misguided belief that work aims to be some form of meritocracy, in the same way college might.
LIFO and FIFO
LIFO rather than FIFO is the norm in Firing. New hires are less likely to have established themselves as essential to the company, and have less personal connections within it. More importantly many countries redundancy legislation doesn't kick in until over 2 years of employment and the longer you have been employed the more the company will have to pay to terminate you.
Which means a new hire who has uprooted for their new tech job, will be the most likely to find themselves losing that job when bulk redundancies hit.
But FIFO has its place, next would be older engineers. Some companies don't even hire hands on engineers much over the age of 40, anyway. But staff near retirement have at most only a few years left to contribute and may cost more for the same grade. So encouraging early retirement can be part of the bulk redundancy process.
Prejudicial Firing
Whilst redundancy is all about costs and not about your personal performance. That is not to say companies who pass the redundancy choices down to junior managers may not end up with firing disproportionate numbers of workers who are not from the same background as their manager, ie white USA males, ideally younger than the manager. But prejudice is not personal either. That is pretty much what defines it as prejudice, a pre-judgement of people based on physical characteristics rather than their ability at the job. Also people are least likely to fire staff that they have the most in common with, resulting in prejudicial firing.
Unfortunately it seems many companies with a good diversity policy for hiring, may not have adequate ones for firing. Again resulting in losing more of the higher performing staff.
I have heard of a case where someone got a new manager, who on joining was told to cut from his team, so he fired everyone outside the USA. The worker was so keen to stay at their current employer they went over the head of their manager to senior management and asked for their redundancy to be repealed. Since they had been at the company many years and personally knew senior management, this worked.
Alternatively a more purely cost based restructure may hire all developers from cheaper countries and fire most of them in the US. As happened with Google's Python team recently.
Fight for your job?
The company may set up a pool process for bulk redundancies if numbers are high enough per country, where you can fight for a place on the lifeboat of remaining positions.
In both cases I would recommend that you don't waste time on a company that doesn't value you. If you do stay you risk, dealing with the bulk redundancy aftermath. Which will be present unless the redundancies were for a pivot (3) or one off event (4).
An increased workload, pay freezes, no bonus, needing to over work to justify being kept on, plus a negative work atmosphere.
In a case where I stayed after the department I was in was axed, I had to reapply for a new job which was moved to a different division. The work was less worthwhile and at the time, the employment of in-house software developers as a whole, was questioned as being unnecessary for the organisation. I outstayed my welcome for 18 months of legacy commercial software support, before getting the message and quitting.
Lesson learnt, if you must ask to to stay in your company, via senior management, a pool or reapplication. Make sure you look around and apply for other jobs outside of it at the same time.
You also miss out on a minimum of a couple of months tax free pay as a settlement.
On the other hand, if the redundancy round is for a more minor pivot, and you are happy in the role, it may be well worth staying around to see how things pan out.
Of course you may get no choice in the matter, in which case, get straight into GET HIRED mode, and start the job search. If you can manage it fast enough, you will benefit financially from the whole process. Although if the reason is (5) a sector wide reduction, then it will be take longer and be harder to obtain the usual 20% pay increase that a new position can offer.
H I R E D
- It is a lot easier to get a pay rise or promotion by changing companies, than being promoted internally. To fast track your career to a principal or architect top IC role. Or just get a pay rise.
- Changing jobs gives you much wider experience, of different technology, approaches and cultures. Making you a better engineer.
- If you have been in your current job over 10 years without significant internal promotions or changes of role then it is detrimental to your CV, indicating you are stuck in a rut and unable to handle change, eg. new technology.
- You want to shift sectors.
I changed from public sector web developer, to commercial cloud engineer with one move. - You want to get into new technology that is not used in your current role.
I changed from a Python, Ruby config management automation engineer to a Kubernetes Golang engineer with another. - You want to change your role in tech, or leave it entirely. For example get out of sales as a solution architect and back into a more technical role as an SRE.
Of course you probably need to be in a job for at least 2 years to fully master it.
If your CV has loads of similar positions where you barely make it past the probation period, its marking you out as a failure at those roles == Fail hiring at the first step, the HR CV check.
You just need to prove you have a range of experience and software languages and are willing to learn, early in a technology boom. To catch the cloud engineer bus, I got a job in it in 2016. The US cloud sector was $8 billion back then. It is $600 billion now. Similarly to get on board with Golang and Kubernetes in 2019. In the first few years of a tech boom most companies will initially have to cross train engineers without direct experience. The corollary of that is that in the current downturn attempting to pivot to an established technology, which k8s has become, is going to be much harder.
So around £60k for a junior role, but in 3-4 years it should jump to at least £100k for a senior AI engineer. Of course for US salaries add 30%, plus usually free medical, life insurance etc. The lower tax rates cancels out the higher cost of living in the US ... so its UK salary +30% in real terms*. Researching the going rate for the particular role, technical skills and sector you are applying for is a necessary part of the hiring process. In order that you don't let recruitment bargain you down too low.
* Note that geographic software pay differences are why you often come across engineers of other nationalities emigrating to, and working in the higher paying countries, USA, Canada and Australia. I have worked with many people from the UK and Europe who live in the USA, and Indians who live there or Europe, for example.
Of course as a cheap foreign worker myself, I too stick with US companies partly because they pay rather more than UK ones, even if a lot lower than what I would get if I moved there 😉
Now is the time when such a switch will be easier to accomplish without having to work nights doing courses, certifications and personal projects. The usual means of demonstrating your ability without any work experience.
If not then the recruitment is likely for a group of roles in an expansion process and from screening and CV, you are not one of the top candidates. You may waiting on the backlog of potential interviewees for a couple of extra months before it properly kicks off.
Or you are told the post is no longer available, sorry!
Even if you would eventually get a post it may stretch your redundancy settlement. Therefore I would not bother pursuing any application process that is looking to be stretching on past 6 weeks.
Start date will be 5 weeks from contract (partly to cater for notice, referee and compliance checks etc)
That makes it 2 months minimum from applying for a role to starting.
With another for introduction to team mates / office etc. which is unlikely to have any effect on the hiring decision unless you are your potential new manager take an instant personal dislike to each other.
The technical interview will consist of technical questions to explore whether you have the knowledge and experience required, plus some thing to confirm you can write code and discuss that code, for a developer or SRE role. For the former it would likely be application code whilst for the latter automation code.
For a more purely system administration / IT support role it will involve specifying your processes for resolving issues.
If you are unlucky and it is an in person interview, you may have to whiteboard pseudo code live in response to a changing task described to you on the spot. Although I have only had that once. More common, especially for hybrid / remote roles, is the take away task. To be completed in a 'few hours' at most.
It is possible that either of the above could be replaced by another source for your code. Talking through one of your open source packages, if you have any. Or talking through one or two longer automated coding exercise assessed tasks. I have never come across either of these though.
The main point is that the core of any technical interview for a developer related role will involve talking through code you have written, as a kicking off point to check your understanding of the code, how it could be improved, how you would tackle scaling, or a new exemplar functional requirement. Its faults and features.
You will be asked to talk through past code or technical work in a more generic manner in response to standard questions along the lines of examples of your past work that show how you fit the job.
Preparing for the Technical Interview
It doesn't take much to work out that a 20% pay rise is worth, a day's worth of work a week.
Assuming you stay in your new job for 2 or 3 years - that is equivalent to 6 months pay.
On that basis even doing a week of work to apply to, and prepare for a single job is still very well worth it, if you get the job.
Adopting a scatter gun approach, ie applying with a generic CV and covering letter to 10 or more jobs, is a waste of time in my view. If you need a new job, then it should be one you are genuinely interested in and research. That means probably you should only have a maximum of 3 tailored applications on the go at once. Even when I was made redundant (and about to get married) I think I limited myself to 4 job applications in total, with one primary one that thankfully I did end up getting.
There are many sites that can advise how best to do that, based on the framework that your hiring will be decided upon I have outlined above. I think preparing some Challenge Action Result stories targeted at the details of the new employer is useful. Plus spending a day or so refining that '2 hours' development task. Researching the company and preparing specific questions and perhaps suggestions for your interviewers.
Being a Technical Interviewer
From the other side of the table, clearly candidates need to show sufficient competency for the post. They may show it, but only within a totally different technical stack. Smaller companies tend to have less capacity and time to get people up to speed with new tech. So will likely fail these candidates even though they are capable of doing the job eventually.
The technical interviewers will tend to pair on the assessment - to improve its consistency. Swapping partners for interviews regularly also helps.
The assessment process is likely to use some online system such as Jobvite or Greenhouse where each interviewer assesses the candidate. Finally summarising it all with a recommendation for strong pass, pass or fail. Sometimes for a specific post and grade, otherwise the assessment can include a grade recommendation. The manager then rubber stamps that assuming appropriate funding is available. HR's job is to beat the candidate down to the lowest reasonable price, without going so low the candidate walks away.
A healthy growing company will tend to have a rolling recruitment process as they expect to be increasing head count in proportion to customers and revenue. On that basis they will likely be aiming to recruit anyone with a good pass, plus maybe most of the passes too.
Given that engineering jobs are highly specialised and require relevant experience I have not seen cases of way more interviewees than jobs. Currently, even with all the redundancies, there is still an under supply of engineers.
Also the approach for HR will be to set experience and skills pre-requisites for the roles that will keep the numbers down for those who make it to technical interview to around double the number of vacancies. Since it takes out a day of work for each interviewing engineer, to prep, interview and assess.
HIRING SUMMARY
You must pass each of the first 5 or 6 steps to get to the next one and get the job.
- HR check written application is a plausible candidate
- FAANG sized company - automated quiz / Leetcode style challenge - to reduce the numbers - because they get way more speculative applicants.
- Recruiter chat to check candidate is genuine and available
- CV skills / experience check vs other applicants to shortlist those worth interviewing
- Technical task could be takeaway or whiteboard / questionairre interview
- Technical interview, in person or Zoom with engineers
- Manager interview / introduction to team mates.
- Recruiter chat. Negotiate exact salary. Agree start date.
- Contract is signed, YOU ARE HIRED.
Real Python
Python Sequences: A Comprehensive Guide
A phrase you’ll often hear is that everything in Python is an object, and every object has a type. This points to the importance of data types in Python. However, often what an object can do is more important than what it is. So, it’s useful to discuss categories of data types and one of the main categories is Python’s sequence.
In this tutorial, you’ll learn about:
- Basic characteristics of a sequence
- Operations that are common to most sequences
- Special methods associated with sequences
- Abstract base classes
SequenceandMutableSequence - User-defined mutable and immutable sequences and how to create them
This tutorial assumes that you’re familiar with Python’s built-in data types and with the basics of object-oriented programming.
Get Your Code: Click here to download the free sample code that you’ll use to learn about Python sequences in this comprehensive guide.
Take the Quiz: Test your knowledge with our interactive “Python Sequences: A Comprehensive Guide” quiz. You’ll receive a score upon completion to help you track your learning progress:

Interactive Quiz
Python Sequences: A Comprehensive GuideIn this quiz, you'll test your understanding of sequences in Python. You'll revisit the basic characteristics of a sequence, operations common to most sequences, special methods associated with sequences, and how to create user-defined mutable and immutable sequences.
Building Blocks of Python Sequences
It’s likely you used a Python sequence the last time you wrote Python code, even if you don’t know it. The term sequence doesn’t refer to a specific data type but to a category of data types that share common characteristics.
Characteristics of Python Sequences
A sequence is a data structure that contains items arranged in order, and you can access each item using an integer index that represents its position in the sequence. You can always find the length of a sequence. Here are some examples of sequences from Python’s basic built-in data types:
>>> # List
>>> countries = ["USA", "Canada", "UK", "Norway", "Malta", "India"]
>>> for country in countries:
...     print(country)
...
USA
Canada
UK
Norway
Malta
India
>>> len(countries)
6
>>> countries[0]
'USA'

>>> # Tuple
>>> countries = "USA", "Canada", "UK", "Norway", "Malta", "India"
>>> for country in countries:
...     print(country)
...
USA
Canada
UK
Norway
Malta
India
>>> len(countries)
6
>>> countries[0]
'USA'

>>> # Strings
>>> country = "India"
>>> for letter in country:
...     print(letter)
...
I
n
d
i
a
>>> len(country)
5
>>> country[0]
'I'
Lists, tuples, and strings are among Python’s most basic data types. Even though they’re different types with distinct characteristics, they have some common traits. You can summarize the characteristics that define a Python sequence as follows:
- A sequence is an iterable, which means you can iterate through it.
- A sequence has a length, which means you can pass it to
len()to get its number of elements. - An element of a sequence can be accessed based on its position in the sequence using an integer index. You can use the square bracket notation to index a sequence.
There are other built-in data types in Python that also have all of these characteristics. One of these is the range object:
>>> numbers = range(5, 11)
>>> type(numbers)
<class 'range'>

>>> len(numbers)
6

>>> numbers[0]
5
>>> numbers[-1]
10

>>> for number in numbers:
...     print(number)
...
5
6
7
8
9
10
You can iterate through a range object, which makes it iterable. You can also find its length using len() and fetch items through indexing. Therefore, a range object is also a sequence.
You can also verify that bytes and bytearray objects, two of Python’s built-in data structures, are also sequences. Both are sequences of integers. A bytes sequence is immutable, while a bytearray is mutable.
Special Methods Associated With Python Sequences
In Python, the key characteristics of a data type are determined using special methods, which are defined in the class definitions. The special methods associated with the properties of sequences are the following:
.__iter__(): This special method makes an object iterable using Python’s preferred iteration protocol. However, it’s possible for a class without an.__iter__()special method to create iterable objects if the class has a.__getitem__()special method that supports iteration. Most sequences have an.__iter__()special method, but it’s possible to have a sequence without this method..__len__(): This special method defines the length of an object, which is normally the number of elements contained within it. Thelen()built-in function calls an object’s.__len__()special method. Every sequence has this special method..__getitem__(): This special method enables you to access an item from a sequence. The square brackets notation can be used to fetch an item. The expressioncountries[0]is equivalent tocountries.__getitem__(0). For sequences,.__getitem__()should accept integer arguments starting from zero. Every sequence has this special method. This method can also ensure an object is iterable if the.__iter__()special method is missing.
Therefore, all sequences have a .__len__() and a .__getitem__() special method and most also have .__iter__().
However, it’s not sufficient for an object to have these special methods to be a sequence. For example, many mappings also have these three methods but mappings aren’t sequences.
A dictionary is an example of a mapping. You can find the length of a dictionary and iterate through its keys using a for loop or other iteration techniques. You can also fetch an item from a dictionary using the square brackets notation.
This characteristic is defined by .__getitem__(). However, .__getitem__() needs arguments that are dictionary keys and returns their matching values. You can’t index a dictionary using integers that refer to an item’s position in the dictionary. Therefore, dictionaries are not sequences.
Slicing in Python Sequences
Read the full article at https://realpython.com/python-sequences/ »
[ Improve Your Python With 🐍 Python Tricks 💌 – Get a short & sweet Python Trick delivered to your inbox every couple of days. >> Click here to learn more and see examples ]
Zero to Mastery
Python Monthly Newsletter 💻🐍
53rd issue of Andrei Neagoie's must-read monthly Python Newsletter: Python Security Best Practices, State of Python 2024, Prompt Engineering, and much more. Read the full newsletter to get up-to-date with everything you need to know from last month.