
Planet Python
Last update: July 09, 2025 07:42 AM UTC
July 08, 2025
PyCoder’s Weekly
Issue #689: Design Patterns, Signals, TorchAudio, and More (July 8, 2025)
#689 – JULY 8, 2025
View in Browser »

Design Patterns You Should Unlearn in Python
The Gang of Four design patterns specify object oriented solutions to common issues in code, except Python doesn’t have many of the problems the solutions are aiming to solve. This article talks about some of the common patterns and the easier ways to solve the problems they intend to address in Python. See also Part 2.
RACEYCHAN
Signals: State Management for Python Developers
If you’ve ever debugged why your cache didn’t invalidate or notifications stopped firing after a “simple” state change, this guide is for you. Signals are becoming a JavaScript standard, but Python developers can use the same patterns to eliminate “forgot to update that thing” bugs.
TUAN ANH BUI • Shared by Tuan Anh Bui
Prevent Postgres Slowdowns on Python Apps with this Check List

Avoid performance regressions in your Python app by staying on top of Postgres maintenance. This monthly check list outlines what to monitor, how to catch slow queries early, and ways to ensure indexes, autovacuum, and I/O are performing as expected →
PGANALYZE sponsor
Use TorchAudio to Prepare Audio Data for Deep Learning
Learn to prepare audio data for deep learning in Python using TorchAudio. Explore how to load, process, and convert speech to spectrograms with PyTorch tools.
REAL PYTHON
Articles & Tutorials
Solving Problems and Saving Time in Chemistry With Python
What motivates someone to learn how to code as a scientist? How do you harness the excitement of solving problems quickly and make the connection to the benefits of coding in your scientific work? This week on the show, we speak with Ben Lear and Christopher Johnson about their book “Coding For Chemists.”
REAL PYTHON podcast
Django’s Ecosystem
The Django library’s website has added a new page called “Django’s Ecosystem”. It has two parts: a source of resources for more information and a detailed package listing. The package listing is broken down by type and includes debugging tools, static file management, API development, and much more.
DJANGO SOFTWARE FOUNDATION
Workshop: Unpack OWASP Top 10 LLMs with Snyk

Join Snyk and OWASP Leader Vandana Verma Sehgal on Tuesday, July 15 at 11:00AM ET for a live session covering: ✓ The top LLM vulnerabilities ✓ Proven best practices for securing AI-generated code ✓ Snyk’s AI-powered tools automate and scale secure dev. See live demos plus earn 1 CPE credit! here →
SNYK.IO sponsor
Use Keyword-Only Arguments in Dataclasses
Python dataclasses are a really nice feature for constructing classes that primarily hold or work with data. This post describes a small tip: using the kw_only=True aspect to enforce keyword arguments. See also the associated HN discussion.
CHRISTIAN HAMMOND
Application Logging in Python: Recipes for Observability
The logging module is powerful, but it can be somewhat complex. This tutorial covers structured JSON output, centralizing logging configuration, using contextvars to automatically enrich your logs with request-specific data, and other useful patterns for your observability needs.
AYOOLUWA ISAIAH • Shared by Ayooluwa Isaiah
Escaping Contravariance Hell
Ever used a Python type checker and got a frustrating error message like “This violates the Liskov substitution principle?” This post explains why “contravariance” is the underlying issue and how to deal with it.
QUANSIGHT.ORG • Shared by Marco Gorelli
Python for Nonprofits
This article and code demonstrates how to use Python to retrieve, analyze, visualize, and share nonprofit data. Even if you’re not dealing with nonprofits, the advice is useful to any data project.
GITHUB.COM/KBURCHFIEL
How to Migrate Your Python & Django Projects to uv
This post shows you one way of migrating an existing project to uv, including how to update your pyproject.toml file and what changes you might need to make if you use Docker.
TOBIAS MCNULTY
Dashboards With FastAPI, MongoDB, and WebSockets
This tutorial looks at how to develop a real-time order dashboard with FastAPI, MongoDB, and WebSockets to stream live data updates from the backend to the frontend.
ABDULAZEEZ ABDULAZEEZ ADESHINA • Shared by Mike Herman
Django Annual Impact Report
Every year the Django Software Foundation releases a report on its activities, including key milestones, community narratives, and what is coming in the future.
DJANGO SOFTWARE FOUNDATION
Python 3.14 Preview: Template Strings (T-Strings)
Python 3.14 introduces t-strings: a safer, more flexible alternative to f-strings. Learn how to process templates securely and customize string workflows.
REAL PYTHON
Implementing the Factory Method Pattern in Python
Learn how to use the Factory Method pattern in Python, when to apply it, how to refactor your code for it, and explore a reusable implementation.
REAL PYTHON course
Projects & Code
Events
Python Leiden User Group
July 10, 2025
PYTHONLEIDEN.NL
Python Atlanta
July 10 to July 11, 2025
MEETUP.COM
PyDelhi User Group Meetup
July 12, 2025
MEETUP.COM
DFW Pythoneers 2nd Saturday Teaching Meeting
July 12, 2025
MEETUP.COM
EuroPython 2025
July 14 to July 21, 2025
EUROPYTHON.EU
PyHEP.dev 2025
July 14 to July 18, 2025
CERN.CH
Happy Pythoning!
This was PyCoder’s Weekly Issue #689.
View in Browser »
[ Subscribe to 🐍 PyCoder’s Weekly 💌 – Get the best Python news, articles, and tutorials delivered to your inbox once a week >> Click here to learn more ]
EuroPython
EuroPython 2025: Sponsor Job Postings
EuroPython is approaching, and as we prepare for another great edition, we’d like to take a moment to thank our community and sponsors for their continued support.
We&aposre also excited to share some fantastic job opportunities from our sponsors!
Bloomberg
Senior Software Engineer - Network Production Engineer
As a Network Production Engineer, you will be a critical member of the team responsible for the full lifecycle of our global network infrastructure that supports Bloomberg’s core products and services. This includes building and maintaining a network that is scalable, reliable and robust.
Our network is vast, connecting several large-scale Data Centers and over a hundred edge sites. It connects Bloomberg to hundreds of thousands of our clients, over 1,500 global exchanges and trading venues over private connectivity, Internet and Public Cloud. This is a unique opportunity to help build robust, highly scalable solutions that will power the future of how Bloomberg automates network infrastructure. You&aposll be trusted to design and work on tooling that builds on automation best practices and principles.
You need to have:
- Extensive experience as a Software, Network Production, or System Reliability
Engineer. - Experience with building, maintaining and continuously enhancing automations needed for scalability & efficiency in running the Network Infrastructure.
- Experience in infrastructure Automation and orchestration Frameworks e.g. Ansible, Airflow, Terraform, Chef, Salt.
- Proven experience with object-oriented programming languages preferably in Python.
- A bachelor&aposs or master&aposs degree in computer science, Engineering, Mathematics, a similar field of study or equivalent work experience.
Learn more about this opportunity here.
Arm
ML/EDA DevOps Intern – Python Automation for AI in Hardware
Location: Sophia Antipolis, France
Duration: 6 months
Start Date: Flexible (Autumn/Winter 2025)
Description: Work at the cutting edge of ML and chip design automation. You&aposll help us integrate Python-based ML workflows into our EDA toolchain, improving the speed and accuracy of hardware design. Think: AI meets silicon.
What you’ll do:
- Develop Python scripts for model deployment and training workflows
- Build DevOps tools for managing and scaling ML jobs
- Analyze and visualize large datasets used in chip design
- Learn from experts at the forefront of AI and hardware engineering
If you&aposre excited about how Python can accelerate hardware design and enjoy playing with ML models, automation, and large-scale data, this is your space.
Link to apply: https://careers.arm.com/job/sophia-antipolis/ml-eda-devops-intern/33099/82134400992
Google Cloud
Find your next job at Google • Google Cloud • YouTube…
Create • design • code • build for everyone:
We currently have 1,900+ job positions for Pythonistas worldwide:
▶️ https://careers.google.com/jobs/results?q=python
Numberly
Software Engineer - Backend / Fullstack
Numberly uses technology for marketing: we help clients better understand their customers by implementing systems to collect, analyze, and use data. With over 150 engineers (a third of Numberly&aposs talents), we work in autonomous teams to ensure everyone can influence technical and organizational choices. The NMP team develops and maintains the Numberly MarTech Platform, a suite of applications for campaign management across digital channels like email, SMS, push notifications, and social media. We prioritize code quality, modern technical stacks, and efficient processes. We seek a curious, autonomous individual with backend experience to contribute quickly to our team.
Responsibilities
- Collaborating with a product owner and UX/UI designers to develop new features
- Improving platform performance and user experience
- Documenting technical changes and sharing progress with the team
- Monitoring advancements in tools and libraries
- Proposing technical and organizational improvements
Requirements
- Strong communicator able to explain complex ideas and listen actively
- Desire to grow personally and mentor others technically and professionally
- Confidence in making trade-offs to drive project progress
- Experience writing code and managing deployments
- Professional English proficiency (international teams)
- Preference for Linux use
- Familiarity with our technical stack (especially backend)
- Vue 3 knowledge (a plus)
- Open-source contributions (a plus)
Benefits
- Fast onboarding with mentorship and team rotations
- Monthly global team meetings (Happy Meetings)
- Freedom of speech and collaborative decision-making
- Social impact initiatives (1000mercis, Open Source contributions)
- Diverse workplace (30+ nationalities, 97/100 gender equity score)
- Modern offices with amenities (library, music studio, pet-friendly)
- Remote flexibility (up to 50% remote, 60-day consecutive remote option)
- Swile meal vouchers and international office mobility
- Perks like Gymlib, sports classes, themed parties
- Unlimited coffee/tea/infusions and mystery lunches
Picnic Technologies
Senior Data Engineer
As a Data Engineer at Picnic, you are responsible for translating business needs into successful technical designs. You’ll work with large data sets, discover new insights and business opportunities, and promote business intelligence.
It’s a role with plenty of freedom: think you&aposve spotted a way to ensure our large fleet of electric vehicles is used in the most efficient way? Go ahead and test, evaluate, and evolve your ideas alongside our Distribution team.
More interested in customer behavior? Work on in-app analytics to ensure our mobile store remains smooth, speedy, and robust.
Join the ride: https://grnh.se/7elvekk21us
TravelPerk
Senior Software Engineer (Full Stack and Backend)
Required skills and experience:
- "Product Engineering" mindset
- Pragmatism and obsession for simplicity, efficiency, and performance
- Extensive experience in similar roles building technically complex products in any web programming language
- An expert level at server-side, client-side or full stack development. Your final role within the team will depend on your skills and internal training will be provided
- Obsession for quality and testing
- Eager to learn new technologies and frameworks
- Strong communication skills
- Experience leading technical decision making discussion
The role is open in: London, Barcelona, Edinburgh and Berlin.
Interested? Apply here! https://grnh.se/mj0xp9zv1us
Apify
Open Source Engineer (TypeScript)
What you’ll be working on? Apify has grown as the tool of choice for any Node.js/JS/TS engineer when it comes to web scraping and web automation. We are now also taking on the Python community. Our open-source tooling is used by tens of thousands of people worldwide. Check out the Crawlee library, our GitHub, and the vibrant community on Discord.
- You&aposll be part of one of our 7 product teams—the team that works on Apify’s open-source tools.
- The team is led by Martin Adamek, co-author of Apify’s Crawlee and his very own MikroORM library.
- You&aposll face many challenges regarding the usage of browsers in the cloud, browser fingerprinting, scalability, and more.
- But you&aposll also be in direct touch with the community that uses the tools you build.
They say there are no perfect candidates, but you might be the one if you have:
- Experience with working on large, complex applications or frameworks
- Great skills at developing and debugging in JavaScript/Node.js/TypeScript or have this skill in some other programming language and are able to learn it quickly
- Familiarity with Linux
- Experience in open-source development is a plus
- Experiment-driven and collaborative mindset
- Good communication skills in English
Ataccama
We&aposre on a mission to power a better future with data. Our platform helps all kinds of data professionals build high-quality, governed, reusable data products—earning us a spot as a Leader in the Gartner Magic Quadrant® and the backing of Bain Capital Tech Opportunities.
We&aposre aiming to lead in AI-powered cloud data management—and that means building a company where people love to work and grow. Our global team thrives on collaboration and lives by our values: Challenging Fun, ONE Team, Customer Centric, Candid and Caring, Aim High.
Join us as a Python Engineer and help transform Ataccama into a smarter, faster, more scalable SaaS platform.
Senior Python Senior Python Software Engineer
- Advanced proficiency in modern Python.
- Strong experience with cloud platforms like AWS and/or Azure, including familiarity with their common managed services (e.g., Aurora Serverless, managed AKS, EKS).
- In-depth knowledge of Kubernetes, including Helm charts and container management.
- Extensive understanding of relation database systems and familiarity with message queues
- Experience with CI/CD tools, especially GitLab, to streamline and automate the deployment and management of our applications across various stages of the development lifecycle.
- An interest in AI and large language models will be considered an advantage.
Visit here for more information
Snowflake
Amsterdam
Requirements
- Sales engineering/solution architect experience in a SaaS environment or relevant industry experience (analytics, data science, data engineering etc)
- Outstanding presentation skills to both technical and executive audiences, whether impromptu on a whiteboard or using presentations and demos
- Understanding of and experience with data architecture, data analytics and cloud technology
- Hands on experience with SQL
- Ability to solve customer specific business problems and apply Snowflake’s solutions
- Customer-facing skills to effectively communicate our vision to a wide variety of technical and executive audiences both written and verbal
Preferred job requirements
- Hands on experience with Python
- Experience working with modern data technology (e.g. dbt, spark, containers, devops tooling, orchestration tools, git, etc.)
- Experience with data science and machine learning technology
Real Python
Exploring Protocols in Python
In Python, a protocol specifies the methods and attributes that a class must implement to be considered of a given type. Protocols are important in Python’s type hint system, which allows for static type checking through external tools, such as mypy, Pyright, and Pyre.
Before there were protocols, these tools could only check for nominal subtyping based on inheritance. There was no way to check for structural subtyping, which relies on the internal structure of classes. This limitation affected Python’s duck typing system, which allows you to use objects without considering their nominal types. Protocols overcome this limitation, making static duck typing possible.
In this video course, you’ll:
- Gain clarity around the use of the term protocol in Python
- Learn how type hints facilitate static type checking
- Learn how protocols allow static duck typing
- Create custom protocols with the
Protocolclass - Understand the differences between protocols and abstract base classes
[ Improve Your Python With 🐍 Python Tricks 💌 – Get a short & sweet Python Trick delivered to your inbox every couple of days. >> Click here to learn more and see examples ]
Python Insider
Python 3.14.0 beta 4 is here!
It’s the final 3.14 beta!
https://www.python.org/downloads/release/python-3140b4/
This is a beta preview of Python 3.14
Python 3.14 is still in development. This release, 3.14.0b4, is the last of four planned beta releases.
Beta release previews are intended to give the wider community the opportunity to test new features and bug fixes and to prepare their projects to support the new feature release.
We strongly encourage maintainers of third-party Python projects to test with 3.14 during the beta phase and report issues found to the Python bug tracker as soon as possible. While the release is planned to be feature-complete entering the beta phase, it is possible that features may be modified or, in rare cases, deleted up until the start of the release candidate phase (Tuesday 2025-07-22). Our goal is to have no ABI changes after beta 4 and as few code changes as possible after the first release candidate. To achieve that, it will be extremely important to get as much exposure for 3.14 as possible during the beta phase.
This includes creating pre-release wheels for 3.14, as it helps other projects to do their own testing. However, we recommend that your regular production releases wait until 3.14.0rc1, to avoid the risk of ABI breaks.
Please keep in mind that this is a preview release and its use is not recommended for production environments.
Major new features of the 3.14 series, compared to 3.13
Some of the major new features and changes in Python 3.14 are:
New features
Note that PEPs 734 and 779 are exceptionally new in beta 3!
- PEP 779: Free-threaded Python is officially supported
- PEP 649: The evaluation of type annotations is now deferred, improving the semantics of using annotations.
- PEP 750: Template string literals (t-strings) for custom string processing, using the familiar syntax of f-strings.
- PEP 734: Multiple interpreters in the stdlib.
- PEP
784: A new module
compression.zstdproviding support for the Zstandard compression algorithm. - PEP
758:
exceptandexcept*expressions may now omit the brackets. - Syntax highlighting in PyREPL, and support for color in unittest, argparse, json and calendar CLIs.
- PEP 768: A zero-overhead external debugger interface for CPython.
- UUID
versions 6-8 are now supported by the
uuidmodule, and generation of versions 3-5 and 8 are up to 40% faster. - PEP
765: Disallow
return/break/continuethat exit afinallyblock. - PEP 741: An improved C API for configuring Python.
- A new type of interpreter. For certain newer compilers, this interpreter provides significantly better performance. Opt-in for now, requires building from source.
- Improved error messages.
- Builtin implementation of HMAC with formally verified code from the HACL* project.
- A new command-line interface to inspect running Python processes using asynchronous tasks.
- The pdb module now supports remote attaching to a running Python process.
(Hey, fellow core developer, if a feature you find important is missing from this list, let Hugo know.)
For more details on the changes to Python 3.14, see What’s new in Python 3.14. The next pre-release of Python 3.14 will be the first release candidate, 3.14.0rc1, scheduled for 2025-07-22.
Build changes
- PEP 761: Python 3.14 and onwards no longer provides PGP signatures for release artifacts. Instead, Sigstore is recommended for verifiers.
- Official macOS and Windows release binaries include an experimental JIT compiler.
Incompatible changes, removals and new deprecations
- Incompatible changes
- Python removals and deprecations
- C API removals and deprecations
- Overview of all pending deprecations
Python install manager
The installer we offer for Windows is being replaced by our new install manager, which can be installed from the Windows Store or from its download page. See our documentation for more information. The JSON file available for download below contains the list of all the installable packages available as part of this release, including file URLs and hashes, but is not required to install the latest release. The traditional installer will remain available throughout the 3.14 and 3.15 releases.
More resources
- Online documentation
- PEP 745, 3.14 Release Schedule
- Report bugs at github.com/python/cpython/issues
- Help fund Python and its community
And now for something completely different
All this talk of π and yet some say π is wrong. Tau Day (June 28th, 6/28 in the US) celebrates τ as the “true circle constant”, as the ratio of a circle’s circumference to its radius, C/r = 6.283185… The Tau Manifesto declares π “a confusing and unnatural choice for the circle constant”, in part because “2π occurs with astonishing frequency throughout mathematics”.
If you wish to embrace τ the good news is PEP 628 added math.tau
to Python 3.6 in 2016:
When working with radians, it is trivial to convert any given fraction of a circle to a value in radians in terms of
tau. A quarter circle istau/4, a half circle istau/2, seven 25ths is7*tau/25, etc. In contrast with the equivalent expressions in terms ofpi(pi/2,pi,14*pi/25), the unnecessary and needlessly confusing multiplication by two is gone.
Enjoy the new release
Thanks to all of the many volunteers who help make Python Development and these releases possible! Please consider supporting our efforts by volunteering yourself or through organisation contributions to the Python Software Foundation.
Regards from a cloudy Helsinki, looking forward to Prague and EuroPython next week,
Your release team,
Hugo van Kemenade
Ned Deily
Steve
Dower
Łukasz Langa
Python Software Foundation
Notice of Python Software Foundation Bylaws Change - Effective July 23, 2025
This post serves as notice that the Board of the Python Software Foundation has resolved to amend the Bylaws, effective July 23, 2025, to remove a condition of the Bylaws that would prevent the Foundation from complying with data privacy laws including those in effect in the European Union, the United Kingdom, and the State of California.
Section 3.8 of the Bylaws grants Voting Members the right to request the list of Voting Members’ names and email addresses. As written, this data must be given unconditionally, which would violate the previously mentioned laws. The amendment we are making grants the Foundation the ability to place conditions upon the use of that list in a way that allows us to comply with data privacy laws.
The full change can be found at https://github.com/psf/bylaws/pull/7/files
The Board determined that this change was time-sensitive and chose to amend the Bylaws without prior consultation with Voting Members. We greatly value the input of our membership in the governance of the Foundation. Therefore, we have opted to make only the most minimal change that will enable the Foundation to comply with data privacy laws and protect our members, while preserving the spirit of the text that the membership agreed to when adopting these Bylaws.
A future Bylaws update will be offered to the membership at a future election. As we are less than 3 months from the 2025 Board election, we are targeting the 2026 Board election to allow the membership to discuss further amendments for the membership to vote upon.
Thanks,
The Python Software Foundation Board
The Python Coding Stack
Python Backstage • Disassembling Python Code Using the `dis` Module
You're at the theatre. You're watching an impeccably produced play, and you're stunned at some of the visual effects. "How do they do that?", you're wondering.
But you're lucky to have a VIP pass, and you'll be touring backstage after the play to see what happens behind the scenes. The magic will be revealed.
What if you could go backstage at Python Theatre, too? What if you could see what happens behind the scenes when you run a Python program?
Well, you can.
Caveat: There are many levels of "behind the scenes" Python, ranging from understanding special methods and their connection to every Python operation to understanding the quirks of how functions, classes, data structures, and other operations work. But in this post, I'm going a bit further behind the scenes.
This post is relevant to CPython, the main Python implementation and almost certainly the one you're using, whether you know it or not.
I briefly pondered whether this article should be 3,000 or 30,000 words long. You'll be pleased to know that I opted for the shorter option!
Let's Go Backstage
Let's start with this short Python program:

I'm sure you don't need me to explain this code. By the way, I’m showing line numbers in the code snippets in today’s post as these will be relevant later on.
But what happens when you run this script? The Python interpreter converts this code into an intermediate form called bytecode. This is a lower level of instructions, and it's what's executed to produce the desired output.
And you can peek at what this bytecode looks like using the dis module. This module allows you to disassemble this intermediate bytecode stage:
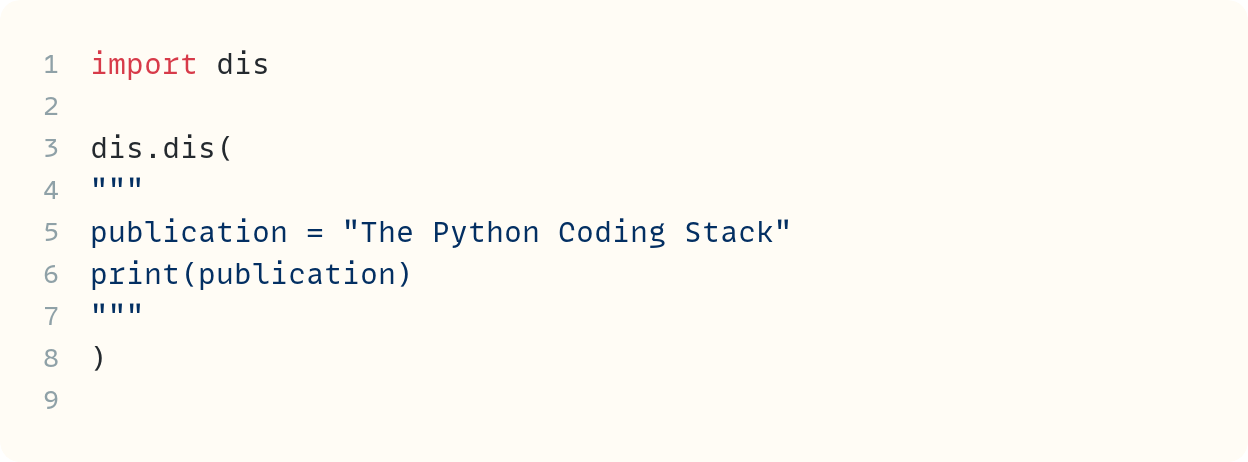
You call the dis() function from the dis module and pass a string with the same code you had in the earlier program. Note that the indentation of the argument to dis, which is on multiple lines, is not the preferred format. This is needed because indentation matters in triple-quoted strings, and the triple-quoted string contains Python code, where indentation matters!
Here's the output from this code:
0 RESUME 0
2 LOAD_CONST 0 ('The Python Coding Stack')
STORE_NAME 0 (publication)
3 LOAD_NAME 1 (print)
PUSH_NULL
LOAD_NAME 0 (publication)
CALL 1
POP_TOP
RETURN_CONST 1 (None)"Gobbledegook. This is not Python", I can hear you shout at your screen. Let's explore what's happening here, without going too much down the rabbit hole. By the way, I'm using Python 3.13 in this article. Some instructions have changed in recent Python versions, so your output may be different if you're using older Python versions.
The output from dis.dis() is grouped into three segments separated by a blank line. This means there are three distinct sets of instructions in your program.
The first is the one we'll ignore for now. RESUME initialises the execution context for the code object. It’s used in all sorts of code, including simple scripts, but plays a more significant role in generators or async functions, where execution may pause and resume. In this case, "resume" means start from the beginning!
The second group contains two instructions:
LOAD_CONSTloads a constant to the top of the stack. The stack is the memory area used to store and manage data during code execution. The constant in this case is the string"The Python Coding Stack". This constant is the first one defined in this program, which is why there's a0afterLOAD_CONSTand before('The Python Coding Stack)in the displayed output. Index0refers to the first item.STORE_NAMEtakes whatever is at the top of the stack, which is the string"The Python Coding Stack"that was placed there by the previous instruction, and stores it in the first name defined in the program. That's the identifier (name)publication. The0next to it shows it's the first name used in this program.
Python names are also called identifiers. I'll use these terms interchangeably in this post.
This first block, which consists of two instructions, refers to the first line in this program:

Python performs two steps when executing this line.
The third group of instructions contains more steps:
LOAD_NAMEis similar to theLOAD_CONSTinstruction you saw earlier, but instead of a constant, it loads a name (identifier). It's now the turn of the nameprint. This is placed at the top of the stack. Note that there's a1betweenLOAD_NAMEand(print)sinceprintis the second identifier used in the program (index=1). The first one ispublicationused in the previous line of the program.PUSH_NULLis one you can safely ignore for now. It places a null value on the stack. It's a relatively new addition used to tidy up the stack. It provides consistency with other operations, such as instance method calls, which requireselfas the first argument.LOAD_NAMEagain. This time, the interpreter is loading the first identifier used in the code,publication, and places it on the stack. Recall that this refers to the string"The Python Coding Stack"following the first line of code.CALL, you guessed it, calls the function that's on the stack with one argument—that's the number1next toCALL. The argument is also on the stack following the previous instruction.POP_TOPis another instruction you can ignore. The previous step calledprint(), which returnsNone. Since thisNonevalue made it onto the top of the stack,POP_TOPremoves it since it's not required.RETURN_CONSTshows that this is the end of your script, which Python treats as a code object. It returnsNoneto the Python interpreter running this script. This is the second constant used in this program, hence the1shown. The first constant is the string"The Python Coding Stack".
Those are plenty of steps for a two-line program!
There's one bit of the output from dis.dis() I haven't mentioned yet. This is the number in the first column shown at the start of each block of instructions.
Let's ignore the 0 ahead of RESUME. The 2 displayed before the first block of two instructions refers to the line number within the code. The code in this case is whatever is included in the triple-quoted string you pass to dis.dis(). But why isn't it 1 since publication = "The Python Coding Stack" is the first line of your mini two-line program?
Because it isn't the first line. The triple-quoted string starts right after the first """. But what's there right after the """? Here's your answer:

There's a newline character, \n, right after the triple-quoted string. So, what appears as the first line is actually the second. The first line is blank. There's also a blank fourth line!
In my code, I wrote the following:

I did this only to make the code more readable by placing the triple quotes on separate lines. You can remove the first and last blank lines in your mini-program if you prefer:

Rerun this script with this change and you'll see the line numbers listed as 1 and 2 since the code block in the triple-quoted string now only has two lines—there are no blank lines.
Disassembling Functions
Let's place your two-line program in a function:
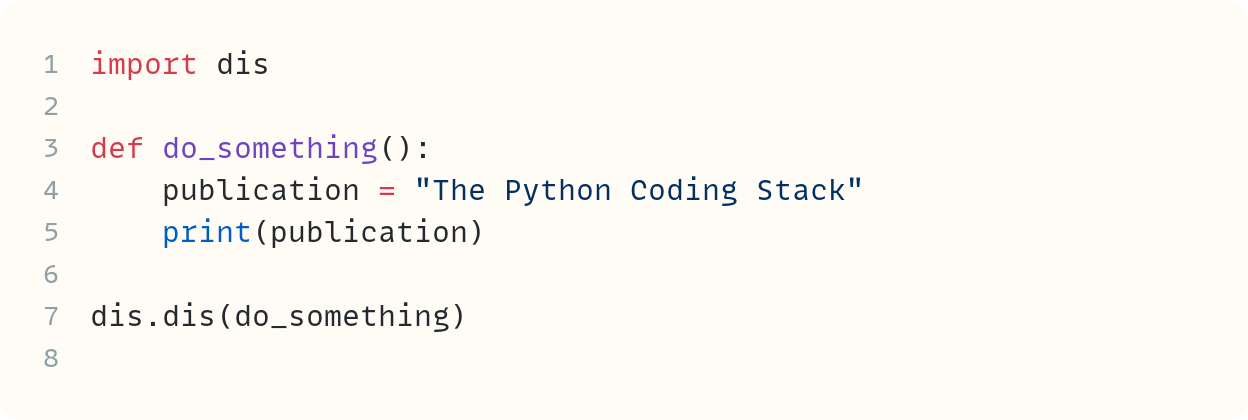
Note that this time, you pass the function name directly to dis.dis() and not a string with the code. This disassembles the function:
3 RESUME 0
4 LOAD_CONST 1 ('The Python Coding Stack')
STORE_FAST 0 (publication)
5 LOAD_GLOBAL 1 (print + NULL)
LOAD_FAST 0 (publication)
CALL 1
POP_TOP
RETURN_CONST 0 (None)Let's look at the differences from the example presented earlier in this post.
The line numbers now refer to the lines within the whole script. So, the first line is line 3, which is the line that includes def do_something(). And the two blocks of instructions now refer to lines 4 and 5 within the script.
The second block of instructions (if you count RESUME as the first block) is nearly identical to the earlier one. The interpreter loads the constant "The Python Coding Stack" and places it at the top of the stack, and then it stores it in publication. But there are two differences:
The first difference is not really important, but here it is anyway. The two constants in the code are still the string
"The Python Coding Stack"andNone, but the compiler stores them in a different order, so the string is the second constant, the one with index1.The instruction to store the value by linking it to an identifier is now
STORE_FASTrather thanSTORE_NAME. The identifierpublicationis a local variable within the function, so the interpreter has a more efficient process to store the data.
How about the final block, the one that refers to the final line of code in the function?
In the previous example, when you ran the two-line program as a script, the first two instructions in the final block were
LOAD_NAME 1 (print)andPUSH_NULL. Now, these are replaced byLOAD_GLOBAL 1 (print + NULL). The nameprintis a global variable, so theLOAD_GLOBALinstruction deals with this specific case. It also pushes a null value on the stack so that there's no need for an explicitPUSH_NULL. But you can ignore this null value.The second instruction is
LOAD_FASTrather thanLOAD_NAME. Once again,LOAD_FASTdeals with loading a local variable, which is more efficient than loading a global variable.
The rest is the same as in the previous example, except that None is now the first constant (index=0) rather than the second one.
Some Optimisation You'll (Nearly) Never Need To Do
Let's look at this code now:

The function do_something() finds the maximum value within the list numbers 100,000 times. This is, of course, a waste of time since the answer will remain the same value, 8, but bear with me…
Here's the human-readable representation of the bytecode that's output by dis.dis():
5 RESUME 0
6 LOAD_GLOBAL 1 (range + NULL)
LOAD_CONST 1 (100000)
CALL 1
GET_ITER
L1: FOR_ITER 18 (to L2)
STORE_FAST 0 (_)
7 LOAD_GLOBAL 3 (max + NULL)
LOAD_GLOBAL 4 (numbers)
CALL 1
POP_TOP
JUMP_BACKWARD 20 (to L1)
6 L2: END_FOR
POP_TOP
RETURN_CONST 0 (None)We'll proceed more quickly now that you're familiar with some of these terms. Ignore RESUME and let's focus on the first line of code within the function, which is on line 6. This is the for statement:
LOAD_GLOBALloads the global namerange(and also pushes a null value on the stack, which you don't care about much).LOAD_CONSTloads the constant integer100000, which is the argument you pass torange()in theforloop statement.CALLshows it's now time to callrange()with one argument.GET_ITERrepresents the start of the iteration process. Python creates an iterator from the iterable used in theforstatement. In this case, it creates arange_iteratorobject from the iterable objectrange. You can read more about iterables, iterators, the iterator protocol, and.__iter__()in these posts:FOR_ITERtries to fetch the next item from the iterator that's just been placed on the stack in the previous step. TheL1shown next toFOR_ITERis a label used to show different parts of theforloop. There are two options for what happens next:If the iterator returns a value, then the interpreter moves on to the next instruction,
STORE_FAST, which you'll get to soon in this bulleted list.If the iterator is exhausted and raises a
StopIterationexception (see links above to find out more about iteration), then it jumps forward to the labelL2. This refers to the instructions needed to end theforloop. The18next toFOR_ITERrefers to the number of bytes to jump forward within the bytecode. Typically, each instruction is two bytes, but some need more bytes. So don't worry too much about this number. The human-readable output shows you the correct point using the labelL2.
STORE_FASTstores the value yielded by the iterator to a local variable. Recall that the_FASTsubscript refers to local variables within functions. In this case, this is stored in the local variable_.
The body of this for loop includes just one line, which is line 7 in the script. Let's speed through this by combining some instructions into the same bullet point:
LOAD_GLOBAL(x2): First, there are two global variables to load,maxandnumbers. The identifiermaxis in the built-in scope, whereasnumbersis in the global scope, butLOAD_GLOBALis used for both. To read more about scopes, you can see Let's Eliminate General Bewilderment • Python's LEGB Rule, Scope, and Namespaces.CALLandPOP_TOP: You've seen these already. These instructions call the functionmax()with one argument—note the1next toCALL—and thenPOP_TOPclears the value returned bymax()since you're not doing anything with the return value in the code. If you try to assign the return value to a variable, you'll see thatPOP_TOPis not needed since the value is stored in a local variable. Try it out to see…JUMP_BACKWARD: It's the end of this iteration, so it's time to jump back to the instruction labelledL1, which is the start of the loop. This is 20 bytes back, if you care to know! The instruction at the point labelledL1isFOR_ITER, which attempts to get the next value from the iterator.
And when FOR_ITER cannot fetch any more values from the iterator, as you may recall from bullet point 5 above, it jumps to the instruction labelled L2. Note that this also refers to line 6 in the code:
END_FOR: Do you need me to explain this? This is the instruction that actually gets rid of the exhausted iterator object from the stack.POP_TOP: This is used for consistency and to tidy up the stack. You can safely ignore it!RETURN_CONST: This is the end of the code object, which in this case is the function definition. So, it returnsNoneto the Python interpreter.
Do you want to join a forum to discuss Python further with other Pythonistas? Upgrade to a paid subscription here on The Python Coding Stack to get exclusive access to The Python Coding Place's members' forum. More Python. More discussions. More fun.
And you'll also be supporting this publication. I put plenty of time and effort into crafting each article. Your support will help me keep this content coming regularly and, importantly, will help keep it free for everyone.
And now, for the (possibly useless) optimisation
There are three LOAD_GLOBAL instructions in the bytecode for this function. But you’ve come across the LOAD_FAST instruction earlier in this article, which, as the name implies, is faster. Can we replace some or all of the LOAD_GLOBAL instructions with LOAD_FAST?
Let's start by timing this code first. The changes are highlighted in green:

The timeit.repeat() call calls the function do_something() 1,000 times and repeats this process five times by default. Therefore, timings is a list showing five times, each one showing how long it took to call do_something() 1,000 times. You can then take an average of these five readings:
[6.457241459000215,
 6.45811324999886,
 6.480874916000175,
 6.472584875002212,
 6.502984124999784]
Average time: 6.47435972500025 seconds
The average time to call do_something() 1,000 times is 6.47 seconds. Of course, your mileage may vary depending on your computer and what else is running in the background.
Now, you can replace the global list numbers with a local list. The easiest way to do this is to include a parameter in the function definition and then pass the list as an argument when you call the function:

First, let's see the output from dis.dis():
6 RESUME 0
7 LOAD_GLOBAL 1 (range + NULL)
LOAD_CONST 1 (100000)
CALL 1
GET_ITER
L1: FOR_ITER 14 (to L2)
STORE_FAST 1 (_)
8 LOAD_GLOBAL 3 (max + NULL)
LOAD_FAST 0 (data)
CALL 1
POP_TOP
JUMP_BACKWARD 16 (to L1)
7 L2: END_FOR
POP_TOP
RETURN_CONST 0 (None)Ignoring RESUME, the first block of instructions is almost identical. The line number is different—it's now line 7, since an additional import in this script has pushed everything down by a line. The number of bytes in FOR_ITER is also different, but let's ignore this.
In the second main block, linked to line 8 of the code, there's one important change. The second instruction is now LOAD_FAST instead of LOAD_GLOBAL. This loads data, which is now a local variable since data is the variable created when you pass the global list numbers as an argument assigned to the parameter data.
And here's the output from the call to timeit.repeat():
[6.2737918330021785,
 6.286419416999706,
 6.250972666999587,
 6.234414000002289,
 6.241118416997779]
Average time: 6.257343266800308 seconds
The average time is down to about 6.26 seconds from the previous 6.47 seconds. It's not a huge difference, but it shows how accessing local variables using LOAD_FAST is more efficient than accessing global variables using LOAD_GLOBAL.
But there are two more LOAD_GLOBAL instructions in the bytecode. But, I hear you say, these are references to the built-in names range and max. How can you bypass this limitation?
Let's start with max. Have a look at this code:

You define a local variable max_ and make it equal to the built-in max. This way, each time you need to refer to max_ when you call it in the for loop, you use a local variable instead of a global one:
6 RESUME 0
7 LOAD_GLOBAL 0 (max)
STORE_FAST 1 (max_)
8 LOAD_GLOBAL 3 (range + NULL)
LOAD_CONST 1 (100000)
CALL 1
GET_ITER
L1: FOR_ITER 11 (to L2)
STORE_FAST 2 (_)
9 LOAD_FAST 1 (max_)
PUSH_NULL
LOAD_FAST 0 (data)
CALL 1
POP_TOP
JUMP_BACKWARD 13 (to L1)
8 L2: END_FOR
POP_TOP
RETURN_CONST 0 (None)Note how in the block of instructions linked to line 9, you no longer have any LOAD_GLOBAL. Both instructions that need to load data are now LOAD_FAST, since both max_ and data are local variables.
However, you now have an additional block, the one linked to line 7 in your code (max_ = max), which is not included in the original code. Here, you still need to use LOAD_GLOBAL and also have an additional STORE_FAST to store the max function object in the local variable max_. But you only need to do this once!
What about the time it takes? Drum roll…
[6.103223165999225,
 6.050973375000467,
 6.056473458000255,
 6.06607754200013,
 6.083692415999394]
Average time: 6.072087991399894 seconds
The average time is now 6.07 seconds, down from 6.25 seconds when you used the global max() within the for loop. Even though you still have LOAD_GLOBAL linked to line 7 and the additional overhead of storing this to max_, each iteration of the for loop is a bit quicker since you can now use LOAD_FAST each time you call max_().
The difference in performance is not huge, but it was even more noticeable in older versions of Python.
Can you use the same trick with range? Yes, you can, but you won't gain any speed advantage. Can you see why?
Whereas your code needs to use LOAD_FAST in each iteration of the for loop when referring to max_ and data, it only uses LOAD_GLOBAL once to refer to range. Therefore, it doesn't make sense to replace range with a local variable equivalent. You still need to use LOAD_GLOBAL once to load the built-in range, but then you waste time reassigning it to a local variable. So let's not do this! You can try it out if you wish.
[I've been writing this article for a while, on and off, and as I was writing, my friend and fellow author wrote a somewhat related article that dives even deeper into this topic. This last comparison was inspired by his article: Why This Python Performance Trick Doesn’t Matter Anymore]
Final Words
There's so much more we could explore by disassembling code. But I promised a short-ish article, so I'll stop here. Perhaps I'll post about this again in the future.
Disassembling code using dis.dis() is helpful in understanding Python better and writing more efficient code. In some cases, you can look for ways to optimise your code by looking at the bytecode. In some other use cases, you may have a stubborn bug you can't expose, and the bytecode may give you a different perspective.
If you want to explore a bit further on your own, you can start with the dis module's documentation code at dis — Disassembler for Python bytecode, and specifically at the list of possible instructions further down the page: https://docs.python.org/3/library/dis.html#dis.Instruction.
Your VIP pass allowed you to take a brief tour of the Python Theatre's backstage area. But here's some advice. Don't spend too long there on any single visit. It's dark, and there are plenty of obstacles backstage. You may never find your way out again!

Photo by Dawn Lio: https://www.pexels.com/photo/stage-with-lightings-2177813/
Code in this article uses Python 3.13
The code images used in this article are created using Snappify. [Affiliate link]
You can also support this publication by making a one-off contribution of any amount you wish.
For more Python resources, you can also visit Real Python—you may even stumble on one of my own articles or courses there!
Also, are you interested in technical writing? You’d like to make your own writing more narrative, more engaging, more memorable? Have a look at Breaking the Rules.
And you can find out more about me at stephengruppetta.com
Further reading related to this article’s topic:
Iterable: Python's Stepping Stones (Data Structure Categories #1)
A One-Way Stream of Data • Iterators in Python (Data Structure Categories #6)
Let's Eliminate General Bewilderment • Python's LEGB Rule, Scope, and Namespaces
Appendix: Code Blocks
Code Block #1
publication = "The Python Coding Stack"
print(publication)
Code Block #2
import dis

dis.dis(
"""
publication = "The Python Coding Stack"
print(publication)
"""
)
Code Block #3
publication = "The Python Coding Stack"
Code Block #4
"""
"first line?"
"second line?"
"""
# '\n"first line?"\n"second line?"\n'
Code Block #5
import dis

dis.dis(
"""
publication = "The Python Coding Stack"
print(publication)
"""
)
Code Block #6
import dis

dis.dis(
"""publication = "The Python Coding Stack"
print(publication)"""
)
Code Block #7
import dis

def do_something():
    publication = "The Python Coding Stack"
    print(publication)

dis.dis(do_something)
Code Block #8
import dis

numbers = [2, 4, 6, 8]

def do_something():
    for _ in range(100_000):
        max(numbers)

dis.dis(do_something)
Code Block #9
import dis
import timeit

numbers = [2, 4, 6, 8]

def do_something():
    for _ in range(100_000):
        max(numbers)

dis.dis(do_something)

timings = timeit.repeat(
    "do_something()",
    number=1_000,
    globals=globals(),
)

print(timings)
print(f"Average time: {sum(timings) / len(timings)} seconds")
Code Block #10
import dis
import timeit

numbers = [2, 4, 6, 8]

def do_something(data):
    for _ in range(100_000):
        max(data)

dis.dis(do_something)

timings = timeit.repeat(
    "do_something(numbers)",
    number=1_000,
    globals=globals(),
)

print(timings)
print(f"Average time: {sum(timings) / len(timings)} seconds")
Code Block #11
# ...

def do_something(data):
    max_ = max
    for _ in range(100_000):
        max_(data)

# ...
For more Python resources, you can also visit Real Python—you may even stumble on one of my own articles or courses there!
Also, are you interested in technical writing? You’d like to make your own writing more narrative, more engaging, more memorable? Have a look at Breaking the Rules.
And you can find out more about me at stephengruppetta.com
Seth Michael Larson
Setting Discord status from physical GameCube console

Have you ever seen one of your friends playing a game or listening to music in their Discord “status”? That feature is called “Rich Presence”.
What if you want to show your Discord friends that you're playing your GameCube? and I don't mean an emulator like Dolphin, I'm talking about a physical console from 2001.
We can do just that with a simple Python script and a Memcard Pro GC. The Memcard Pro GC is an internet-connected GameCube Memory Card virtualizer. The Memcard Pro GC automatically switches to a virtual Memory Card (VMC) for specific games when launched with a “Game ID”-aware launcher like Swiss or the FlippyDrive.
We can use this automatic VMC switching feature to “detect” when a game is being played on a physical GameCube and update Discord with a new Rich Presence.
Configuring the Memcard Pro GC
You can buy a Black or White Memcard Pro GC from 8BitMods for ~$45 USD plus shipping. They are oftentimes sold out, so you may need to be patient for a re-stock.
There is a documented first-time setup page. If you're on
Ubuntu or Linux like me, you can use mkfs to format the microSD filesystem to exFAT:
# Find your microSD card. Make sure it's the right size
# and device so you don't accidentally overwrite your
# storage drive(s) / boot drive. You want the /dev directory
sudo fdisk -l

# Might need to fiddle with microSD card, un-and-remount,
# make sure it's not in read-only mode on the adapter.
sudo apt-get install exfat-fuse
sudo mkfs.exfat -n memcardprogc </dev/...>
You should see something like this when you're done:
Writing volume boot record: done
Writing backup volume boot record: done
Fat table creation: done
Allocation bitmap creation: done
Upcase table creation: done
Writing root directory entry: done
Synchronizing...
exFAT format complete!
After that put all the files on the new filesystem and plug the card into a GameCube or Wii, power the console on, and let the device install the firmware.
NOTE: When I set up the Memcard Pro GC I wasn't able to get the latest firmware at the time (v2.0.4) to work without the device endlessly boot-looping. I tried downgrading to an earlier version of the firmware (v2.0.0) and the device worked flawlessly. Maybe I'll try again if the firmware is updated again and see what happens.
Once the device is online do the setup for connecting the device to WiFi. From here you can access the “Settings” page on your phone or computer.
For automatic detection to work as expected we need to create a default
memory card that isn't associated with a Game ID (I used MemoryCard1) and to disable
the “Load Last Card when MemCard Boots” feature. Now on boot-up the Memcard Pro GC will
use the MemoryCard1
instead of whatever your last played game was by default.
Now we can create VMCs for every game which the Memcard Pro GC will automatically do when we launch a new game through our Game ID launcher. This can be done quickly in CubeBoot on the FlippyDrive by selecting games in your library one-by-one but not launching into the game completely. This is enough to trigger the Memcard Pro GC to load the VMC for a given Game ID.
NOTE: If you plan to do anything with the FTP server with the Memcard Pro GC you need to configure a username and password, enable the server, and crucially completely power off and power on the console for the FTP server to start on boot. I lost around 30 minutes trying to get FTP to work to this oversight.
Downloading assets
So we'll need two different assets from the GameTDB. First we'll need a list of valid Game IDs so our program can distinguish between a VMC not associated with an actual game and the cover artwork for the games we own.
Download the wiidb.txt database in your preferred language (I am using English)
and “Covers” for each region of games that your collection contains.
I own games from the USA (NSTC) and Japan (NSTC-J) regions, so I downloaded those
covers for those regions.
The covers from GameTDB are 160x224 pixels which is below the minimums that Discord requires for Art Assets (512x512) so we can scale them up with ImageMagick after we've unzipped the images into a directory.
First we need to isolate only the cover artworks for games in our library.
For this we can query the VMCs on our Memcard Pro GC after we've setup
VMCs for each game. Replace the IP address (192.168.0.43) with the one used for your own Memcard Pro GC:
$ curl -X POST \
  --data '{"limit":100,"start":0}' \
  http://192.168.0.43/api/query | \
  pcregrep -o1 'gameID":\s*"([A-Z0-9]{6})'
Example list of Game IDs
GPVE01
GC6E01
G8MJ01
G4SE01
GAFE01
GEZE8P
GKYE01
GLME01
GM4E01
GP5E01
GP6E01
GP7E01
GFTE01
GMPE01
G8ME01
GPIE01
GSNE8P
GZLE01
GALE01
GMSE01
GS8E7D
GXSE8P
GSOE8P
G9SE8P
G2XE8P
PZLE01
GPVJ01
Save this list into a file and make sure there's a trailing newline. Now we can use the list we generated to
select and resize only the game cover artworks we plan to use.
Assuming we have a directory of the original images named covers/
and an empty directory named discord-icons/
sudo apt-get install imagemagick

cat gameids.txt | while read gameid
do
   convert covers/$gameid.png -scale 400% discord-icons/$gameid.png
done
We don't want ImageMagick to blur or interpolate the images, so we use -scale instead of -resize.
At this point you should have a directory full of upscaled images to use with your Discord application.
Creating the Discord Application
To use “Rich Presence” you need a Discord application.
There are plenty of tutorials on how to create one of these. I named
the application “GameCube” so the Discord status will say “Seth is playing GameCube”.
You'll need to upload all the newly resized game cover artwork images under the
Rich Presence > Art Assets section.
NOTE: Uploading tons of Art Assets to Discord applications is kinda annoying. Super aggressive rate-limiting, upload them in small batches and take your time. Duplicates aren't a huge issue so don't sweat it!
Copy your Discord application ID into the script below.
Querying the Memcard Pro GC
The Memcard Pro GC provides a simple JSON HTTP API
that can be queried for the current state of the VMC.
Requesting GET /api/currentState returns a JSON
body including the current Game ID and game name
for the VMC:
{
  "gameName": "Paper Mario: The Thousand-Year Door",
  "gameID": "G8ME0100",
  "currentChannel": 1,
  "rssi": -40
}
We can periodically call this API and then, using the
pypresence library, we can update our Discord Rich
Status. We need to have fairly lax timeouts and retries
to avoid unnecessarily setting and clearing the Rich
Status due to things like the memory card not responding
fast enough, the Memcard Pro GC is a fairly low powered device:
Full Python script source code
import urllib3
import pypresence
import time
import re
import pathlib

ROOT_DIR = pathlib.Path(__file__).absolute().parent
with (ROOT_DIR / "wiitdb.txt").open(mode="r") as f:
    GAME_ID_TO_NAMES = {
        gid: name
        for gid, name in re.findall(
            r"^([A-Z0-9]{6}) = (.+?)$",
            f.read(),
            re.DOTALL | re.MULTILINE,
        )
    }


class MemcardGCPresence:
    def __init__(
        self, memcardgc_host: str, discord_app_id: str
    ):
        self.host = memcardgc_host
        self.http = urllib3.HTTPConnectionPool(
            memcardgc_host
        )
        self.discord = pypresence.Presence(
            client_id=discord_app_id
        )
        self.discord.connect()
        self.active_game_id: str | None = None
        self.consecutive_errors = 0

    def poll_forever(self):
        try:
            while True:
                poll_start = time.time()
                self.poll_once()

                # Only set Discord status every 15 seconds.
                poll_duration = time.time() - poll_start
                time.sleep(max([0, 15 - poll_duration]))
        finally:
            self.reset()
            self.close()

    def poll_once(self) -> None:
        try:
            resp = self.http.request(
                "GET",
                "/api/currentState",
                timeout=3,
                redirect=False,
                retries=False,
            )
            if resp.status != 200:
                raise ValueError("Invalid HTTP status")
            data = resp.json()
            game_id_with_revision = data["gameID"]
            # We use the GameID without the revision
            # to determine the game cover artwork.
            game_id = game_id_with_revision[:6]
            game_name = data["gameName"]
        except (
            urllib3.exceptions.HTTPError,
            ValueError,
            KeyError,
        ):
            self.consecutive_errors += 1
            if (
                self.active_game_id
                and self.consecutive_errors > 3
            ):
                self.reset()
            return

        # Game ID isn't a known game. Might be the default
        # memory card or a ROM hack that we don't know about.
        if game_id not in GAME_ID_TO_NAMES:
            self.reset()
            return

        # New game, set Rich Presence.
        if game_id_with_revision != self.active_game_id:
            self.discord.update(
                activity_type=pypresence.ActivityType.PLAYING,
                state=game_name,
                start=int(time.time()),
                # Discord lowercases all filenames.
                large_image=game_id.lower(),
            )
            self.active_game_id = game_id_with_revision

    def reset(self) -> None:
        if self.active_game_id is not None:
            print(f"Stopped playing {self.active_game_id}")
        self.consecutive_errors = 0
        self.active_game_id = None
        self.discord.clear()

    def close(self) -> None:
        self.http.close()
        self.http = None
        try:
            self.discord.clear()
        except Exception:
            pass
        self.discord.close()
        self.discord = None


if __name__ == "__main__":
    memcardgc = MemcardGCPresence(
        # Default IP address for the Memcard Pro GC.
        # Update if necessary. Include your own
        # Discord App ID.
        memcardgc_host="192.168.0.43",
        discord_app_id="<Discord App ID>",
    )
    memcardgc.poll_forever()
The above script is open source under the MIT license.
So now when you're playing your GameCube at home you can run this script, and you should see your Discord status change to the game you are playing. Magic!
Let me know what games you still play on your GameCube! :)
July 07, 2025
Real Python
Free-Threaded Python Unleashed and Other Python News for July 2025
Last month was a watershed moment for Python. Python 3.14 beta 3, released mid-June, isn’t just another pre-release. It’s the first build in which the long-awaited free-threaded or “no-GIL” variant is officially supported. That’s right: a no-GIL Python is finally taking shape.
The interpreter isn’t the only thing making headlines, though.
Below you’ll find a curated tour of the latest Python developments, broken down by area so you can zero in on your favorite topic.
Join Now: Click here to join the Real Python Newsletter and you'll never miss another Python tutorial, course, or news update.
Core Python Development
CPython’s core improved in concurrency and stability last month. The third beta of Python 3.14 now officially supports the no-GIL build for CPython, signaling a new era of multi-core Python. That same release also brought multiple interpreters into the standard library, while earlier in June, the core team rolled out a coordinated batch of security patches across all maintained versions to keep your deployments safe.
Python 3.14 Beta 3 Lands Free-Threaded Support
On June 17, the release team pushed Python 3.14.0b3 to the mirrors. What sets this beta apart is the acceptance of PEP 779, which promotes the GIL-less build from experimental to supported. That single status change means binary wheels, continuous integration images, and even hosting platforms can start treating free-threaded Python as a first-class citizen.
Why is that a big deal? The Global Interpreter Lock (GIL) has long limited Python’s ability to use multiple CPU cores effectively. With a supported no-GIL build, data science and high-throughput web workloads can reach for true multithreading without resorting to subprocess orchestration.
While this is exciting, many caveats remain. Native extensions must be rebuilt, and performance trade-offs still exist. Still, the road to production looks increasingly well paved, and the Python community can start preparing for Phase III, which would make the free-threaded build the default.
Multiple Interpreters Join the Standard Library
Beta 3 also finalizes another language proposal with PEP 734 – Multiple Interpreters in the Stdlib. This PEP supersedes PEP 554 and adds Python subinterpreters to the standard library via the concurrent.interpreters module. This addition hoists the ability to run multiple interpreters from the C API up to the standard library, paving the way to making this approach to concurrency more popular in the Python ecosystem.
Together with earlier additions like t-string literals, Python 3.14 is shaping up to be a feature-packed release when it ships this October.
Coordinated Security Releases Ensure Safety
If you maintain anything on a Long-Term Support (LTS) Python version, then block off some time to upgrade. Earlier last month, the core team released fixes for multiple tarfile CVE identifiers and an ipaddress memory bug across all supported branches: 3.13.4, 3.12.11, 3.11.13, 3.10.18, and 3.9.23. If you think this might affect you, then read the full details on the Python Insider blog.
And—as it sometimes goes in life and software—just a week later, Python 3.13.5 shipped to fix regressions introduced by 3.13.4. These included, most notably, a Windows build failure for C extensions and unintended delays when raising TypeError exceptions in generators. If you’re on the 3.13 series, then you can upgrade directly to 3.13.5.
Library and Tooling Highlights
From data science to web development, Python’s ecosystem is keeping pace with the core language’s progress.
Read the full article at https://realpython.com/python-news-july-2025/ »
[ Improve Your Python With 🐍 Python Tricks 💌 – Get a short & sweet Python Trick delivered to your inbox every couple of days. >> Click here to learn more and see examples ]
Python Bytes
#439 That Astral Episode
<strong>Topics covered in this episode:</strong><br> <ul> <li><em>* <a href="https://docs.astral.sh/ty?featured_on=pythonbytes">ty documentation site and uv migration guide</a></em>*</li> <li><em>* <a href="https://pydevtools.com/blog/uv-build-backend/?featured_on=pythonbytes">uv build backend is now stable</a> + other Astral news</em>*</li> <li><em>* <a href="https://www.pythonmorsels.com/refactoring-boolean-expressions/?featured_on=pythonbytes">Refactoring long boolean expressions</a></em>*</li> <li><em>* <a href="https://github.com/eightBEC/fastapi-ml-skeleton?featured_on=pythonbytes">fastapi-ml-skeleton</a></em>*</li> <li><strong>Extras</strong></li> <li><strong>Joke</strong></li> </ul><a href='https://www.youtube.com/watch?v=fClLeYVRhvc' style='font-weight: bold;'data-umami-event="Livestream-Past" data-umami-event-episode="439">Watch on YouTube</a><br> <p><strong>About the show</strong></p> <p><strong>Sponsored by</strong> Sentry: <a href="http://pythonbytes.fm/sentry">pythonbytes.fm/sentry</a></p> <p><strong>Connect with the hosts</strong></p> <ul> <li>Michael: <a href="https://fosstodon.org/@mkennedy">@mkennedy@fosstodon.org</a> / <a href="https://bsky.app/profile/mkennedy.codes?featured_on=pythonbytes">@mkennedy.codes</a> (bsky)</li> <li>Brian: <a href="https://fosstodon.org/@brianokken">@brianokken@fosstodon.org</a> / <a href="https://bsky.app/profile/brianokken.bsky.social?featured_on=pythonbytes">@brianokken.bsky.social</a></li> <li>Show: <a href="https://fosstodon.org/@pythonbytes">@pythonbytes@fosstodon.org</a> / <a href="https://bsky.app/profile/pythonbytes.fm">@pythonbytes.fm</a> (bsky)</li> </ul> <p>Join us on YouTube at <a href="https://pythonbytes.fm/stream/live"><strong>pythonbytes.fm/live</strong></a> to be part of the audience. Usually <strong>Monday</strong> at 10am PT. Older video versions available there too.</p> <p>Finally, if you want an artisanal, hand-crafted digest of every week of the show notes in email form? Add your name and email to <a href="https://pythonbytes.fm/friends-of-the-show">our friends of the show list</a>, we'll never share it.</p> <p><strong>Michael #1: <a href="https://docs.astral.sh/ty?featured_on=pythonbytes">ty documentation site and uv migration guide</a></strong></p> <ul> <li>via Skyler Kasko</li> <li>Astral created <a href="https://docs.astral.sh/ty?featured_on=pythonbytes">a documentation site for ty</a> (PR <a href="https://github.com/astral-sh/ty/pull/744?featured_on=pythonbytes">#744</a> in release <a href="https://github.com/astral-sh/ty/releases/tag/0.0.1-alpha.13?featured_on=pythonbytes">0.0.1-alpha.13</a>).</li> <li>Astral added <a href="https://docs.astral.sh/uv/guides/migration/pip-to-project?featured_on=pythonbytes">a page on migrating from pip to a uv project</a> in the uv documentation. (PR <a href="https://github.com/astral-sh/uv/pull/12382?featured_on=pythonbytes">#12382</a> in release <a href="https://github.com/astral-sh/uv/releases/tag/0.7.19?featured_on=pythonbytes">0.7.19</a>).</li> <li><a href="https://talkpython.fm/episodes/show/506/ty-astrals-new-type-checker-formerly-red-knot?featured_on=pythonbytes">Talk Python episode on ty</a>.</li> </ul> <p><strong>Brian #2: <a href="https://pydevtools.com/blog/uv-build-backend/?featured_on=pythonbytes">uv build backend is now stable</a> + other Astral news</strong></p> <ul> <li><p><a href="https://pydevtools.com/blog/uv-build-backend/?featured_on=pythonbytes"><strong>The uv build backend is now stable</strong></a></p> <ul> <li>Tim Hopper via Python Developer Tooling Handbook</li> </ul></li> <li><p><a href="https://bsky.app/profile/crmarsh.com/post/3lszmqo27b224?featured_on=pythonbytes">From Charlie Marsh</a></p> <ul> <li>“The uv build backend is now stable, and considered ready for production use. An alternative to setuptools, hatchling, etc. for pure Python projects, with a focus on good defaults, user-friendly error messages, and performance. When used with uv, it's 10-35x faster.”</li> <li><p>“(In a future release, we'll make this the default.)”</p> <div class="codehilite"> <pre><span></span><code><span class="k">[build-system]</span> <span class="n">requires</span><span class="w"> </span><span class="o">=</span><span class="w"> </span><span class="p">[</span><span class="s2">"uv_build>=0.7.19,<0.8.0"</span><span class="p">]</span> <span class="n">build-backend</span><span class="w"> </span><span class="o">=</span><span class="w"> </span><span class="s2">"uv_build"</span> </code></pre> </div></li> <li><p>I believe it’s faster, but I agree with <a href="https://bsky.app/profile/snarky.ca/post/3lt3ozeg7jk27?featured_on=pythonbytes">Brett Canno</a>n in asking “What's being benchmarked? I'm not sure what a "backend sync" is referring to other than maybe installing the build back-end?”</p></li> </ul></li> <li><p>See also: <a href="https://www.youtube.com/watch?v=TiBIjouDGuI">uv: Making Python Local Workflows FAST and BORING in 2025</a> - Hynek</p></li> </ul> <p><strong>Brian #3: <a href="https://www.pythonmorsels.com/refactoring-boolean-expressions/?featured_on=pythonbytes">Refactoring long boolean expressions</a></strong></p> <ul> <li><p>Trey Hunner</p></li> <li><p>This is applied boolean logic, and even folks who learned this in a CS program probably did so early on, and may have forgotten it.</p></li> <li><p>How can you improve the readability of long Boolean expressions in Python?</p> <ul> <li><p>Put parens around the whole expression and separate clauses onto different lines</p></li> <li><p>Where to put boolean operators between clauses? at the end of the line or the beginning?</p> <ul> <li>PEP8 recommends the beginning <div class="codehilite"> <pre><span></span><code><span class="k">if</span> <span class="p">(</span><span class="n">expression1</span> <span class="ow">and</span> <span class="n">expression2</span> <span class="ow">and</span> <span class="n">expression3</span><span class="p">):</span> <span class="o">...</span> </code></pre> </div></li> </ul></li> <li><p>Naming sub-expressions with variables</p> <ul> <li>Odd downside that wouldn’t occur to me. All expressions are evaluated, thus not taking advantage of expression short-circuiting.</li> </ul></li> <li><p>Naming operations with functions</p> <ul> <li>Less readable, but takes advantage of short-circuiting</li> </ul></li> <li><p>Using De Morgan’s Law : replacing a compound expression with a similar (and hopefully easier to read) expression</p> <div class="codehilite"> <pre><span></span><code><span class="c1"># neither: we want both to be false</span> <span class="ow">not</span> <span class="p">(</span><span class="n">a</span> <span class="ow">or</span> <span class="n">b</span><span class="p">)</span> <span class="o">==</span> <span class="p">(</span><span class="ow">not</span> <span class="n">a</span><span class="p">)</span> <span class="ow">and</span> <span class="p">(</span><span class="ow">not</span> <span class="n">b</span><span class="p">)</span> <span class="c1"># never_both: at least one false</span> <span class="ow">not</span> <span class="p">(</span><span class="n">a</span> <span class="ow">and</span> <span class="n">b</span><span class="p">)</span> <span class="o">==</span> <span class="p">(</span><span class="ow">not</span> <span class="n">a</span><span class="p">)</span> <span class="ow">or</span> <span class="p">(</span><span class="ow">not</span> <span class="n">b</span><span class="p">)</span> </code></pre> </div></li> </ul></li> </ul> <p><strong>Michael #4: <a href="https://github.com/eightBEC/fastapi-ml-skeleton?featured_on=pythonbytes">fastapi-ml-skeleton</a></strong></p> <ul> <li>FastAPI Skeleton App to serve machine learning models production-ready.</li> <li>This repository contains a skeleton app which can be used to speed-up your next machine learning project.</li> <li>The code is fully tested and provides a preconfigured <code>tox</code> to quickly expand this sample code.</li> <li>A sample regression model for house price prediction is included in this project.</li> <li>Short write up on "<a href="https://blobs.pythonbytes.fm/what-does-set-a-do.html">What does set -a do?</a>"</li> </ul> <p><strong>Extras</strong></p> <p>Brian:</p> <ul> <li><a href="https://www.oregoncountryfair.org?featured_on=pythonbytes">OCF</a></li> </ul> <p>Michael:</p> <ul> <li><p>via Wei Lee</p></li> <li><p>Extra Airflow ruff rules:</p> <p>Starting from Ruff version 0.11.13, most changes from Airflow 2 to Airflow 3 can be automated using AIR3. (It’s still in preview so a “—-preview” flag is needed)</p> <p>e.g., if you have the following Airflow 2 code</p> <div class="codehilite"> <pre><span></span><code><span class="kn">import</span><span class="w"> </span><span class="nn">datetime</span> <span class="kn">from</span><span class="w"> </span><span class="nn">airflow.models</span><span class="w"> </span><span class="kn">import</span> <span class="n">DAG</span> <span class="kn">from</span><span class="w"> </span><span class="nn">airflow.operators.empty</span><span class="w"> </span><span class="kn">import</span> <span class="n">EmptyOperator</span> <span class="k">with</span> <span class="n">DAG</span><span class="p">(</span> <span class="n">dag_id</span><span class="o">=</span><span class="s2">"my_dag_name"</span><span class="p">,</span> <span class="n">start_date</span><span class="o">=</span><span class="n">datetime</span><span class="o">.</span><span class="n">datetime</span><span class="p">(</span><span class="mi">2021</span><span class="p">,</span> <span class="mi">1</span><span class="p">,</span> <span class="mi">1</span><span class="p">),</span> <span class="n">schedule_interval</span><span class="o">=</span><span class="s2">"@daily"</span><span class="p">,</span> <span class="p">):</span> <span class="n">EmptyOperator</span><span class="p">(</span><span class="n">task_id</span><span class="o">=</span><span class="s2">"task"</span><span class="p">)</span> </code></pre> </div> <p>it can be fixed with <code>uvx ruff check --select AIR3 --fix --unsafe-fixes --preview</code></p> <div class="codehilite"> <pre><span></span><code><span class="kn">import</span><span class="w"> </span><span class="nn">datetime</span> <span class="kn">from</span><span class="w"> </span><span class="nn">airflow.sdk</span><span class="w"> </span><span class="kn">import</span> <span class="n">DAG</span> <span class="kn">from</span><span class="w"> </span><span class="nn">airflow.providers.standard.operators.empty</span><span class="w"> </span><span class="kn">import</span> <span class="n">EmptyOperator</span> <span class="k">with</span> <span class="n">DAG</span><span class="p">(</span> <span class="n">dag_id</span><span class="o">=</span><span class="s2">"my_dag_name"</span><span class="p">,</span> <span class="n">start_date</span><span class="o">=</span><span class="n">datetime</span><span class="o">.</span><span class="n">datetime</span><span class="p">(</span><span class="mi">2021</span><span class="p">,</span> <span class="mi">1</span><span class="p">,</span> <span class="mi">1</span><span class="p">),</span> <span class="n">schedule</span><span class="o">=</span><span class="s2">"@daily"</span><span class="p">,</span> <span class="p">):</span> <span class="n">EmptyOperator</span><span class="p">(</span><span class="n">task_id</span><span class="o">=</span><span class="s2">"task"</span><span class="p">)</span> </code></pre> </div> <p>which works with Airflow 3.</p></li> </ul> <p><strong>Joke:</strong></p> <ul> <li><a href="https://social.chinwag.org/@mike/114800294387410694?featured_on=pythonbytes">Front Toward Enemy</a></li> </ul>
July 06, 2025
Anwesha Das
Creating Pull request with GitHub Action
---
name: Testing Gha
on:
  workflow_dispatch:
    inputs:
      GIT_BRANCH:
        description: The git branch to be worked on
        required: true

jobs:
  test-pr-creation:
    name: Creates test PR
    runs-on: ubuntu-latest
    permissions:
      pull-requests: write
      contents: write
    env:
      GIT_BRANCH: ${{ inputs.GIT_BRANCH }}
    steps:
      - uses: actions/checkout@v4
      - name: Updates README
        run: echo date >> README.md

      - name: Set up git
        run: |
          git switch --create "${GIT_BRANCH}"
          ACTOR_NAME="$(curl -s https://api.github.com/users/"${GITHUB_ACTOR}" | jq --raw-output &apos.name // .login&apos)"
          git config --global user.name "${ACTOR_NAME}"
          git config --global user.email "${GITHUB_ACTOR_ID}+${GITHUB_ACTOR}@users.noreply.github.com"

      - name: Add README
        run: git add README.md

      - name: Commit
        run: >-
          git diff-index --quiet HEAD ||
          git commit -m "test commit msg"
      - name: Push to the repo
        run: git push origin "${GIT_BRANCH}"

      - name: Create PR as draft
        env:
          GITHUB_TOKEN: ${{ github.token }}
        run: >-
          gh pr create
          --draft
          --base main
          --head "${GIT_BRANCH}"
          --title "test commit msg"
          --body "pr body"

      - name: Retrieve the existing PR URL
        id: existing-pr
        env:
          GITHUB_TOKEN: ${{ github.token }}
        run: >
          echo -n pull_request_url= >> "${GITHUB_OUTPUT}"

          gh pr view
          --json &aposurl&apos
          --jq &apos.url&apos
          --repo &apos${{ github.repository }}&apos
          &apos${{ env.GIT_BRANCH }}&apos
          >> "${GITHUB_OUTPUT}"
      - name: Select the actual PR URL
        id: pr
        env:
          GITHUB_TOKEN: ${{ github.token }}
        run: >
          echo -n pull_request_url=
          >> "${GITHUB_OUTPUT}"

          echo &apos${{steps.existing-pr.outputs.pull_request_url}}&apos
          >> "${GITHUB_OUTPUT}"

      - name: Log the pull request details
        run: >-
           echo &aposPR URL: ${{ steps.pr.outputs.pull_request_url }}&apos | tee -a "${GITHUB_STEP_SUMMARY}"


      - name: Instruct the maintainers to trigger CI by undrafting the PR
        env:
          GITHUB_TOKEN: ${{ github.token }}
        run: >-
            gh pr comment
            --body &aposPlease mark the PR as ready for review to trigger PR checks.&apos
            --repo &apos${{ github.repository }}&apos
            &apos${{ steps.pr.outputs.pull_request_url }}&apos
The above is an example of how to create a draft PR via GitHub Actions. We need to give permissions to the GitHub action to create PR in a repository (workflow permissions in the settings).

Hopefully, this blogpost will help my future self.
July 04, 2025
PyPy
PyPy v7.3.20 release
PyPy v7.3.20: release of python 2.7, 3.11
The PyPy team is proud to release version 7.3.20 of PyPy after the previous
release on Feb 26, 2025. The release fixes some subtle bugs in ctypes and
OrderedDict and makes PyPy3.11 compatible with an upcoming release of
Cython.
The release includes two different interpreters:
PyPy2.7, which is an interpreter supporting the syntax and the features of Python 2.7 including the stdlib for CPython 2.7.18+ (the
+is for backported security updates)PyPy3.11, which is an interpreter supporting the syntax and the features of Python 3.11, including the stdlib for CPython 3.11.13.
The interpreters are based on much the same codebase, thus the double release. This is a micro release, all APIs are compatible with the other 7.3 releases.
We recommend updating. You can find links to download the releases here:
We would like to thank our donors for the continued support of the PyPy project. If PyPy is not quite good enough for your needs, we are available for direct consulting work. If PyPy is helping you out, we would love to hear about it and encourage submissions to our blog via a pull request to https://github.com/pypy/pypy.org
We would also like to thank our contributors and encourage new people to join the project. PyPy has many layers and we need help with all of them: bug fixes, PyPy and RPython documentation improvements, or general help with making RPython's JIT even better.
If you are a python library maintainer and use C-extensions, please consider making a HPy / CFFI / cppyy version of your library that would be performant on PyPy. In any case, cibuildwheel supports building wheels for PyPy.
What is PyPy?
PyPy is a Python interpreter, a drop-in replacement for CPython It's fast (PyPy and CPython performance comparison) due to its integrated tracing JIT compiler.
We also welcome developers of other dynamic languages to see what RPython can do for them.
We provide binary builds for:
x86 machines on most common operating systems (Linux 32/64 bits, Mac OS 64 bits, Windows 64 bits)
64-bit ARM machines running Linux (
aarch64) and macos (macos_arm64).
PyPy supports Windows 32-bit, Linux PPC64 big- and little-endian, Linux ARM 32 bit, RISC-V RV64IMAFD Linux, and s390x Linux but does not release binaries. Please reach out to us if you wish to sponsor binary releases for those platforms. Downstream packagers provide binary builds for debian, Fedora, conda, OpenBSD, FreeBSD, Gentoo, and more.
What else is new?
For more information about the 7.3.20 release, see the full changelog.
Please update, and continue to help us make pypy better.
Cheers, The PyPy Team
Real Python
The Real Python Podcast – Episode #256: Solving Problems and Saving Time in Chemistry With Python
What motivates someone to learn how to code as a scientist? How do you harness the excitement of solving problems quickly and make the connection to the benefits of coding in your scientific work? This week on the show, we speak with Ben Lear and Christopher Johnson about their book "Coding For Chemists."
[ Improve Your Python With 🐍 Python Tricks 💌 – Get a short & sweet Python Trick delivered to your inbox every couple of days. >> Click here to learn more and see examples ]
July 03, 2025
Mike Driscoll
Python eBook Fourth of July Sale
Happy Fourth of July! I am hosting a sale for the 4th of July weekend, where you can get 25% off most of my books and courses.

Here are the books included in the sale and the direct links with the 25% coupon already applied:
- Python 101
- Python 201: Intermediate Python
- ReportLab: PDF Processing in Python
- Jupyter Notebook 101
- Creating GUI Applications with wxPython
- Pillow: Image Processing with Python
- Automating Excel with Python
- The Python Quiz Book
- Python Logging
- JupyterLab 101
I hope you’ll check out the sale, but even if you don’t, I hope you have a great holiday weekend!
The post Python eBook Fourth of July Sale appeared first on Mouse Vs Python.
Armin Ronacher
Tools: Code Is All You Need
If you've been following me on Twitter, you know I'm not a big fan of MCP (Model Context Protocol) right now. It's not that I dislike the idea; I just haven't found it to work as advertised. In my view, MCP suffers from two major flaws:
- It isn’t truly composable. Most composition happens through inference.
- It demands too much context. You must supply significant upfront input, and every tool invocation consumes even more context than simply writing and running code.
A quick experiment makes this clear: try completing a GitHub task with the
GitHub MCP, then repeat it with the gh CLI tool. You'll almost certainly
find the latter uses context far more efficiently and you get to your intended
results quicker.
But MCP is the Future!
I want to address some of the feedback I've received on my stance on this. I evaluated MCP extensively in the context of agentic coding, where its limitations were easiest to observe. One piece of feedback is that MCP might not make a ton of sense for general code generation, because models are already very good at that but they make a lot of sense for end-user applications, like, say, automating a domain-specific task in a financial company. Another one is that I need to look at the world of the future, where models will be able to reach many more tools and handle much more complex tasks.
My current take is that my data indicates that current MCP will always be harder to use than writing code, primarily due to the reliance on inference. If you look at the approaches today for pushing towards higher tool counts, the proposals all include a layer of filtering. You pass all your tools to an LLM and ask it to filter it down based on the task at hand. So far, there hasn't been much better approaches proposed.
The main reason I believe this will most likely also hold true — that you shouldn't be using MCP in its current form even for non-programming, domain-specific tasks — is that even in those cases code generation just is the better choice because of the ability to compose.
Replace Yourself With A Shellscript
The way to think about this problem is that when you don't have an AI, and you're solving a problem as a software engineer, your tool of choice is code. Perhaps as a non-software engineer, code is out of reach. Many many tasks people do by hand are actually automatable through software. The challenge is finding someone to write that software. If you're working in a niche environment and you're not a programmer yourself, you might not pick up a programming book to learn how to code, and you might not find a developer willing to provide you with a custom piece of software to solve your specific problem. And yes, maybe your task requires some inference, but many do need them all the time.
There is a reason we say “to replace oneself with a shell script”, it's because that has been happening for a long time. With LLMs and programming, the idea is that rather than replacing yourself with a shell script, you're replacing yourself with an LLM. But you run into three problems: cost, speed, and general reliability. All these problems are what we need to deal with before we can even think of tool usage or MCP. We need to figure out how to ensure that our automated task actually works correctly at scale.
Automation at Scale
The key to automation is really to automate things that will happen over and over. You're not going to automate a one-shot change that will never recur. You're going to start automating the things where the machine can truly give you a productivity boost because you're going to do it once or twice, figure out how to make it work, and then have the machine repeat it a thousand times. For that repetition, there's a very strong argument to be made for always using code. That's because if we instruct the machine to use inference to do it, it might work, particularly for small tasks, but it requires validation which can take almost the same time as doing it in the first place. Getting an LLM to calculate for you sort of works, but it's much better for the LLM to write the Python code to do the calculation. Why? First, you can review the formula, not the calculated result. We can write it ourselves or we can use the LLM as a judge to figure out if the approach is correct. Don't really have to validate that Python calculates correct, you can rely on that. So, by opting for code generation for task solving, we get a little closer to being able to verify and validate the process ourselves, rather than hoping the LLM inferred correctly.
This obviously goes way beyond calculation. Take, for instance, this blog. I converted this entire blog from reStructuredText to Markdown recently. I put this conversion off for a really long time, partly because I was a little too lazy. But also, when I was lazy enough to consider deploying an LLM for it, I just didn't trust it to do the conversion itself without regressing somewhere. I was worried that if it ran out of context, it might start hallucinating text or change wording slightly. It's just that I worried about subtle regressions too much.
I still used an LLM for it, but I asked it to do that transformation in a different way: through code.
LLM to Code to LLM
-
I asked the LLM to perform the core transformation from reStructuredText to Markdown but I also asked it to do this in a way that uses the underlying AST (Abstract Syntax Tree). So, I instructed it to parse the reStructuredText into an actual reStructuredText AST, then convert that to a Markdown AST, and finally render it to HTML, just like it did before. This gave me an intermediate transformation step and a comparable end result.
-
Then, I asked it to write a script that compares the old HTML with the new HTML, performs the diffing after some basic cleanup it deemed necessary for comparison. I asked it to consider what kind of conversion errors were actually acceptable. So, it read through its own scripts to see where it might not match the original output due to known technical limitations (e.g., footnotes render differently between the Markdown library I'm using and the reStructuredText library, so even if the syntax matches correctly, the HTML would look different). I asked it to compensate for this in that script.
-
After that was done, I asked it to create a third script, which I could run over the output of hundreds of files to analyze the differece to go back into the agentic loop for another iteration tep.
Then I kicked this off in a loop. I did not provide all the posts, I started with 10 until differences were low and then had it do it for all. It did this for maybe 30 minutes or so until I came back to it and found it in a pretty acceptable state.
What's key about this transformation is not so much that the LLM was capable of pulling it off, but that I actually trusted this process at the end because I could review the approach. Not only that, I also tried to ask another LLM what it thinks of the code that another LLM wrote, and the changes. It gave me much higher confidence that what was going on would not lose data. It felt right to me. It felt like a mechanical process that was fundamentally correct, and I was able to observe it and do spot checks. At worst, the regressions were minor Markdown syntax errors, but the text itself wouldn't have been corrupted.
Another key here is also that because the inference is rather constant, the cost of inference in this process scales with the number of iteration steps and the sample size, but it doesn't depend on how many documents I'm wanting to convert overall. Eventually, I just had it run over all documents all the time but running it over 15 docs vs 150 docs is more or less the same effort, because the final LLM based analysis step did not have that many more things to review (it already skipped over all minor differences in the files).
MCP Cannot Do That
This is a long-winded way of saying that this entire transformation went through code. It's a pipeline that starts with human input, produces code, does an LLM as a judge step and iterates. And you can take this transformation and apply it to a general task as well.
To give an example, one MCP you might be using is Playwright. I find it very hard to replace Playwright with a code approach for all cases because what you're essentially doing is remotely controlling your browser. The task you're giving it largely involves reading the page, understanding what's on it, and clicking the next button. That's the kind of scenario where it's very hard to eliminate inference at each step.
However, if you already know what the page is — for instance, if you're navigating your own app you're working on — then you can actually start telling it to write a Playwright Python script instead and run that. This script can perform many of those steps sequentially without any inference. I've noticed that this approach is significantly quicker, and because it understands your code, it still generally produces correct results. It doesn't need to navigate, read page contents, find a button, or press an input in real-time. Instead, it will write a single Python script that automates the entire process in one go, requiring very little context by comparison.
This process is repeatable. Once the script is written, I can execute it 100, 200, or even 300 times without requiring any further inference. This is a significant advantage that an MCP typically cannot offer. It's incredibly challenging to get an LLM to understand generic, abstract MCP tool calls. I wish I could, for example, embed an MCP client directly into a shell script, allowing me to run remote MCP services efficiently via code generation, but actually doing that is incredibly hard because the tools are not written with non inference based automation in mind.
Also, as ironic as it is: I'm a human, not an MCP client. I can run and debug a script, I cannot even figure out how to reliably do MCP calls. It's always a gamble and incredibly hard to debug. I love using the little tools that Claude Code generates while generating code. Some of those I had it convert into long term additions to my development process.
Where does this take us?
I don't know. But it's an interesting moment to think what we could potentially do to make code generation for purposeful agentic coding better. The weird thing is that MCP is actually pretty great when it works. But it feels in the current form too much like a dead end that cannot be scaled up, particularly to automation at scale because it relies on inference too much.
So maybe we need to look at ways to find a better abstraction for what MCP is great at, and code generation. For that that we might need to build better sandboxes and maybe start looking at how we can expose APIs in ways that allow an agent to do some sort of fan out / fan in for inference. Effectively we want to do as much in generated code as we can, but then use the magic of LLMs after bulk code execution to judge what we did.
I can also imagine that it might be quite interesting to do code generation in a way that also provides enough context for an LLM to explain in human language to a non programmer what the script is doing. That might enable these flows to be used by human users that are not developers themselves.
In any case I can only encourage people to bypass MCP and to explore what else is possible. LLMs can do so much more if you give them the power to write code.
Further Reading
Here are some more posts you might want to read or videos you might want to watch:
- My Agentic Coding Talk where I go into this topic a bit.
- Drew Breunig's post “How to fix your context” which covers some attempts to improve MCP tool selection if you cannot avoid it.
- Manuel Odendahl's excellent “MCPs are Boring” talk from AI Engineer that was one of the first to point to the challenges with MCP.
Quansight Labs Blog
Escaping Contravariance Hell
Protocols and TypeVars
July 02, 2025
Real Python
Python 3.14 Preview: Template Strings (T-Strings)
Python 3.14’s t-strings allow you to intercept and transform input values before assembling them into a final representation. Unlike f-strings, which produce a str object, t-strings resolve to a Template instance, allowing you to safely process and customize dynamic content.
One of the key benefits of t-strings is their ability to help prevent security vulnerabilities like SQL injection and XSS attacks. They’re also valuable in other fields that rely on string templates, such as structured logging.
By the end of this tutorial, you’ll understand that:
- Python t-strings are a generalization of f-strings, designed to safely handle and process input values.
- The main components of a t-string include static string parts and interpolations, which are accessible through the
Templateclass. - You process t-strings by iterating over their components, using attributes such as
.strings,.interpolations, and.valuesfor safe and customized handling.
Python t-strings enhance both security and flexibility in string processing tasks. This tutorial will guide you through understanding t-strings, comparing them with f-strings, and exploring their practical use cases in Python programming.
Get Your Code: Click here to download the free sample code that shows you how to use Python 3.14’s new template strings.
Take the Quiz: Test your knowledge with our interactive “Python 3.14 Preview: Template Strings (T-Strings)” quiz. You’ll receive a score upon completion to help you track your learning progress:

Interactive Quiz
Python 3.14 Preview: Template Strings (T-Strings)Evaluate your grasp of Python's t-strings, which provide a structured and secure way to handle string templates.
Exploring String Templates Before Python 3.14
Creating string templates that you can populate with specific values dynamically is a common requirement in programming. A string template is a string that contains placeholders—special markers representing variable values—that you can dynamically replace at runtime.
You’ll often use templates to generate text or structured content by filling these placeholders with actual data. Before Python 3.14, the language provided several tools that allowed you to interpolate and format values in your strings:
- string formatting operator (
%) str.format()- f-strings
string.Templateformat()string.Formatter.parse()
You can use all these tools to create and process string templates. Of course, each has its own unique strengths and weaknesses.
The String Formatting Operator (%)
The string formatting operator (%), inspired by C’s printf() syntax, is the oldest string formatting and interpolation tool in Python. Here’s a quick example of how you can use this operator to create and process templates:
>>> city = "Vancouver"
>>> temperature = 52
>>> template = "The temperature in %s is %d F."

>>> template % (city, temperature)
'The temperature in Vancouver is 52 F.'
In this example, you have two variables containing data. The first contains a string, and the second holds an integer value. Then, you define a string template using the %s and %d syntax to define placeholders or replacement fields. The s means that the first field must be filled with a string, and the d indicates that the field accepts decimal integer values. These are known as conversion types.
Finally, you use the % operator to dynamically interpolate the variables’ content into the template and build a new string.
This operator also allows you to apply formatting rules to the input values. For example, here’s how you can format currency values:
>>> template = "$%.2f"

>>> template % 2456.5673
'$2456.57'
In this example, the template contains the literal dollar sign ($) to indicate that the formatted value represents a USD amount. The $ character is not part of the formatting syntax itself but part of the output.
Then, you have a replacement field that starts with the string formatting operator (%) followed by the string ".2f". This string is a format specifier that formats any input number as a floating-point value with a precision of two digits.
Note: To learn more about formatting strings, check out the following tutorials:
You can format a string inline using the % operator by passing the values directly. This approach combines the template and the data in a single step, but it doesn’t allow you to reuse the template later on:
>>> "$%.2f" % 2456.5673
'$2456.57'
When you have a complex template, the string formatting operator’s syntax can become cumbersome and hard to read:
Read the full article at https://realpython.com/python-t-strings/ »
[ Improve Your Python With 🐍 Python Tricks 💌 – Get a short & sweet Python Trick delivered to your inbox every couple of days. >> Click here to learn more and see examples ]
Quiz: Python 3.14 Preview: Template Strings (T-Strings)
Evaluate your grasp of Python’s t-strings, which provide a structured and secure way to handle string templates.
[ Improve Your Python With 🐍 Python Tricks 💌 – Get a short & sweet Python Trick delivered to your inbox every couple of days. >> Click here to learn more and see examples ]
Django Weblog
Django bugfix release issued: 5.2.4
Today we've issued the 5.2.4 bugfix release.
The release package and checksums are available from our downloads page, as well as from the Python Package Index.
The PGP key ID used for this release is Natalia Bidart: 2EE82A8D9470983E
Python Software Foundation
Thinking about running for the PSF Board? Let’s talk!
PSF Board elections are a chance for the community to choose representatives to help the PSF create a vision for and build the future of the Python community. This year, there are 4 seats open on the PSF Board. Check out who is currently on the PSF Board on our website. (Dawn Wages, Jannis Leidel, Kushal Das, and Simon Willison are at the end of their current terms.)
Office Hours Information
This year, the PSF Board is dedicating a few of their regular Office Hour sessions on the PSF Discord to the topic of the election. This is your chance to connect with current board members to ask questions and learn more about what being a part of the Board entails.
The two upcoming Office Hour sessions will be dedicated to the topic of the election:
- Tuesday, July 8th, 1 PM UTC - Nominations
- Tuesday, August 12th, 9 PM UTC - Membership & general election questions
We welcome you to join the PSF Discord to participate in Office Hours. The server is moderated by PSF Staff and locked between office hours sessions. If you’re new to Discord, check out some Discord Basics to help you get started.
Who runs for the Board?
Who runs for the board? People who care about the Python community, who want to see it flourish and grow, and also have a few hours a month to attend regular meetings, serve on committees, participate in conversations, and promote the Python community. Want to learn more about being on the PSF Board? Check out the following resources to learn more about the PSF, as well as what being a part of the PSF Board entails:
- Life as Python Software Foundation Director video on YouTube
- FAQs About the PSF Board video on YouTube
- Our past few Annual Impact Reports:
Nomination info
You can nominate yourself or someone else. We encourage you to reach out to people before you nominate them to ensure they are enthusiastic about the potential of joining the Board. Nominations open on Tuesday, July 29th, 2:00 pm UTC, so you have a few weeks to research the role and craft a nomination statement. The nomination period ends on Tuesday, August 12th, 2:00 pm UTC. There will be a 'call for nominations' blog post with more information and resources about nominations coming soon.
Talk Python to Me
#512: Building a JIT Compiler for CPython
Do you like to dive into the details and intricacies of how Python executes and how we can optimize it? Well, do I have an episode for you. We welcome back Brandt Bucher to give us an update on the upcoming JIT compiler for Python and why it differs from JITs for languages such as C# and Java.<br/> <br/> <strong>Episode sponsors</strong><br/> <br/> <a href='https://talkpython.fm/ppm'>Posit</a><br> <a href='https://talkpython.fm/training'>Talk Python Courses</a><br/> <br/> <h2 class="links-heading">Links from the show</h2> <div><strong>Brandt Bucher</strong>: <a href="https://github.com/brandtbucher?featured_on=talkpython" target="_blank" >github.com/brandtbucher</a><br/> <br/> <strong>PyCon Talk: What they don't tell you about building a JIT compiler for CPython</strong>: <a href="https://www.youtube.com/watch?v=NE-Oq8I3X_w&ab_channel=PyConUS" target="_blank" >youtube.com</a><br/> <strong>Specializing, Adaptive Interpreter Episode</strong>: <a href="https://talkpython.fm/episodes/show/381/python-perf-specializing-adaptive-interpreter" target="_blank" >talkpython.fm</a><br/> <strong>Watch this episode on YouTube</strong>: <a href="https://www.youtube.com/watch?v=abNY_RcO-BU" target="_blank" >youtube.com</a><br/> <strong>Episode #512 deep-dive</strong>: <a href="https://talkpython.fm/episodes/show/512/building-a-jit-compiler-for-cpython#takeaways-anchor" target="_blank" >talkpython.fm/512</a><br/> <strong>Episode transcripts</strong>: <a href="https://talkpython.fm/episodes/transcript/512/building-a-jit-compiler-for-cpython" target="_blank" >talkpython.fm</a><br/> <br/> <strong>--- Stay in touch with us ---</strong><br/> <strong>Subscribe to Talk Python on YouTube</strong>: <a href="https://talkpython.fm/youtube" target="_blank" >youtube.com</a><br/> <strong>Talk Python on Bluesky</strong>: <a href="https://bsky.app/profile/talkpython.fm" target="_blank" >@talkpython.fm at bsky.app</a><br/> <strong>Talk Python on Mastodon</strong>: <a href="https://fosstodon.org/web/@talkpython" target="_blank" ><i class="fa-brands fa-mastodon"></i>talkpython</a><br/> <strong>Michael on Bluesky</strong>: <a href="https://bsky.app/profile/mkennedy.codes?featured_on=talkpython" target="_blank" >@mkennedy.codes at bsky.app</a><br/> <strong>Michael on Mastodon</strong>: <a href="https://fosstodon.org/web/@mkennedy" target="_blank" ><i class="fa-brands fa-mastodon"></i>mkennedy</a><br/></div>
Seth Michael Larson
Open Source Security work isn't “Special”
I gave this keynote at OpenSSF Community Day NA 2025 in Denver, Colorado. There will be a YouTube video recording available at a later date. This talk was given as the Security-Developer-in-Residence at the Python Software Foundation, a role which is sponsored by Alpha-Omega. Thanks to Alpha-Omega for supporting security in the Python ecosystem.
To understand why security is special, we have to take a look at why open source is an amazing thing. For many components of open source, users that have the time, desire, and expertise are able to contribute meaningfully to projects. As a maintainer of an open source project, this is awesome!

Users and contributors can work on the areas they are interested in, like triaging bug reports, engaging with the community, or writing great docs. For smaller open source projects this is especially important, there’s only one or a few maintainers and they can’t do it all on their own sustainably.
But not for security, right? Security is special.

Only a select few are supposed to be able to handle vulnerability reports, configure the repository and package manager settings, and secure the release process. This tight association between security work and maintainers is what I’d like to try to pull apart today.
Maintainers, especially for smaller projects, are almost always experts in the domain of the project, not necessarily in security. But the expectations of open source projects means that maintainers feel compelled to do this work to keep their project and users safe.
And those expectations for security today, that security work is done by few rather than many, combined with the secretive nature of security work means that maintainers often feel isolated.
Maintainers don’t see how other projects are triaging vulnerabilities and can’t learn from each other. They can’t compare notes on what they are seeing and whether they are doing the right thing. Isolation in security work breeds a culture of fear. Fear of doing the wrong thing and making your users unsafe.

This private conversation was published with permission from Marcelo, maintainer of Starlette, a popular Python library that powers FastAPI.
He was seeing security reports that seemed convincing but they were also confusing. He asked for my help and together we determined the reports were generated with an LLM and were meaningless. I later published an article about “slop security reports” that other projects were seeing too, including curl, Python, Django, and others. But none of us would know what the others were seeing without sharing.

Smaller projects are shaped by their tools, not the other way around. Small projects don’t have the time and resources to make a square peg fit into a circular hole when it comes to any type of tooling, including security. They don’t have time to create bots and wrappers and bend these tools to work for them, like many larger projects do.
This means that whatever is available or the default experience is probably what they work with, and often our tools encode the assumption that “only maintainers do security work”.
Of the top 10,000 open source packages with GitHub repositories identified by Ecosystems dataset, 35% are owned by a GitHub user, not a GitHub organization. This has huge implications for what features are available to those projects and who is able to do security work at all.

Security tools and vulnerability reports often introduce an asymmetry by creating work to do without resolving the issues identified. Fixing security issues while weighing user expectations, performance, and backwards compatibility is a tough job. This is the reason maintainers are often hesitant to adopt security scanners and tools, because adoption is easy but being on the hook to triage the findings forever is hard.
If a bunch of your limited time with a project is spent doing work that isn’t aligned with your interests in the project, this can lead to burnout which only makes the problem worse.
This image is from the changelog of libexpat which states that the project is understaffed and without funding and is in need of help responding to findings from fuzzing the project within the standard 90 day grace period.
So what can we all do to make security work less “special” and more like other open source contributions?
I propose a new model for open source security contributions, where security work is completed by trusted individuals that aren’t necessarily maintainers on behalf of projects. This model break the assumption that maintainers are the only ones that can do security work, especially for smaller projects.
These “security contributors” could be maintainers or contributors of other open source projects that know about security, they could be foundations offering up resources to their ecosystem, or engineers at companies helping their dependency graph.
Even if you’re not contributing security work directly to an open source project, I think there’s reframing, re-engineering, and rethinking work that we can all do to make this model successful.
Now I know what you might be thinking: “What about XZ?” XZ often comes up during conversations involving trust in contributors to open source projects, but I’m not convinced it’s the show-stopper it’s often portrayed as.

The technologies to discover the backdoor trigger of XZ already exist but had not yet been adopted by the project, such as reproducible builds, build provenance, capability analysis, or using a canonical URL to download source code.
Malicious contributors have always been a problem for open source and the solution can’t be that we just stop trusting each other or accepting help from our community. We lose something bigger than the XZ-utils backdoor if we let this incident define how open source security works going forward.
We have to be able to build trust amongst contributors and projects and security work can’t all fall on maintainers. If we want open source sustainability then we cannot let XZ-utils define open source security.

So what can we all do to nurture this more sustainable model of open source security contribution?
We can all use our voices and experiences to build a more positive and healthy security culture and overcome the isolation inherent to security work.

Sharing and encouraging the sharing experiences shows others that they’re not the only ones that think this is difficult. Seeing others sharing experiences shows that it’s okay to ask for help and to not be perfect, instead the focus should be on always improving.

If you’re a public contributor to open source security, making yourself visible and approachable is a great way to begin building trust in the communities you participate in. Conferences and in-person meetups are excellent venues for promoting positive security culture and building trust amongst a community.
There is something about being in-person that really let’s people be vulnerable and talk honestly about what they are experiencing and their problems which sometimes is exactly what we need to hear. When I’m at conferences I also like to offer up 1-on-1 time to discuss security issues with maintainers or help them adopt new security features.

TLS and public key infrastructure scale trust of the internet and web, we need more technologies that scale trust in open source contributions.
We should continue contributing to and adopting technologies that enable trust for open source projects and contributions. This is especially meaningful when the technology is added to existing tooling like package managers and build tools. Technologies like build reproducibility, build provenance, and capability analysis can all minimize the risk from adding more privileged contributors.

We need platforms and tools to update their underlying assumptions about who does security work for projects to support this new open source security contribution model.
Separating maintenance responsibilities and security work is beneficial for users wanting to help projects, too. If we assume that the securing and maintaining are linked, then it becomes a more difficult task to be able to offer help to open source projects. Some projects do not have the governance in place to transition from one to many maintainers. Some maintainers want to continue owning the project roadmap and vision.
Getting your manager on-board with you maintaining a project is a difficult and amorphous ask compared to more tightly defined “security work” for an open source dependency your team uses. Open Source Program Offices (OSPOs) could use this model to concretely show how they are benefiting their whole open source supply-chain, and not only the larger projects that are able to receive grant funding.
I don’t think this change happens overnight, but we need to think about where we might go. From my experience working in open source, security work isn’t the special sauce, it’s always trust.
Whether you’re an open source user, a contributor to OpenSSF or other security working groups, or a developer of tools for open source projects, I hope I’ve inspired you that we need to think beyond current models of how security work is done for open source projects to achieve sustainable open source security.
Python⇒Speed
330× faster: Four different ways to speed up your code
Note: The original version of this article was slightly different, e.g. with 500x speedup; I reworked it to make the argument clearer.
If your Python code is slow and needs to be fast, there are many different approaches you can take, from parallelism to writing a compiled extension. But if you just stick to one approach, it’s easy to miss potential speedups, and end up with code that is much slower than it could be.
To make sure you’re not forgetting potential sources of speed, it’s useful to think in terms of practices. Each practice:
- Speeds up your code in its own unique way.
- Involves distinct skills and knowledge.
- Can be applied on its own.
- Can also be applied together with other practices for even more speed.
To make this more concrete, in this article I’ll work through an example where I will apply multiple practices. Specifically I’ll be demonstrating the practices of:
- Efficiency: Getting rid of wasteful or repetitive calculations.
- Compilation: Using a compiled language, and potentially working around the compiler’s limitations.
- Parallelism: Using multiple CPU cores.
- Process: Using development processes that result in faster code.
We’ll see that:
- Applying just the Practice of Efficiency to this problem gave me an almost 2× speed-up.
- Applying just the Practice of Compilation gave me a 10× speed-up.
- When I applied both, the result was even faster.
- Following up with the Practice of Parallelism gave even more of a speedup, for a final speed up of 330×.
July 01, 2025
PyCoder’s Weekly
Issue #688: Checking Dicts, DuckDB, Reading shelve.py, and More (July 1, 2025)
#688 – JULY 1, 2025
View in Browser »
Statically Checking Python Dicts for Completeness
To keep code concerns separate you might have two data structures (like an Enum and a dict) that are supposed to change in sequence: adding a value to the Enum requires you to add a similar value in the dict. This is common when separating business logic from UI code. This article shows you ways of making sure the corresponding changes happen together.
LUKE PLANT
Starting With DuckDB and Python
Learn how to use DuckDB in Python to query large datasets with SQL or its Python API, handle files like Parquet or CSV, and integrate with pandas or Polars.
REAL PYTHON course
From AI Hype to Durable Reality: Why Agentic Flows Need Distributed-Systems Discipline

If you’ve explored building agentic AI, you’ve likely discovered that the glamorous part of AI ends quickly; operationalizing for production is where projects live or die. Explore these seven lessons from our team on how to transform agentic flows into reliable powerhouses →
TEMPORAL sponsor
Code Reading: The Python Module shelve.py
Reading code is a great way to learn to write better code. This post walks you through the standard library shelve module as code-reading practice.
BEYOND DREAMSCAPE
Python Jobs
Sr. Software Developer (Python, Healthcare) (USA)
Articles & Tutorials
New Python Client Library for Google Data Commons
Google Data Commons announced the general availability of its new Python client library for the Data Commons. The goal of the library is to enhance how students, researchers, analysts, and data scientists access and leverage Data Commons.
KARA MOSCOE • Shared by Ariana Gaspar
From Notebooks to Production Data Science Systems
Talk Python To Me interviews Catherine Nelson and they discuss techniques and tools to move your data science from an experimental notebook to full production workflows.
KENNEDY & NELSON podcast
Deploy Your Streamlit, Dash, Bokeh Apps all in one Place
Posit Connect Cloud is a cloud environment for showcasing your Python apps, no matter the framework.
POSIT sponsor
Python enumerate(): Simplify Loops That Need Counters
Learn how to simplify your loops with Python’s enumerate(). This tutorial shows you how to pair items with their index cleanly and effectively using real-world examples.
REAL PYTHON
Your Guide to the Python print() Function
Learn how Python’s print() function works, avoid common pitfalls, and explore powerful alternatives and hidden features that can improve your code.
REAL PYTHON
Building a Multi-Tenant App With Django
This tutorial explains how to implement a multi-tenant web app in Django using the django-tenants and django-tenant-users packages.
NIK TOMAZIC • Shared by Michael Herman
Flask or Django: Which One Best Fits Your Python Project?
Explore the key factors to take into account when deciding between Flask or Django for your Python app.
FEDERICO TROTTA • Shared by AppSignal
Fun With uv and PEP 723
How to use uv and the Python inline script metadata proposal PEP 723 to run scripts seamlessly.
DEEPAK JOIS
How I’ve Run Major Projects
If you want to progress to being a technical lead, you need to understand how to manage projects. This post talks about the skills you need, and how often times it is mostly about being organized.
BEN KUHN
How to Think About Time in Programming
Time is a complex thing to code. This article is a very deep dive, covering absolute measurement, civil time, modern time keeping, the mess that are timezones, and much more.
SHAN RAUF
Projects & Code
POC Implementation of Progressive JSON
GITHUB.COM/MACIEYNG • Shared by Maciej
Events
🇨🇦
July 1, 2025
REALPYTHON.COM
Python New Zealand: Python Learners’ Co-Op
July 3, 2025
IRIDESCENT.NZ
Canberra Python Meetup
July 3, 2025
MEETUP.COM
Sydney Python User Group (SyPy)
July 3, 2025
SYPY.ORG
PyCon Colombia 2025
July 4 to July 7, 2025
PYCON.CO
Python Norte 2025
July 4 to July 7, 2025
PYTHONNORTE.ORG
SciPy 2025
July 7 to July 14, 2025
SCIPY.ORG
Python-Powered Cloud on July 22
July 22, 2025
MEETUP.COM • Shared by Laura Stephens
Happy Pythoning!
This was PyCoder’s Weekly Issue #688.
View in Browser »
[ Subscribe to 🐍 PyCoder’s Weekly 💌 – Get the best Python news, articles, and tutorials delivered to your inbox once a week >> Click here to learn more ]
Real Python
Implementing the Factory Method Pattern in Python
This video course explores the Factory Method design pattern and its implementation in Python. Design patterns became a popular topic in late 90s after the so-called Gang of Four (GoF: Gamma, Helm, Johson, and Vlissides) published their book Design Patterns: Elements of Reusable Object-Oriented Software.
The book describes design patterns as a core design solution to reoccurring problems in software and classifies each design pattern into categories according to the nature of the problem. Each pattern is given a name, a problem description, a design solution, and an explanation of the consequences of using it.
The GoF book describes Factory Method as a creational design pattern. Creational design patterns are related to the creation of objects, and Factory Method is a design pattern that creates objects with a common interface.
This is a recurrent problem that makes Factory Method one of the most widely used design patterns, and it’s very important to understand how it works and know how to apply it.
By the end of this video course, you’ll:
- Understand the components of Factory Method
- Recognize opportunities to use Factory Method in your applications
- Know how to modify existing code and improve its design by using the pattern
- Be able to identify opportunities where Factory Method is the appropriate design pattern
- Know how to choose an appropriate implementation of Factory Method
- Understand how to implement a reusable, general purpose solution of Factory Method
[ Improve Your Python With 🐍 Python Tricks 💌 – Get a short & sweet Python Trick delivered to your inbox every couple of days. >> Click here to learn more and see examples ]
Mike Driscoll
Creating a Website with Sphinx and Markdown
Sphinx is a Python-based documentation builder. The Python documentation is written using Sphinx. The Sphinx project supports using ReStructuredText and Markdown, or a mixture of the two. Each page of your documentation or website must be written using one of those two formats.
The original Python 101 website uses an old version of Sphinx, for example.
In this tutorial, you will learn how to use Sphinx to create a documentation site. Here is an overview of what you’ll learn:
- Getting the dependencies
- Setting up the site
- Making Markdown work in Sphinx
- Building your Sphinx site
- Adding content to your site
Let’s start by installing all the packages you need to get Sphinx working!
Getting the Dependencies
You will need the following packages to be able to use Sphinx and Markdown:
- sphinx
- myst-parser
You should install these package in a Python virtual environment. Open up your terminal and pick a location where you would like to create a new folder. Then run the following command:
python -m venv NAME_OF_VENV_FOLDER
Once you have the virtual environment, you need to activate it. Go into the Scripts folder and run the activate command in there.
Now you can install the dependencies that you need using pip, which will install them to your virtual environment.
Here’s how to install them using pip:
python -m pip install myst-parser sphinx
Once your packages are installed, you can learn how to set up your site!
Setting Up the Site
Now that your packages are installed, you must set up your Sphinx website. To create a barebones Sphinx site, run the following command inside your virtual environment:
sphinx-quickstart NAME_OF_SITE_FOLDER
It will ask you a series of questions. The Sphinx documentation recommends keeping the source and build folders separate. Otherwise, you can set the other fields as needed or accept the defaults.
You will now have the following tree structure in your SITE_FOLDER:

You will work with the files and directories in this structure for the rest of the tutorial.
The next step on your Sphinx journey is to enable Markdown support.
Making Markdown Work in Sphinx
Go into the source directory and open the conf.py file in your favorite Python IDE. Update the extensions and the source_suffix variables to the following (or add them if they do not exist):
extensions = ['myst_parser']

source_suffix = ['.rst', '.md']
These changes tell Sphinx to use the Myst parser for Markdown files. You also leave ReStructuredText files in there so that your Sphinx website can handle that format.
You now have enough of your site available to build it and ensure it works.
Building Your Sphinx Site
You can now build a simple site with only an index page and the auto-generated boilerplate content. In your terminal, run the following command in the root of your Sphinx folder:
sphinx-build -M html .\source\ .\build\
The HTML files will be created inside the build/html folder. If you open the index page, it will look something like this:

Good job! You now have a Sphinx website!
Now you need to add some custom content to it.
Adding Content to Your Site
You can add ReStructuredText or Markdown files for each page of your site. You must update your index.rst file to add those pages to your table of contents using the toctree section:
.. toctree::
   :maxdepth: 2
   :caption: Contents:

   SUB_FOLDER/acknowledgments.md
   doc_page1.md
   OTHER_FOLDER/sub_doc_page1.md
Let’s add some real content. Create a new file called decorators.md in the root folder that contains the index.rst file. Then enter the following text in your new Markdown file:
# Python: All About Decorators

Decorators can be a bit mind-bending when first encountered and can also be a bit tricky to debug. But they are a neat way to add functionality to functions and classes. Decorators are also known as a “higher-order function”. This means that they can take one or more functions as arguments and return a function as its result. In other words, decorators will take the function they are decorating and extend its behavior while not actually modifying what the function itself does.

There have been two decorators in Python since version 2.2, namely **classmethod()** and **staticmethod()**. Then PEP 318 was put together and the decorator syntax was added to make decorating functions and methods possible in Python 2.4. Class decorators were proposed in PEP 3129 to be included in Python 2.6. They appear to work in Python 2.7, but the PEP indicates they weren’t accepted until Python 3, so I’m not sure what happened there.

Let’s start off by talking about functions in general to get a foundation to work from.

## The Humble Function

A function in Python and in many other programming languages is just a collection of reusable code. Some programmers will take an almost bash-like approach and just write all their code in a file with no functions. The code just runs from top to bottom. This can lead to a lot of copy-and-paste spaghetti code. Whenever two pieces of code do the same thing, they can almost always be put into a function. This will make updating your code easier since you’ll only have one place to update them.
Make sure you save the file. Then, re-run the build command from the previous section. Now, when you open the index.html file, you should see your new Markdown file as a link that you click on and view.
Wrapping Up
Sphinx is a powerful way to create documentation for your projects. Sphinx has many plugins that you can use to make it even better. For example, you can use sphinx-apidoc to automatically generate documentation from your source code using the autodoc extension.
If you are an author and you want to share your books online, Sphinx is a good option for that as well. Having a built-in search functionality makes it even better. Give Sphinx a try and see what it can do for you!
The post Creating a Website with Sphinx and Markdown appeared first on Mouse Vs Python.