
Planet Python
Last update: March 25, 2026 09:44 PM UTC
March 25, 2026
Talk Python to Me
#542: Zensical - a modern static site generator
If you've built documentation in the Python ecosystem, chances are you've used Martin Donath's work. His Material for MKDocs powers docs for FastAPI, uv, AWS, OpenAI, and tens of thousands of other projects. But when MKDocs 2.0 took a direction that would break Material and 300 ecosystem plugins, Martin went back to the drawing board. The result is Zensical: A new static site generator with a Rust core, differential builds in milliseconds instead of minutes, and a migration path designed to bring the whole community along.<br/> <br/> <strong>Episode sponsors</strong><br/> <br/> <a href='https://talkpython.fm/sentry'>Sentry Error Monitoring, Code talkpython26</a><br> <a href='https://talkpython.fm/training'>Talk Python Courses</a><br/> <br/> <h2 class="links-heading mb-4">Links from the show</h2> <div><strong>Guest</strong><br/> <strong>Martin Donath</strong>: <a href="https://github.com/squidfunk?featured_on=talkpython" target="_blank" >github.com</a><br/> <br/> <strong>Zensical</strong>: <a href="https://zensical.org?featured_on=talkpython" target="_blank" >zensical.org</a><br/> <strong>Material for MkDocs</strong>: <a href="https://squidfunk.github.io/mkdocs-material/?featured_on=talkpython" target="_blank" >squidfunk.github.io</a><br/> <strong>Getting Started</strong>: <a href="https://zensical.org/docs/get-started/?featured_on=talkpython" target="_blank" >zensical.org</a><br/> <strong>Github pages</strong>: <a href="https://docs.github.com/en/pages?featured_on=talkpython" target="_blank" >docs.github.com</a><br/> <strong>Cloudflare pages</strong>: <a href="https://pages.cloudflare.com?featured_on=talkpython" target="_blank" >pages.cloudflare.com</a><br/> <strong>Michaels Example</strong>: <a href="https://gist.github.com/mikeckennedy/f03686c4c4ce7ce88b41c6b91c3226cf?featured_on=talkpython" target="_blank" >gist.github.com</a><br/> <strong>Material for MkDocs</strong>: <a href="https://zensical.org/docs/setup/basics/#transition-from-mkdocs" target="_blank" >zensical.org</a><br/> <strong>gohugo.io/content-management/shortcodes</strong>: <a href="https://gohugo.io/content-management/shortcodes/?featured_on=talkpython" target="_blank" >gohugo.io</a><br/> <strong>a sense of size of the project</strong>: <a href="https://blobs.talkpython.fm/zensical-size.webp?cache_id=fe7bda" target="_blank" >blobs.talkpython.fm</a><br/> <strong>Zensical Spark</strong>: <a href="https://zensical.org/spark/?featured_on=talkpython" target="_blank" >zensical.org</a><br/> <br/> <strong>Watch this episode on YouTube</strong>: <a href="https://www.youtube.com/watch?v=V1BvvIPUzes" target="_blank" >youtube.com</a><br/> <strong>Episode #542 deep-dive</strong>: <a href="https://talkpython.fm/episodes/show/542/zensical-a-modern-static-site-generator#takeaways-anchor" target="_blank" >talkpython.fm/542</a><br/> <strong>Episode transcripts</strong>: <a href="https://talkpython.fm/episodes/transcript/542/zensical-a-modern-static-site-generator" target="_blank" >talkpython.fm</a><br/> <br/> <strong>Theme Song: Developer Rap</strong><br/> <strong>🥁 Served in a Flask 🎸</strong>: <a href="https://talkpython.fm/flasksong" target="_blank" >talkpython.fm/flasksong</a><br/> <br/> <strong>---== Don't be a stranger ==---</strong><br/> <strong>YouTube</strong>: <a href="https://talkpython.fm/youtube" target="_blank" ><i class="fa-brands fa-youtube"></i> youtube.com/@talkpython</a><br/> <br/> <strong>Bluesky</strong>: <a href="https://bsky.app/profile/talkpython.fm" target="_blank" >@talkpython.fm</a><br/> <strong>Mastodon</strong>: <a href="https://fosstodon.org/web/@talkpython" target="_blank" ><i class="fa-brands fa-mastodon"></i> @talkpython@fosstodon.org</a><br/> <strong>X.com</strong>: <a href="https://x.com/talkpython" target="_blank" ><i class="fa-brands fa-twitter"></i> @talkpython</a><br/> <br/> <strong>Michael on Bluesky</strong>: <a href="https://bsky.app/profile/mkennedy.codes?featured_on=talkpython" target="_blank" >@mkennedy.codes</a><br/> <strong>Michael on Mastodon</strong>: <a href="https://fosstodon.org/web/@mkennedy" target="_blank" ><i class="fa-brands fa-mastodon"></i> @mkennedy@fosstodon.org</a><br/> <strong>Michael on X.com</strong>: <a href="https://x.com/mkennedy?featured_on=talkpython" target="_blank" ><i class="fa-brands fa-twitter"></i> @mkennedy</a><br/></div>
PyCharm
Expanding Our Core Web Development Support in PyCharm 2026.1
With PyCharm 2026.1, our core IDE experience continues to evolve as we’re bringing a broader set of professional-grade web tools to all users for free. Everyone, from beginners to backend-first developers, is getting access to a substantial set of JavaScript, TypeScript, and CSS features that were previously only available with a Pro subscription.
React, JavaScript, TypeScript, and CSS support
Leverage a comprehensive set of editing and formatting tools for modern web languages within PyCharm, including:
- Basic React support with code completion, component and attribute navigation, and React component and prop rename refactorings.
- Advanced import management:
- Enjoy automatic JavaScript and TypeScript imports as you work.
- Merge or remove unnecessary references via the Optimize imports feature.
- Get required imports automatically when you paste code into the editor.
- Enhanced styling: Access CSS-tailored code completion, inspections, and quick-fixes, and view any changes in real time via the built-in web preview.
- Smart editor behavior: Utilize smart keys, code vision inlay hints, and postfix code completions designed for web development.
Navigation and code intelligence
Finding your way around web projects is now even more efficient with tools that allow for:
- Pro-grade navigation: Use dedicated gutter icons for Jump to… actions, recursive calls, and TypeScript source mapping.
- Core web refactorings: Perform essential code changes with reliable Rename refactorings and actions (Introduce variable, Change signature, Move members, and more).
- Quality control: Maintain high code standards with professional-grade inspections, intentions, and quick-fixes.
- Code cleanup: Identify redundant code blocks through JavaScript and TypeScript duplicate detection.
Frameworks and integrated tools
With the added essential support for some of the most popular frontend frameworks and tools, you will have access to:
- Project initialization: Create new web projects quickly using the built-in Vite generator.
- Standard tooling: Standardize code quality with integrated support for Prettier, ESLint, TSLint, and StyleLint.
- Script management: Discover and execute NPM scripts directly from your
package.json. - Security: Check project dependencies for security vulnerabilities.
We’re excited to bring these tried and true features to the core PyCharm experience for free! We’re certain these tools will help beginners, students, and hobbyists tackle real-world tasks within a single, powerful IDE. Best of all, core PyCharm can be used for both commercial and non-commercial projects, so it will grow with you as you move from learning to professional development.
Real Python
How to Use Git: A Beginner's Guide
This tutorial shows you how to use Git to track changes in a project using just a few core commands and save clean snapshots of your work. If you’ve ever changed a file, broken something, and wished you could undo it, version control makes that possible. Git keeps a running history of your files so you can see what changed and when.
In this guide, you’ll set up Git locally and use the core workflow from the terminal to track and record changes in a Python project. By the end, you’ll have a working Git repository with a recorded commit history you can inspect and manage:
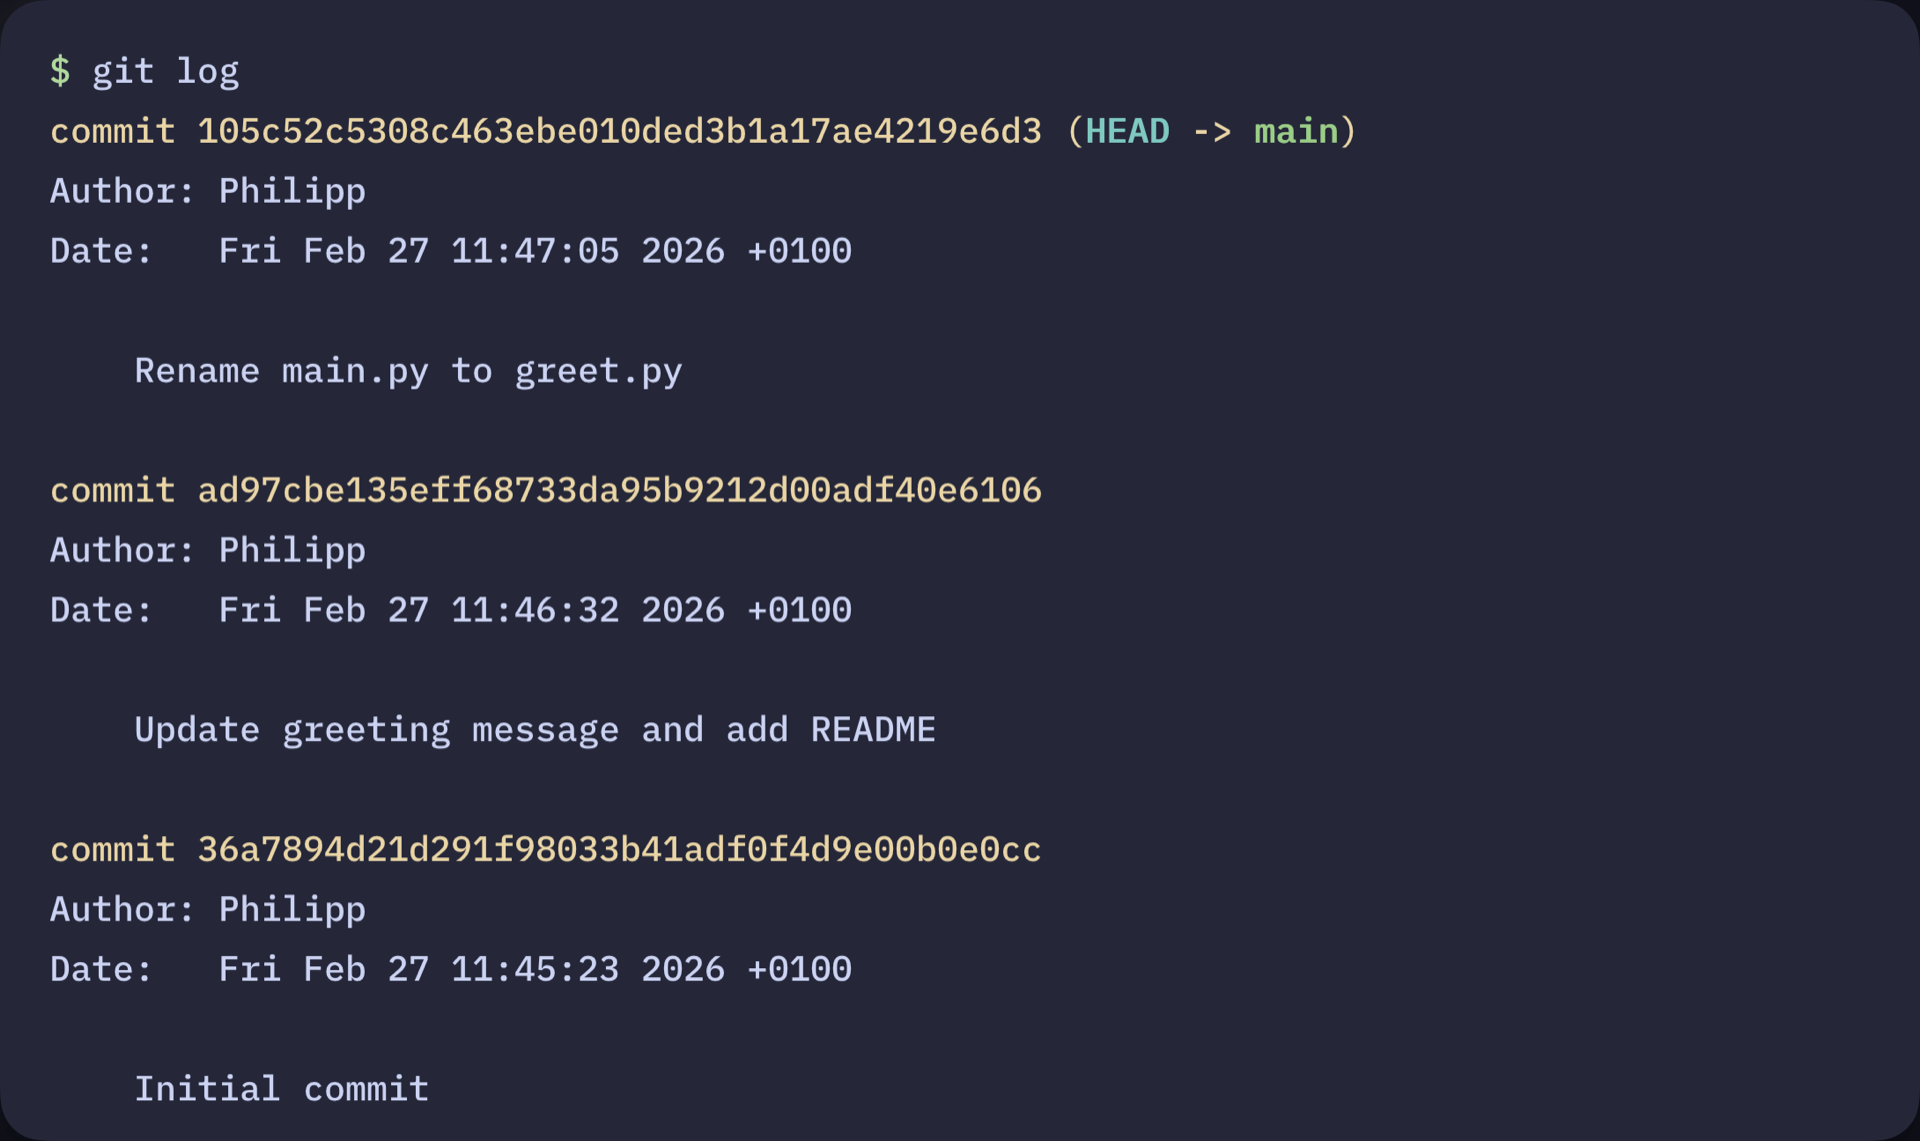 Commit History Displayed With git log
In the next sections, you’ll create your own repository and begin building that history from scratch. Before you begin, you can download a Git cheat sheet to keep the core commands handy:
Get Your Cheat Sheet: Click here to download your free Git cheat sheet and keep the core Git workflow, essential commands, and commit tips at your fingertips.
Take the Quiz: Test your knowledge with our interactive “How to Use Git: A Beginner's Guide” quiz. You’ll receive a score upon completion to help you track your learning progress:
Interactive Quiz
How to Use Git: A Beginner's GuideTest your knowledge of Git basics: initializing repos, staging files, committing snapshots, and managing your project history.
How to Use Git: Prerequisites
Before you start tracking your code with Git, make sure you have the right tools in place. This tutorial assumes that you’re comfortable working with the command line and have some basic Python knowledge.
Here’s what you’ll need to get started:
- A terminal or command prompt
- Python 3.10 or higher installed on your system
Note: Git and GitHub are often confused, but they’re not the same thing:
- Git is version control software that runs on your computer. It tracks changes to your files and manages your project’s history locally.
- GitHub is an online platform for hosting Git repositories. It provides collaboration tools that make sharing code, working with teams, and backing up your projects easier.
You don’t need a GitHub account to use Git or follow this tutorial. Later, if you want to share your code with others or back it up online, you can optionally push your Git repository to platforms like GitHub, GitLab, or Bitbucket.
To learn more about the differences between Git and GitHub, check out Introduction to Git and GitHub for Python Developers.
With these prerequisites in place, you’re ready to begin setting up Git and tracking changes in your project. In the next step, you’ll install Git, prepare your existing Python files, and initialize your first repository.
Step 1: Install Git and Prepare Your Project
To start, you’ll check whether Git is installed on your system, prepare a simple project, and initialize a Git repository so you can begin tracking changes right away.
Check Whether Git Is Already Installed
Before you can start using Git, you need to make sure it’s installed on your machine. Chances are that Git is already present on your system. To check whether Git is installed, run this command:
$ git --version
If this command displays a Git version, you’re good to go and can create a project directory. Otherwise, you need to install Git on your system before continuing.
Install Git on Your System
Luckily, Git provides installers for Windows, macOS, and Linux on its official website, offering a straightforward way to install Git on your machine. Because installation steps vary across operating systems, this guide links to the official documentation rather than reproducing those steps here.
If you prefer a graphical interface, you can install a Git client such as GitHub Desktop, Sourcetree, or GitKraken. These tools install Git automatically during setup.
Once installed, open your terminal and confirm that Git is available:
$ git --version
git version 2.24.0.windows.2
Your Git version may appear slightly different from this example, depending on your operating system and when you installed Git. That’s perfectly fine. As long as Git is installed and the command runs successfully, you’ll be able to follow along with the rest of this tutorial without any issues.
Create a Project Directory
Read the full article at https://realpython.com/how-to-use-git/ »
[ Improve Your Python With 🐍 Python Tricks 💌 – Get a short & sweet Python Trick delivered to your inbox every couple of days. >> Click here to learn more and see examples ]
Quiz: Using Data Classes in Python
Revisit how Python data classes work with Python Data Classes.
You’ll review how to define data classes, add default values to fields, customize ordering and comparisons, and work with immutable data classes.
This quiz is based on the video course and reinforces the practical syntax and patterns you need to create concise classes and reduce boilerplate.
[ Improve Your Python With 🐍 Python Tricks 💌 – Get a short & sweet Python Trick delivered to your inbox every couple of days. >> Click here to learn more and see examples ]
Kevin Renskers
Building modern Django apps with Alpine AJAX, revisited
About nine months ago I wrote an article about my quest to simplify my web development stack. How I went from SvelteKit on the frontend and Django on the backend, to an all-Django stack for a new project, using Alpine AJAX to enable partial page updates.
I’ve now been using this new stack for a while, and my approach -as well as my opinion- has changed significantly. Let’s get into what works, what doesn’t, and where I ended up.
A quick recap
Alpine AJAX is a lightweight alternative to htmx, which you can use to enhance server-side rendered HTML with a few attributes, turning <a> and <form> tags into AJAX-powered versions. No more full page refreshes when you submit a form.
The key mechanic: when a form has x-target="comments", Alpine AJAX submits the form via AJAX, finds the element with that ID in the response, and swaps it into the page. The server returns HTML, not JSON.
In the original article I used django-template-partials (since merged into Django itself) to mark sections of a template as named partials using {% partialdef %}. Combined with a custom AlpineTemplateResponse the view could automatically return just the targeted partial when the request came from Alpine AJAX.
Where I began: template partials
Let’s say you have an article page with the article body parsed from Markdown, a like button, and a comment section. The template looks something like this:
article.html{% extends "base.html" %} {% block body %} <article> <h1>{{ article.title }}</h1> {{ article_html|safe }} {% partialdef like_form inline %} <form method="post" id="like_form" x-target="like_form"> {% csrf_token %} <button type="submit" name="toggle-like"> {% if article.is_liked %}Unlike{% else %}Like{% endif %} </button> </form> {% endpartialdef %} {% partialdef comments inline %} <div id="comments"> {% for comment in article.comments.all %} <div>{{ comment.user }}: {{ comment.text }}</div> {% endfor %} <form method="post" x-target="comments"> {% csrf_token %} {{ comment_form }} <button type="submit" name="add-comment">Submit</button> </form> </div> {% endpartialdef %} </article> {% endblock %} Every form POSTs to the same article view, which handles all the actions in one big post method:
views.pyclass ArticleView(View): def get_context(self, request, pk): article = get_object_or_404( Article.objects.prefetch_related("comments") .annotate_is_liked(request.user), pk=pk, ) return { "article": article, "article_html": markdown(article.body), "comment_form": CommentForm(), } def post(self, request, pk): context = self.get_context(request, pk) article = context["article"] if "toggle-like" in request.POST: if article.is_liked: article.unlike(request.user) article.is_liked = False else: article.like(request.user) article.is_liked = True return AlpineTemplateResponse(request, "article.html", context) if "add-comment" in request.POST: form = CommentForm(request.POST) if form.is_valid(): Comment.objects.create(article=article, user=request.user, ...) return AlpineTemplateResponse(request, "article.html", context) return redirect(article) def get(self, request, pk): context = self.get_context(request, pk) return AlpineTemplateResponse(request, "article.html", context) (Please note that I’m not saying this is the correct way to do things, simply that this is how I used to do it in this particular project.)
The AlpineTemplateResponse from the original article takes care of automatically returning just the targeted partial when the request comes from Alpine AJAX. This works fine.
I thought I was being smart to prevent template duplication this way, but there are two problems:
-
The view does too much work. Every POST action calls
get_context, which fetches everything: the article, the parsed Markdown body, the comments, the like state, the comment form. When the user clicks “Like”, we do all this work that we’ll never use in the partial template. The template partial means the response is small, but the server-side work is exactly the same as rendering the full page. -
The template is a mess. Those
{% partialdef %}blocks scattered throughout the template make it noisy and hard to read. In a small example it’s fine, but in a real template with 200+ lines, it gets ugly fast.
When doubt set in: switching to Jinja2
To be honest though, the real killer of my motivation while working on this project has been the Django Template Language. I’m sorry, but I just hate it. I have since 2009, and I still do. The syntax is bad enough, but then you have to constantly fight its limitations. The fact I can’t simply call a function is so incredibly annoying, and is causing way more boilerplate with tons of custom template tags and filters.
So, switch to Jinja2, right? Except that template partials aren’t supported in combination with Jinja2. No more {% partialdef %}. Which means returning full page responses for AJAX requests, which isn’t exactly ideal.
I did it anyway. I ripped out all the {% partialdef %} tags, migrated my templates to Jinja2, and my views just returned the full template for AJAX requests. Alpine AJAX is smart enough to extract the elements it needs by their IDs, and throws away the rest.
This was simpler and I was much happier writing Jinja2 templates, but the wastefulness got worse. Before, the server at least returned a small response. Now it rendered the entire page and sent all of it over the wire, just for the browser to use a tiny piece of it. Of course it’s still better than an old-fashioned MPA, where every response is a full page refresh, but not by a lot.
It was at this moment that I seriously thought about throwing the entire frontend away and rebuilding it in SvelteKit, with Django REST Framework returning JSON responses. But that seemed like a pretty big waste of effort, so instead I took a deep breath and thought about what I wanted:
- Jinja2 templates. Non-negotiable.
- Small, fast AJAX responses. No rendering the full page for a like toggle.
- No template duplication between the full page and the AJAX response.
- Simple views that only do the work they need to do.
Template partials gave me #2 and #3, but not #1 or #4. Switching to Jinja2 and returning the full template for AJAX requests gave me #1 and #3, but not #2 or #4. I needed a different approach.
Where I ended up: separate views with template includes
The answer turned out to be straightforward, and the one I initially discarded as “too much boilerplate”: instead of one monolithic view handling all POST actions, split each action into its own view with its own URL. And instead of {% partialdef %}, use plain {% include %} tags to extract reusable template fragments.
Let me show you. Here’s the simplified article template:
article.html{% extends "base.html" %} {% block body %} <article> <h1>{{ article.title }}</h1> {{ article.body }} {% include "articles/_like_form.html" %} {% include "articles/_comments.html" %} </article> {% endblock %} Clean and readable. Each include is a self-contained fragment. And here’s the like form:
_like_form.html<form method="post" action="{{ url('toggle-like', args=[article.id]) }}" id="like_form" x-target="like_form"> {{ csrf_input }} {% if article.is_liked %} <button type="submit">Unlike</button> {% else %} <button type="submit">Like</button> {% endif %} </form> And finally, the view:
views.pyclass ToggleLikeView(LoginRequiredMixin, View): def post(self, request, pk): article = get_object_or_404( Article.objects.annotate_is_liked(request.user), pk=pk, ) if article.is_liked: article.unlike(request.user) article.is_liked = False article.like_count -= 1 else: article.like(request.user) article.is_liked = True article.like_count += 1 if is_alpine(request): return TemplateResponse( request, "articles/_like_form.html", {"article": article}, ) # For non-Alpine requests, we just redirect back return redirect(article) No comment queries. No form building. No Markdown parsing. Just the like state.
The is_alpine check provides a redirect fallback for non-JavaScript POST requests, keeping things progressive. And the ArticleView itself becomes GET-only. No more branching on POST keys. No get_context method that fetches everything for every action. Each view does one thing.
The trade-offs
There are a few downsides to this approach that are worth mentioning.
More templates. For the article page, I went from one template to several: the include fragments (_like_form.html, _comments.html) that are shared between the full page and the AJAX responses. When an action needs to update multiple elements on the page, you also end up with small response templates that combine the right includes. For example, if submitting a comment should update both the comment list and a comment count elsewhere on the page:
_add_comment_response.html{% include "articles/_comments.html" %} {% include "articles/_engagement_counts.html" %} Trivial, but still a file you have to create and name.
It’s also harder to make sure that the template fragment has access to the context it needs when included into the big template via {% include %}, compared to {% partialdef %} and one single view always rendering it.
More views and URL routes. Each action gets its own view class and its own path() entry. For a page with likes, comments, and subscriptions, that’s three or four extra views.
But here’s what I got in return:
Actual performance improvement. Not just smaller responses, but less work on the server. Each view only queries what it needs.
Jinja2. I’m using Jinja2 instead of the Django Template Language. I can call functions, I have proper expressions, and I don’t need custom template tags for basic things. This alone was worth the switch.
Readable templates. The main article.html is short and shows the page structure at a glance. Each fragment is self-contained. No {% partialdef %} blocks scattered everywhere.
Simple views. Each view does exactly one thing. Easy to understand, easy to test, easy to optimize.
Conclusion
I went through three stages: template partials with Django Template Language, full-page responses with Jinja2, and finally separated views with template includes. Each step solved a real problem with the previous approach.
The pattern I’ve ended up with requires more files and views than I’d like, but each is simple and does one thing. It’s become easier to understand the flow of every action.
My overall feelings on Django + Alpine AJAX have also changed. I still believe there are benefits to using a simplified tech stack and using hypermedia as the engine of state. Just return HTML instead of returning JSON to a JavaScript framework which then has to turn it into HTML. Conceptually it still makes sense to me.
But the dream was to build a plain old Django application using simple views and simple templates, using old-fashioned MPA server-rendered pages. Sprinkle in a few Alpine AJAX attributes and magically your site gets SPA-like usability. And it simply hasn’t played out that way for me. Yes, you could do that, if you’re fine with the wastefulness of returning full pages as a response to AJAX requests. But when you want to do it better than that, you end up with more boilerplate to make it possible to return small bits of HTML.
And this isn’t really about Alpine AJAX specifically; htmx would lead to the exact same place. The fundamental tension is in the HTML-over-the-wire approach itself: the server has to know which fragments of HTML to return, and that means structuring your views and templates around it. You trade the complexity of a JavaScript frontend for a different kind of complexity on the server.
Progressive enhancement adds to that complexity. Every form handling view needs an is_alpine check with a redirect fallback, every form needs to work both as a regular POST and as an AJAX submit. If I dropped progressive enhancement and just required JavaScript, those redirect fallbacks and the branching that comes with them would disappear. The views would be simpler. But I think progressive enhancement is important enough to keep in place.
Would I use Alpine AJAX (or htmx) again? Honestly: probably not. I have a lot more fun when building frontends with SvelteKit, and for me Django shines when I limit its role to an API, ORM, and admin interface - not so much HTML templates and form handling.
Building composable and reusable UI components is so much more natural in SvelteKit, and the performance is simply better (once the initial JS bundle has been downloaded and parsed). But am I going to throw away my current project’s code and redo it all? No, I am not. Django with Alpine AJAX is a nice change of scenery, it’s a nice playground I don’t usually get to play in. I think I ended up with a good compromise, and hey: I still don’t have to build and maintain a separate API, API docs, and frontend.
Antonio Cuni
Inside SPy, part 2: Language semantics
Inside SPy 🥸, part 2: Language semantics
This is the second post of the Inside SPy series. The firstpost was mostly about motivations andgoals of SPy. This post will cover in more detail thesemantics of SPy, including the parts which make it different from CPython.
We will talk about phases of execution, colors, redshifting, the very peculiar waySPy implements static typing, and we will start to dive into metaprogramming.
!!! Success "" Before diving in, I want to express my gratitude to my employer, Anaconda, for giving me the opportunity to dedicate 100% of my time to this open-source project.
March 24, 2026
PyCoder’s Weekly
Issue #727: Sunsetting Jazzband, Spyder, A/B Testing, and More (March 24, 2026)
#727 – MARCH 24, 2026
View in Browser »

Sunsetting Jazzband
Jazzband is (was) an Open Source cooperative for creating and maintaining projects. It maintained over 70 projects many of which were for the Django ecosystem. They included django-redis, django-nose, django-taggit, and loads more. Jazzband’s model has become untenable from the mass of AI submissions, and so it is winding down.
JAZZBAND.CO
Spyder: Your IDE for Data Science Development in Python
Learn how to use the Spyder IDE, a Python code editor built for scientists, engineers, and data analysts working with data-heavy workflows.
REAL PYTHON
How Nordstrom Built Self-Healing Docs with AI Agents

What if your docs updated themselves from Slack conversations? Join our webinar to learn how Nordstrom uses Temporal and AI agents to detect knowledge gaps, extract insights from chat history, and automatically generate pull requests →
TEMPORAL sponsor
Comparing Python Packages for A/B Test Analysis
A practical comparison of tea-tasting, Pingouin, statsmodels, and SciPy for A/B test analysis, with code examples.
EVGENY IVANOV
Python Jobs
Python + AI Content Specialist (Anywhere)
Articles & Tutorials
Guido Interviews Brett Cannon
After last year’s release of the Python documentary, Guido decided to explore those contributors who weren’t mentioned. He now has an going series of written interviews with a variety of contributors from Python’s first 25 years. This interview is with Brett Cannon.
GUIDO VAN ROSSUM
“Requests” Needs You to Test Type Hints
Requests is a popular HTTP client library and is frequently in the top 10 PyPI downloads. There is an on-going effort to add type hinting to the library and to make sure the next release causes few issues, they need help testing.
SETH LARSON
Depot CI: Built for the Agent era
Depot CI: A new CI engine. Fast by design. Your GitHub Actions workflows, running on a fundamentally faster engine — instant job startup, parallel steps, full debuggability, per-second billing. One command to migrate →
DEPOT sponsor
Fire and Forget (Or Never) With Python’s Asyncio
Python’s asyncio.create_task() can silently garbage collect fire-and-forget tasks in 3.12+, meaning they might never run. This article shows you how to use the background tasks set pattern to fix it.
MICHAEL KENNEDY
Thoughts on OpenAI Acquiring Astral
Astral is the organization behind popular Python tools such as uv, ruff, and ty. Recently it was announced that OpenAI would be acquiring Astral. This opinion piece discusses the possible impact.
SIMON WILLISON
Standard Error
Standard error is one of the two writable file streams that is used for printing errors, warning messages, or any outputs that shouldn’t be mixed with the main program.
TREY HUNNER
🎓 Master Python’s Core Principles (Live Course)

Transform your Python skills in just eight weeks, with live expert guidance. No more second-guessing if your code is “Pythonic enough.” Master Python’s object model, advanced iteration, decorators, and clean system design through live instruction and hands-on practice in a small group setting:
REAL PYTHON sponsor
Textual: Creating a Custom Checkbox
The Textual TUI framework allows for a lot of customization and control over its widgets. This article shows you how to change a checkbox widget to give it a new look.
MIKE DRISCOLL
A Practical Guide to Python Supply Chain Security
A comprehensive guide to securing your Python dependencies from ingestion to deployment, covering linting, pinning, vulnerability scanning, SBOMs, and attestations
BERNÁT GÁBOR
Python 3.15’s JIT Is Now Back on Track
Python 3.15’s JIT is now back on track, meeting the performance targets the team set for itself. Progress was a bit bumpy and this post talks about what happened.
KEN JIN
From Properties to Descriptors
This article is about the weird and wonderful world of descriptors in Python. Learn what they’re for and how to use one of the trickier Python concepts.
STEPHEN GRUPPETTA
Modern Python Monorepo With uv and prek
Talk Python interviews Amogh Desai and Jarek Potiuk and they talk about how to use a monorepo with uv and prek.
TALK PYTHON podcast
Downloading Files From URLs With Python
Learn to download files from URLs with Python using urllib and requests, including data streaming for large files.
REAL PYTHON course
Building a Django Chat App With WebSockets
This article covers the best ways to build a chat app in Django using Websockets and ASGI.
HONEYBADGER.IO • Shared by Addison Curtis
Projects & Code
pristan: The Simplest Way to Create a Plugin System
GITHUB.COM/MUTATING • Shared by pomponchik
MaskOps: PII Masking as a Native Polars Plugin
GITHUB.COM/FCARVAJALBROWN • Shared by Felipe Carvajal Brown
Events
Weekly Real Python Office Hours Q&A (Virtual)
March 25, 2026
REALPYTHON.COM
Django Girls Colombia 2026
March 28 to March 29, 2026
DJANGOGIRLS.ORG
Python Sheffield
March 31, 2026
GOOGLE.COM
Python Southwest Florida (PySWFL)
April 1, 2026
MEETUP.COM
STL Python
April 2, 2026
MEETUP.COM
Happy Pythoning!
This was PyCoder’s Weekly Issue #727.
View in Browser »
[ Subscribe to 🐍 PyCoder’s Weekly 💌 – Get the best Python news, articles, and tutorials delivered to your inbox once a week >> Click here to learn more ]
Mike Driscoll
The Python Show – Python Illustrated
In this episode, we hear from two sisters who put together a beginner’s book about Python. The unique hook for their book is that one sister wrote the text while the other did the illustrations. Listen in as we learn about these incredible sisters and how they got into software programming, writing, and technical education.
You can check out their book, Python Illustrated, on Packt or Amazon.
Maaike is an Udemy instructor, and she also has courses on Pluralsight.
This episode was originally published on The Python Show!
The post The Python Show – Python Illustrated appeared first on Mouse Vs Python.
Ari Lamstein
Upcoming O’Reilly Workshop: Building Data Apps with Streamlit and Copilot
On April 14, I’ll be teaching a new 4‑hour live workshop for O’Reilly: Building Data Apps with Streamlit and Copilot.
If you work in Python and want to turn your analyses into interactive, shareable tools, this workshop is designed for you. We’ll start from a Jupyter notebook and build a complete Streamlit app that lets users explore a dataset through interactive controls, charts, and maps. Along the way, we’ll use Copilot to speed up development and discover Streamlit features more efficiently.
What we’ll cover
- Structuring a Streamlit app
- Working with user input (select boxes, filters, etc.)
- Creating interactive graphics with Plotly
- Organizing the UI with columns and tabs
- Deploying your app to Streamlit Cloud
The workshop is hands‑on: you’ll build the app step‑by‑step, and by the end you’ll have a working project you can adapt to your own data.
What You’ll Build
Here’s a screenshot from the app we’ll build together:

The app lets users choose a state and demographic statistic, explore how it changes over time, and view the data as a chart, map, or table.
And while the example uses demographic data, the skills you’ll learn—structuring an app, building interactive controls, and creating dynamic visualizations—apply to any Streamlit project you want to build.
Who is this for?
- Data scientists and analysts who want to make their work more interactive
- Python users who want to build dashboards without learning web development
- Anyone curious about Streamlit or Copilot
If you’re interested, I’d love to have you join. Registration is open now.
The Python Coding Stack
3 • 7600 • 33 • 121 • When Python Stacks Up
When I was a child, I used to pace up and down the corridor at home pretending to teach an imaginary group of people. It was my way of learning.
It still is.
I started writing about Python as a learning tool—to help me sort things out in my head, weave a thread through all the disparate bits of information, clarify my thoughts, make sure any knowledge gaps are filled.
I started The Python Coding Stack three years ago. That’s the first of the mystery numbers in the post’s title revealed! I had written elsewhere before, but at the time of starting The Stack, I felt I had found my own “Python voice”. I had been teaching Python for nearly a decade. I had written plenty of articles, but setting up The Python Coding Stack was a deliberate choice to step up. I was still writing articles primarily for my own benefit, but now I was also writing for others, hoping they would want to learn the way I do.
And 7,600 subscribers apparently do. Thank you for joining this journey, whether you were there three years ago or you joined a few days ago. If you just joined, there’s an archive of 121 articles, most of them long-form tutorials or step-by-step guides.
A special thank you to the 33 subscribers who chose to upgrade to premium and join The Club. It may only amount to 3 coffees per month for you, but it makes a difference to me. Thank you! I hope you’ve been enjoying the exclusive content for The Club members.
And perhaps, if a few more decide to join you in The Club (you can surely cut three coffees out of your monthly intake!), then this publication may even become self-sustainable. Your support can make a real difference—if you value these articles and want to see them continue, please consider joining now. At the moment, I give up a lot of my time for free to think about my articles, plan them, draft them, review them technically, review them linguistically, get them ready for publication, and then publish.
I mentioned my live teaching earlier. My written articles and my live teaching have a lot in common. One of the hardest things about teaching (or communication in general) is to place yourself in the learner’s mindset. I know, it’s obvious. But it’s hard.
A string of words can make perfect sense to someone who already understands the concept, but it’s hard to understand for someone learning it for the first time.
Going from A to B can be a smooth reasoning step for an expert, but requires a few more intermediate steps for a novice.
A trait that helps me in my teaching is my ability to recall the pain points I had when learning a topic. Everything is easy once you know it, but hard when you don’t. Remembering that what comes easily today was once hard is essential for teaching, whatever the format.
I often use my writing to help me with my live teaching. And, just as often, I discover a new angle or insight during live teaching that I then put down in writing. It’s a two-way street. Both forms of communication—live teaching and writing—complement each other.
All this to say that I enjoy writing these articles. They’re useful for me personally, and for my work teaching Python. And I hope they’re useful for you.
121 articles. The cliché would have me say that choosing favourites is like choosing a favourite child. But that’s not the case. There are articles I like less than others. So, I tried to put together a highlights reel of the past three years. Here we go…
The Centre of the Python Universe • Objects
A Stroll Across Python • Fancy and Not So Fancy Tools
The Curious Little Shop at The End of My Street • Python’s f-strings
If You Find if..else in List Comprehensions Confusing, Read This, Else…
Where Do I Store This? • Data Types and Structures
Clearing The Deque—Tidying My Daughter’s Soft Toys • A Python Picture Story
Hermione’s Undetectable Extension Charm: Revealed (Using Python)
bytes: The Lesser-Known Python Built-In Sequence • And Understanding UTF-8 EncodingWhere’s William? How Quickly Can You Find Him? • What’s a Python Hashable Object?
And here are the posts in The Club section of this publication, exclusive for premium subscribers: The Club | The Python Coding Stack
Happy 3rd Birthday to The Python Coding Stack. From just under a hundred people in the first week to 7,600+ today, this community has grown thanks to your enthusiasm.

Let’s keep up the momentum—consider joining The Club today! Your membership can help ensure The Python Coding Stack continues on its path, stronger than ever.

For more Python resources, you can also visit Real Python—you may even stumble on one of my own articles or courses there!
Also, are you interested in technical writing? You’d like to make your own writing more narrative, more engaging, more memorable? Have a look at Breaking the Rules.
And you can find out more about me at stephengruppetta.com
Real Python
Understanding CRUD Operations in SQL
CRUD operations are at the heart of nearly every application you interact with. As a developer, you usually want to create data, read or retrieve data, update data, and delete data. Whether you access a database or interact with a REST API, only when all four operations are present are you able to make a complete data roundtrip in your app.
Creating, reading, updating, and deleting are so vital in software development that these methods are widely referred to as CRUD. Understanding CRUD will give you an actionable blueprint when you build applications and help you understand how the applications you use work behind the scenes. So, what exactly does CRUD mean?
[ Improve Your Python With 🐍 Python Tricks 💌 – Get a short & sweet Python Trick delivered to your inbox every couple of days. >> Click here to learn more and see examples ]
Rodrigo Girão Serrão
Ask the LLM to write code for it

This article covers a useful LLM pattern where you ask the LLM to write code to solve a problem instead of asking it to solve the problem directly.
The problem of merging two transcripts
I had two files that contained two halves of the transcript of an audio recording and I wanted to use an LLM to merge the two halves. There were three reasons that stopped me from simply copying part 2 and pasting it after part 1:
- the two transcripts overlapped (the end of part 1 was after the start of part 2);
- the timestamps for part 2 started from 0, so they were missing an offset; and
- speaker identification was not consistent.
I uploaded the two halves into ChatGPT and asked it to merge the two transcripts, fix the timestamps and the speaker identification, but to not change the text.
The result I got back was a ridiculous attempt at providing the full transcript, with two sections that supposedly represented parts of either transcript I could just copy and paste confidently, and a couple of other ridiculous blunders.
Instead of fighting ChatGPT, I decided to use a very useful pattern I learned about last year.
Ask the LLM to write code for it
Instead of asking ChatGPT to merge the transcripts, I could ask it to analyse them, find the solutions to the three problems listed above, and then write code that would merge the transcripts.
Since I was confident that ChatGPT could
- identify the overlap between the two files;
- use the overlap information to compute the timestamp offset required for part 2; and
- figure out you had to swap the two speakers in part 2,
I knew ChatGPT would be able to write a Python script that could read from both files and apply a couple of string operations to the second part.
This yielded much better results in two ways. ChatGPT was able to find the solutions for the three problems above and write a script that fixed them automatically. That was the goal.
On top of that, since ChatGPT had a very clear implicit goal — get the final merged transcript — and since running Python code is something that ChatGPT can do, ChatGPT even ran the script for me and produced two artifacts at the end:
- the full Python script I could run against the two halves if I wanted; and
- the final, fixed transcript.
This is an example application of a really useful LLM pattern:
Don't ask the LLM to solve a problem. Instead, ask it to write code that solves the problem.
As another visual example, it's much easier to ask an LLM to write a Python script that draws a path that solves a maze (that's just a couple hundred of lines of code) than it is to upload an image and ask the LLM to draw a valid path on the picture of a maze. Try it yourself!
Real Python
Quiz: Python Modules and Packages: An Introduction
In this quiz, you’ll test your understanding of Python Modules and Packages.
By working through this quiz, you’ll revisit how to write and import modules and packages, how to structure code for modular development, and how to combine modules to create larger applications.
This quiz will help you practice organizing projects so they stay easier to maintain and grow.
[ Improve Your Python With 🐍 Python Tricks 💌 – Get a short & sweet Python Trick delivered to your inbox every couple of days. >> Click here to learn more and see examples ]
Nicola Iarocci
Eve 2.3.1
I just released Eve v2.3.1. In the unlikely event that you’ve been using JSONP callbacks with Eve, you’ll want to update as this patch improves on their security (changelog).
Seth Michael Larson
LAN Party Calculator (Mario Kart, Kirby Air Riders, F-Zero)
Nintendo has multiple popular racing franchises, including Mario Kart, Kirby Air Ride, and F-Zero. Each of these franchises spans multiple titles and consoles and have ways to play with more than one console in a single shared “game lobby”. This feature makes these games interesting for LAN parties, where you have many players, consoles, and games in one area.
What does it mean to be the most “LAN-party-able” Nintendo racing game? There are three metrics I found interesting for this question: most-players, price-per-player, and “real-estate”-per-player (aka: TVs/consoles). There is a different “best” game according to each of these metrics. I've compiled the data and created a small calculator to compare:
Game Mode #P Price Consoles Games Cables Adapters TVs
- Price includes consoles, controllers, games, cables, adapters. Prices sourced from Pricecharting and Microcenter (no affiliation) for March 2026. TVs and Mountain Dew™ not included in price.
- “Cables” means Link Cables for the GBA or Ethernet for the GameCube, Switch, and Switch 2.
- “Adapters” means ETH2GC for the GameCube, “USB-A to Ethernet” adapters for docked Switch 1, or “USB-C to Ethernet” for undocked Switch 1 and Switch 2.
Which games are the winners?
- Best price per player: Mario Kart DS using DS Download Play. With this method you can buy a single copy of Mario Kart DS and play concurrently with up to 8 players. With 8 players would cost $62 per player.
- Best real-estate per player: Mario Kart: Double Dash!! in LAN mode. This is somehow the only game in the list that supports 4 players per console in LAN mode, all future games only support 1 or 2 players per console in LAN mode. This means fewer TVs and consoles per player and helps alleviate slightly higher prices these days for GameCube gear.
- Most players: F-Zero 99 hands down wins most players with up to 99 per lobby. Mario Kart World also supports up to 24 concurrent players in LAN mode, but needing to use 12 Switch 2's compared to F-Zero being a Switch 1 title means a much higher price.
Why did you build this?
This post was inspired by hosting a LAN party with friends for my birthday. Researching and verifying the limits for each game and console took a lot of work, so I hope this can save someone some time wrangling all these numbers in the future. After all this research, the games I chose for the LAN party are “Mario Kart: Double Dash” on the GameCube, “Mario Kart 8 Deluxe” and “F-Zero 99” on the Nintendo Switch, and “Mario Kart World” on the Nintendo Switch 2.
The data and the script I used to generate this calculator is all open source. If there are mistakes or improvements, please submit a patch. Please note that I don't own a DS, 3DS, or Wii U so the numbers there are more likely to be incorrect. The rest of this blog post will be about the specifics for each console and game.
What features does each game support?
Each game supports one of four multiplayer modes: Local, LAN, Online, and Share. Availability depends on both the console and the game.
| Game | Console | Year | Local | LAN | Online | Share |
|---|---|---|---|---|---|---|
| Super Mario Kart | SNES | 1992 | YES | NO | NO | NO |
| F-Zero | SNES | 1990 | YES | NO | NO | NO |
| Mario Kart 64 | N64 | 1996 | YES | NO | NO | NO |
| Mario Kart: Super Circuit | GBA | 2001 | NO | YES | NO | YES (1) |
| F-Zero: Maximum Velocity | GBA | 2003 | NO | YES | NO | YES (1) |
| F-Zero: GP Legend | GBA | 2003 | NO | YES | NO | YES (1) |
| Mario Kart: Double Dash!! | GameCube | 2003 | YES | YES | NO | NO |
| Kirby Air Ride | GameCube | 2003 | YES | YES | NO | NO |
| F-Zero GX | GameCube | 2003 | YES | NO | NO | NO |
| Mario Kart DS | DS | 2005 | NO | YES | YES | YES (2) |
| Mario Kart Wii | Wii | 2008 | YES | NO | YES | NO |
| Mario Kart 7 | 3DS/2DS | 2011 | NO | YES | YES | YES (2) |
| Mario Kart 8 | Wii U | 2014 | YES | NO | YES | NO |
| Mario Kart 8 Deluxe | Switch | 2017 | YES | YES | YES | NO |
| F-Zero 99 | Switch | 2023 | NO | NO | YES | NO |
| Mario Kart World | Switch 2 | 2025 | YES | YES | YES | NO |
| Kirby Air Riders | Switch 2 | 2025 | YES | YES | YES | YES (3) |
- (1): via GBA Single-Pak Link Mode
- (2): via DS Download Play
- (3): via Nintendo Switch GameShare
Pricing
Here is a table with costs from March 2026 for each game, console, and accessory:
| Game | Console | Controller | Cable | Adapter | ||
|---|---|---|---|---|---|---|
| F-Zero | $18 | SNES | $129 | $17 | ||
| Super Mario Kart | $34 | |||||
| Mario Kart 64 | $46 | N64 | $87 | $16 | ||
| Mario Kart: Super Circuit | $17 | GBA | $73 | $24 | ||
| F-Zero: GP Legend | $30 | |||||
| F-Zero: Maximum Velocity | $20 | |||||
| F-Zero GX | $61 | GameCube | $119 | $28 | $5 | $25 |
| Kirby Air Ride | $71 | |||||
| Mario Kart: Double Dash!! | $60 | |||||
| Mario Kart DS | $17 | DS | $60 | |||
| Mario Kart Wii | $35 | Wii | $60 | $13 | ||
| Mario Kart 7 | $14 | 3DS/2DS | $94 | |||
| Mario Kart 8 | $10 | Wii U | $129 | $30 | ||
| Mario Kart 8 Deluxe | $35 | Switch | $135 | $36 | $5 | |
| F-Zero 99 | $0 | |||||
| Kirby Air Riders | $50 | Switch 2 | $395 | $36 | $5 | $20 |
| Mario Kart World | $58 |
Game Boy Advance
The Game Boy Advance (GBA) had multiple features that made the console perfect for multi-console multiplayer. These features being the new GBA Link Cables, allowing more than two consoles to connect, and the Single-Pak Link Play that all the GBA titles on this list support.
GBA Link Cables have three terminals per cable, a larger grey plug, a smaller blue plug, and a smaller blue socket in the middle of the cable. The grey and blue plugs both fit into a GBA console, but the larger grey plug does not fit into the small blue socket on the cable. To connect four players, two players connect like normal, and then player three connects their blue plug into the blue socket between the existing connected consoles. In the end, this means you only need N-1 cables for N consoles and that a single player (player 1) ends up with a blue plug in their console.
The second feature “Single-Pak Link Play” allowed a single player to own a cartridge and to share the game with other connected consoles if the game supports the mode. This mode is also sometimes called “Multiboot” or “Joyboot”. Because the game ROM data itself is transferred to the other consoles, this often made for load-times during startup and meant all content wasn't playable by all players. For example, in Mario Kart: Super Circuit only a subset of maps and characters were available in Single-Pay Link Play mode.
GameCube
The GameCube was Nintendo’s first internet-enabled console, even if only 8 titles supported the feature. Only three titles supported LAN play, that being Kirby Air Ride, Mario Kart: Double Dash!!, and 1080° Avalanche.
The GameCube Broadband Adapter is legendarily expensive now due to how few games supported the feature at all. Nowadays, it's advised to modify your GameCube with a method to boot into Swiss and using Swiss’s “Emulate Broadband Adapter” feature with an ETH2GC adapter. These adapters are cheap, even if you don't assemble them yourself. There are a few variants, ETH2GC Sidecar, ETH2GC Lite, and ETH2GC Card Slot. I am currently running a ETH2GC Sidecar and ETH2GC Card Slot and both work together with Mario Kart: Double Dash!! and Kirby Air Ride.
DS, Wii, Wii U, 3DS
The DS supported a feature called DS Download Play, which similar to Single-Pak Link play for the GBA, allowed a playing single game cartridge with up to 8 consoles. The 3DS also supported this feature.
Beyond this I didn't have a lot to say about these consoles, as they aren't my interest. If you have more to say, maybe write your own blog post and send it to me after!
Nintendo Switch
The first-generation Switch is a quirky console being both portable and dockable. Because the console itself has a screen on it, this means you can play games without a TV. However, to access “LAN” modes in Mario Kart 8 Deluxe you need to be physically linked via Ethernet.
Problem is... the original Switch doesn't have an Ethernet port. And depending on whether you're playing docked or undocked: you'll need a different adapter! If you're playing undocked, using the Switch screen as your “TV” you'll need to buy a USB-C to Ethernet adapter. If you're playing docked you'll need to buy a USB-A to Ethernet adapter, as the dock itself doesn't have a USB-C port except for power delivery. Switch OLED docks do have an Ethernet port, so if you have one of those models then you won't need an adapter in docked mode.
Test your adapters before your LAN party, as not every adapter will be accepted by the Switch!
Both the first-generation Switch and Switch 2 also come with two controllers (“Joycons”) per console, meaning you'll have to buy fewer controllers to reach high player counts.
Nintendo Switch 2
The Switch 2 is similar to the Switch 1, being both portable and dockable. Nintendo included an Ethernet port on the Switch 2 dock, and also USB-A and USB-C ports, too. So if you're playing without a TV, you'll still need a USB-C to Ethernet adapter for your Switch 2.
The Switch 2 adds support for a new mode: Game Share. This mode is similar to DS Download Play and Single-Pak Link in terms of functionality but in terms of implementation: it's local game streaming! Even cooler, this feature means that first-generation Switch consoles can “play” some Switch 2 games like Kirby Air Riders without sacrificing any features.
Mario Kart: Double Dash!!
The game supports up to 16 players, however you can only have 8 total karts per race. Double Dash allows two players to share a single kart, with one player driving and other throwing items. LAN mode also doesn't allow selecting which character or kart you are, you are assigned which kart you will be driving.
Kirby Air Ride
Despite supporting LAN mode and having 8 Kirby colors, you are only allowed to have 4 players maximum within City Trial or Air Ride modes. So, the LAN mode only allows having fewer people sharing a TV.
F-Zero GX
I saw a reference online to a Nintendo-hosted online leaderboard via passwords or ghosts for Time Attack, but wasn't able to find an actual source that this happened. If you have a reference or video, please send it my way! Otherwise, I may be mis-remembering something else that I read in the past.
F-Zero 99
First F-Zero game in over 20 years (sorry F-Zero fans, us Kirby Air Ride fans know how you feel). Allows up to 99 players in a private lobby. Game is free, but you need a Switch or Switch 2 console per player. There isn't any local or LAN multiplayer, so once Nintendo Switch Online is sunsetted this game won't be playable with multiplayer.
Mario Kart 8 Deluxe, Mario Kart World
In both Mario Kart 8 Deluxe and Mario Kart World the LAN play mode is hidden behind holding L+R and pressing the left joystick down on the "Wireless Play" option.
Kirby Air Riders
There is very little information online about Kirby Air Riders LAN multiplayer mode. The official Nintendo documentation doesn't describe the allowed number of players per console. If anyone has more definitive data, please reach out. Nintendo Switch GameShare allows playing online with four players with only one cartridge. Nintendo Switch GameShare for Kirby Air Riders is also compatible with Nintendo Switch consoles.
Note that on launch Kirby Air Riders was very disappointing with online play only allowing one player per console. An update added support for more than one player per console for wireless play. LAN mode still requires 1 console per player.
Local Multiplayer
Multiple players play the game on a single console with different controllers.
| Game | 1 | 2 | 3 | 4 |
|---|---|---|---|---|
| Super Mario Kart | $163 | $180 | ||
| F-Zero | $147 | $164 | ||
| Mario Kart 64 | $133 | $149 | $165 | $181 |
| Mario Kart: Double Dash!! | $179 | $207 | $235 | $263 |
| Kirby Air Ride | $190 | $218 | $246 | $274 |
| F-Zero GX | $180 | $208 | $236 | $264 |
| Mario Kart Wii | $95 | $108 | $121 | $134 |
| Mario Kart 8 | $139 | $169 | $199 | $229 |
| Mario Kart 8 Deluxe | $170 | $170 | $206 | $242 |
| Mario Kart World | $453 | $453 | $489 | $525 |
| Kirby Air Riders | $445 | $445 | $481 | $517 |
LAN Multiplayer
Consoles directly communicate to each other through wired, short-range wireless, or “local” internet connections, such as ethernet running to an internet switch/router or are directly wired together through ethernet or console-specific link cable. What distinguishes this mode from “Wireless” is that this mode will continue to work even after Nintendo servers have been discontinued.
| Game | 2 | 3 | 4 | 5 | 6 | 7 | 8 | 9 | 10 | 11 | 12 | 13 | 14 | 15 | 16 | 17 | 18 | 19 | 20 | 21 | 22 | 23 | 24 |
|---|---|---|---|---|---|---|---|---|---|---|---|---|---|---|---|---|---|---|---|---|---|---|---|
| Mario Kart: Super Circuit | $204 | $318 | $432 | ||||||||||||||||||||
| F-Zero: Maximum Velocity | $210 | $327 | $444 | ||||||||||||||||||||
| F-Zero: GP Legend | $230 | $357 | $484 | ||||||||||||||||||||
| Mario Kart: Double Dash!! | $418 | $446 | $474 | $502 | $530 | $558 | $586 | $795 | $823 | $851 | $879 | $1088 | $1116 | $1144 | $1172 | ||||||||
| Kirby Air Ride | $440 | $468 | $496 | ||||||||||||||||||||
| Mario Kart DS | $154 | $231 | $308 | $385 | $462 | $539 | $616 | ||||||||||||||||
| Mario Kart 7 | $216 | $324 | $432 | $540 | $648 | $756 | $864 | ||||||||||||||||
| Mario Kart 8 Deluxe | $390 | $390 | $390 | $585 | $585 | $780 | $780 | $975 | $975 | $1170 | $1170 | ||||||||||||
| Mario Kart World | $956 | $956 | $956 | $1434 | $1434 | $1912 | $1912 | $2390 | $2390 | $2868 | $2868 | $3346 | $3346 | $3824 | $3824 | $4302 | $4302 | $4780 | $4780 | $5258 | $5258 | $5736 | $5736 |
| Kirby Air Riders | $940 | $1410 | $1880 | $2350 | $2820 | $3290 | $3760 | $4230 | $4700 | $5170 | $5640 | $6110 | $6580 | $7050 | $7520 |
Online Multiplayer
Multiplayer where you can play against your friends or other players without needing to be on the same local network. This uses either Wi-Fi or Ethernet but connected to the global internet. This mode relies on a central service so once discontinued will either not be possible or will require modifications to your console, such as wiimmfi for the Nintendo Wii.
| Game | 2 | 3 | 4 | 5 | 6 | 7 | 8 | 9 | 10 | 11 | 12 | 13 | 14 | 15 | 16 | 17 | 18 | 19 | 20 | 21 | 22 | 23 | 24 |
|---|---|---|---|---|---|---|---|---|---|---|---|---|---|---|---|---|---|---|---|---|---|---|---|
| Mario Kart DS | $154 | $231 | $308 | ||||||||||||||||||||
| Mario Kart Wii | $190 | $203 | $216 | $311 | $324 | $419 | $432 | $527 | $540 | $635 | $648 | ||||||||||||
| Mario Kart 7 | $216 | $324 | $432 | ||||||||||||||||||||
| Mario Kart 8 | $278 | $308 | $338 | $477 | $507 | $646 | $676 | ||||||||||||||||
| Mario Kart 8 Deluxe | $340 | $340 | $340 | $510 | $510 | $680 | $680 | ||||||||||||||||
| F-Zero 99 | $270 | $405 | $540 | $675 | $810 | $945 | $1080 | $1215 | $1350 | $1485 | $1620 | $1755 | $1890 | $2025 | $2160 | $2295 | $2430 | $2565 | $2700 | $2835 | $2970 | $3105 | $3240 |
| Mario Kart World | $906 | $906 | $906 | $1359 | $1359 | $1812 | $1812 | $2265 | $2265 | $2718 | $2718 | $3171 | $3171 | $3624 | $3624 | ||||||||
| Kirby Air Riders | $890 | $890 | $890 | $1335 | $1335 | $1780 | $1780 |
Mario Kart Wii, Mario Kart DS have mods you can apply to play online in private servers. Mario Kart: Double Dash!! and Kirby Air Ride also have mods that allow wireless play which wasn't possible when the games were first released.
Share Multiplayer (Single-Pak Link, DS Download Play, Game Share)
This multiplayer mode allows playing with local players that own a console, but not the game. This usually results in a degraded experience for players that don't own the game, such as a reduced number of playable characters, karts, or racetracks. Nintendo Switch “GameShare” uses game streaming between consoles.
| Game | 2 | 3 | 4 | 5 | 6 | 7 | 8 |
|---|---|---|---|---|---|---|---|
| Mario Kart: Super Circuit | $187 | $284 | $381 | ||||
| F-Zero: Maximum Velocity | $190 | $287 | $384 | ||||
| F-Zero: GP Legend | $200 | $297 | $394 | ||||
| Mario Kart DS | $137 | $197 | $257 | $317 | $377 | $437 | $497 |
| Mario Kart 7 | $202 | $296 | $390 | $484 | $578 | $672 | $766 |
| Kirby Air Riders | $840 | $1235 | $1630 |
All Multiplayers
Here is a table comparing all multiplayer modes and their costs:
| Game | Mode | 1 | 2 | 3 | 4 | 5 | 6 | 7 | 8 | 9 | 10 | 11 | 12 | 13 | 14 | 15 | 16 | 17 | 18 | 19 | 20 | 21 | 22 | 23 | 24 |
|---|---|---|---|---|---|---|---|---|---|---|---|---|---|---|---|---|---|---|---|---|---|---|---|---|---|
| Super Mario Kart | LOCAL | $163 | $180 | ||||||||||||||||||||||
| F-Zero | LOCAL | $147 | $164 | ||||||||||||||||||||||
| Mario Kart 64 | LOCAL | $133 | $149 | $165 | $181 | ||||||||||||||||||||
| Mario Kart: Super Circuit | LOCAL | $90 | |||||||||||||||||||||||
| LAN | $90 | $204 | $318 | $432 | |||||||||||||||||||||
| SHARE | $90 | $187 | $284 | $381 | |||||||||||||||||||||
| F-Zero: Maximum Velocity | LOCAL | $93 | |||||||||||||||||||||||
| LAN | $93 | $210 | $327 | $444 | |||||||||||||||||||||
| SHARE | $93 | $190 | $287 | $384 | |||||||||||||||||||||
| F-Zero: GP Legend | LOCAL | $103 | |||||||||||||||||||||||
| LAN | $103 | $230 | $357 | $484 | |||||||||||||||||||||
| SHARE | $103 | $200 | $297 | $394 | |||||||||||||||||||||
| Mario Kart: Double Dash!! | LOCAL | $179 | $207 | $235 | $263 | ||||||||||||||||||||
| LAN | $179 | $418 | $446 | $474 | $502 | $530 | $558 | $586 | $795 | $823 | $851 | $879 | $1088 | $1116 | $1144 | $1172 | |||||||||
| Kirby Air Ride | LOCAL | $190 | $218 | $246 | $274 | ||||||||||||||||||||
| LAN | $190 | $440 | $468 | $496 | |||||||||||||||||||||
| F-Zero GX | LOCAL | $180 | $208 | $236 | $264 | ||||||||||||||||||||
| Mario Kart DS | LOCAL | $77 | |||||||||||||||||||||||
| LAN | $77 | $154 | $231 | $308 | $385 | $462 | $539 | $616 | |||||||||||||||||
| ONLINE | $77 | $154 | $231 | $308 | |||||||||||||||||||||
| SHARE | $77 | $137 | $197 | $257 | $317 | $377 | $437 | $497 | |||||||||||||||||
| Mario Kart Wii | LOCAL | $95 | $108 | $121 | $134 | ||||||||||||||||||||
| ONLINE | $95 | $190 | $203 | $216 | $311 | $324 | $419 | $432 | $527 | $540 | $635 | $648 | |||||||||||||
| Mario Kart 7 | LOCAL | $108 | |||||||||||||||||||||||
| LAN | $108 | $216 | $324 | $432 | $540 | $648 | $756 | $864 | |||||||||||||||||
| ONLINE | $108 | $216 | $324 | $432 | |||||||||||||||||||||
| SHARE | $108 | $202 | $296 | $390 | $484 | $578 | $672 | $766 | |||||||||||||||||
| Mario Kart 8 | LOCAL | $139 | $169 | $199 | $229 | ||||||||||||||||||||
| ONLINE | $139 | $278 | $308 | $338 | $477 | $507 | $646 | $676 | |||||||||||||||||
| Mario Kart 8 Deluxe | LOCAL | $170 | $170 | $206 | $242 | ||||||||||||||||||||
| LAN | $170 | $390 | $390 | $390 | $585 | $585 | $780 | $780 | $975 | $975 | $1170 | $1170 | |||||||||||||
| ONLINE | $170 | $340 | $340 | $340 | $510 | $510 | $680 | $680 | |||||||||||||||||
| F-Zero 99 | LOCAL | $135 | |||||||||||||||||||||||
| ONLINE | $135 | $270 | $405 | $540 | $675 | $810 | $945 | $1080 | $1215 | $1350 | $1485 | $1620 | $1755 | $1890 | $2025 | $2160 | $2295 | $2430 | $2565 | $2700 | $2835 | $2970 | $3105 | $3240 | |
| Mario Kart World | LOCAL | $453 | $453 | $489 | $525 | ||||||||||||||||||||
| LAN | $453 | $956 | $956 | $956 | $1434 | $1434 | $1912 | $1912 | $2390 | $2390 | $2868 | $2868 | $3346 | $3346 | $3824 | $3824 | $4302 | $4302 | $4780 | $4780 | $5258 | $5258 | $5736 | $5736 | |
| ONLINE | $453 | $906 | $906 | $906 | $1359 | $1359 | $1812 | $1812 | $2265 | $2265 | $2718 | $2718 | $3171 | $3171 | $3624 | $3624 | |||||||||
| Kirby Air Riders | LOCAL | $445 | $445 | $481 | $517 | ||||||||||||||||||||
| LAN | $445 | $940 | $1410 | $1880 | $2350 | $2820 | $3290 | $3760 | $4230 | $4700 | $5170 | $5640 | $6110 | $6580 | $7050 | $7520 | |||||||||
| ONLINE | $445 | $890 | $890 | $890 | $1335 | $1335 | $1780 | $1780 | |||||||||||||||||
| SHARE | $445 | $840 | $1235 | $1630 |
Thanks for keeping RSS alive! ♥
March 23, 2026
Talk Python Blog
Updates from Talk Python - March 2026
There have been a bunch of changes to make the podcast and courses at Talk Python just a little bit better. And I wrote a few interesting articles that might pique your interest. So I thought it was time to send you all a quick little update and let you know what’s new and improved.
Talk Python Courses
Account Dashboard for courses
I spoke to a lot of users who said that it’s a bit difficult to jump back into your account and see which courses you were last taking. I can certainly appreciate that, especially if you have the bundle with every class is available. So I added this cool new dashboard that sorts and displays your progress through your most recent course activity as well as courses that you have finished.
"Michael Kennedy's Thoughts on Technology"
Replacing Flask with Robyn wasn't worth it

TL;DR; I converted Python Bytes from Quart/Flask to the Rust-backed Robyn framework and benchmarked it with Locust. There was no meaningful speed or memory improvement - and Robyn actually used more memory. Framework maturity, ecosystem depth, and app server flexibility still matter more than raw benchmark numbers.
Last week I played with the idea of replacing Quart (async Flask ) with Robyn for our bigger web apps. Robyn is built almost entirely in Rust, and in the benchmarks, it looks dramatically better. Not just a little bit faster, but 25 times faster. However, if you’ve been around the block for a while, you know that benchmarks and how things work for your app and your situation are not always the same thing.
So I picked the simplest complex app that I run, Python Bytes, and converted it entirely to run on the Robyn framework. This took a few hours of careful work and experimenting, and I even had to create a Python package to allow Robyn to run the Chameleon template language.
When I was done, it was time to fire up Locust and see if there was any dramatic performance improvements. I certainly wasn’t expecting 25x, but 2x? 1.5x? That would have been really impressive.
Did Robyn improve speed or memory over Flask?
The results were in and the answer was just about no difference in RPS or latency. It turns out that almost all the computational time is in the logic of our app, which of course doesn’t change and I never intended to change it.
- Requests per second: No meaningful difference between Robyn and Quart/Granian
- Latency: Essentially identical under load
- Memory: Robyn actually used more memory, not less
Another area I was hoping to optimize is memory. Our web apps use a lot of memory for what they are. They’re certainly not trivial. But running a couple of copies of the app in a web garden was using way more than I expected that they should. And I thought moving closer to Rust might have positive influences for memory too.
It turns out the Robyn fork actually used more memory, not less, than the current setup. After all, our web apps run on Granian, which is mostly Rust right up to the Flask framework itself already.
Why Flask’s maturity still beats Robyn’s speed
So our fun little spike to explore the Robyn framework is going to remain just that. I’m sticking with Flask. I’ve talked about this before, but maturity in a library or framework is a big plus. The ecosystem for Flask/Quart is much bigger and more polished than for the smaller Robyn framework.
More than that, the app server runtime for Robyn is much less polished than some of the pluggable app servers out there. Think Granian, Gunicorn, uvicorn, etc. For example, Robyn does not support web garden process recycling. In many servers you can say after five hours or 10,000 requests or something like that, just slowly take the request out of a process, spin up a new one and shut down the old one just to keep things fresh. This helps if you’re using some library that holds on to too many caches or some other weird memory thing.
Was the Robyn experiment a waste of time?
Even though I spent maybe close to six hours working on this exploration and decided not to use it, I still found it super valuable. I created the fun Chameleon Robyn package to help people using Robyn have a greater choice of template languages. I got to see my apps from multiple perspectives. I built out some tooling for Claude that I’m going to write about later that is generally really awesome. And I ended up saving significant memory for some of my biggest web apps by just spending more time thinking about how I’m running them currently in Granian and Flask.
PyCharm
OpenAI Acquires Astral: What It Means for PyCharm Users
On March 19, OpenAI announced that it would acquire Astral, the company behind uv, Ruff, and ty. The Astral team, led by founder Charlie Marsh, will join OpenAI’s Codex team. The deal is subject to regulatory approval.
First and foremost: congratulations to Charlie Marsh and the entire Astral team. They shipped some of the most beloved tools in the Python ecosystem and raised the bar for what developer tooling can be. This acquisition is a reflection of the impact they’ve had.
This is big news for the Python ecosystem, and it matters to us at JetBrains. Here’s our perspective.
What Astral built
In just two years, Astral transformed Python tooling. Their tools now see hundreds of millions of downloads every month, and for good reason:
- uv is a blazing-fast package and environment manager that unifies functionality from pip, venv, pyenv, pipx, and more into a single tool. With around 124 million monthly downloads, it has quickly become the default choice for many Python developers.
- Ruff is an extremely fast linter and formatter, written in Rust. For many teams it has replaced flake8, isort, and black entirely.
- ty is a new type checker for Python. It’s still early, and we’re already working on it with PyCharm. It’s showing promise.
This is foundational infrastructure that millions of developers rely on every day. We’ve integrated both Ruff and uv into PyCharm because they substantially make Python development better.
The risks are real, but manageable
Change always carries risk, and acquisitions are no exception. The main concern here is straightforward: if Astral’s engineers get reassigned to OpenAI’s more commercial priorities, these tools could stagnate over time.
The good news is that Astral’s tools are open-source under permissive licenses. The community can fork them if it ever comes to that. As Armin Ronacher has noted, uv is “very forkable and maintainable.” There’s no possible future where these tools go backwards.
Both OpenAI and Astral have committed to continued open-source development. We take them at their word, and we hope for the best.
Our commitment hasn’t changed
JetBrains already has great working relationships with both the Astral and the Codex teams. We’ve been integrating Ruff and uv into PyCharm, and we will continue to do so. We’ve submitted some upstream improvements to ty. Regardless of who owns these tools, our commitment to supporting the best Python tooling for our users stays the same. We’ll keep working with whoever maintains them.
The Python ecosystem is stronger because of the work Astral has done. We hope this acquisition amplifies that work, not diminishes it. We’ll be watching closely, and we’ll keep building the best possible experience for Python developers in PyCharm.
James Bennett
Rewriting a 20-year-old Python library
Way back in 2005, lots of people (ordinary people, not just people who work in tech) used to have personal blogs where they wrote about things, rather than using third-party short-form social media sites. I was one of those people (though I wasn’t yet blogging on this specific site, which launched the following year). And back in 2005, and even earlier, people liked to have comment sections on their blogs where readers could leave their thoughts on posts. And that was an absolute magnet for spam.
There were a few attempts to do something about this. One of them was Akismet, which launched that year and provided a web service you could send a comment (or other user-generated-content) submission to, and get back a classification of spam or not-spam. It turned out to be moderately popular, and is still around today.
The folks behind Akismet also documented their API and set up an API key system so people could write their own clients/plugins for various programming languages and blog engines and content-management systems. And so pretty quickly after the debut of the Akismet service, Michael Foord, who the Python community, and the world, tragically lost at the beginning of 2025, wrote and published a Python library, which he appropriately called akismet, that acted as an API client for it.
He published a total of five releases of his Python Akismet library over the next few years, and people started using it. Including me, because I had several use cases for spam filtering as a service. And for a while, things were good. But then Python 3 was released, and people started getting serious about migrating to it, and Michael, who had been promoted into the Python core team, didn’t have a ton of time to work on it. So I met up with him at a conference in 2015, and offered to maintain the Akismet library, and he graciously accepted the offer, imported a copy of his working tree into a GitHub repository for me, and gave me access to publish new packages.
In the process of porting the code to support both Python 2 and 3 (as was the fashion at the time), I did some rewriting and refactoring, mostly focused on simplifying the configuration process and the internals. Some configuration mechanisms were deprecated in favor of either explicitly passing in the appropriate values, or else using the 12-factor approach of storing configuration in environment variables, and the internal HTTP request stack, based entirely on the somewhat-cumbersome (at that time) Python standard library, was replaced with a dependency on requests. The result was akismet 1.0, published in 2017.
Over the next six years, I periodically pushed out small releases of akismet, mostly focused on keeping up with upstream Python version support (and finally going Python-3-only, in 2020 when Python 2.7 reached its end of upstream support). But beginning in 2024, I embarked on a more ambitious project which spanned multiple releases and turned into a complete rewrite of akismet which finished a few months ago. So today I’d like to talk about why I chose to do that, how the process went, and what it produced.
Why?
Although I’m not generally a believer in the concept of software projects being “done” and thus no longer needing active work (in the same sense as “a person isn’t really dead as long as their name is still spoken”, I believe a piece of software isn’t really “done” as long as it has at least one user), a major rewrite is still something that needs a justification. In the case of akismet, there were two specific things I wanted to accomplish that led me to this point.
One was support for a specific feature of the Akismet API. The akismet Python client’s implementation of the most important API method—the one that tells you whether Akismet thinks content is spam, called comment-check—had, since the very first version, always returned a bool. Which at first sight makes sense, because the Akismet web service’s response body for that endpoint is plain text and is either the string true (Akismet thinks the content is spam) or the string false (Akismet thinks it isn’t spam). Except actually Akismet supports a third option: “blatant” spam, meaning Akismet is so confident in its determination that it thinks you can throw away the content without further review (while a normal “spam” determination might still need a human to look at it and double-check). It signals this by returning the true text response and also setting a custom HTTP response header (X-Akismet-Pro-Tip: discard). But the akismet Python client couldn’t usefully expose this, since the original API design of the client chose to have this method return a two-value bool instead of some other type that could handle a three-value situation. And any attempt to fix it would necessarily change the return type, which would be a breaking change.
The other big motivating factor for a rewrite was the rise of asynchronous Python via async and await, originally introduced in Python 3.5. The async Python ecosystem has grown tremendously, and I wanted to have a version of akismet that could support async/non-blocking HTTP requests to the Akismet web service.
Keep it classy?
The first thing I did was spend a bit of time exploring whether I could replace the entire class-based design of the library. Since the very first version back in 2005, the akismet library had always provided its client as a class (named Akismet) with one method for each supported Akismet HTTP API method. But it’s always worth asking if a class is actually the right abstraction. Very often it’s not! And while Python is an object-oriented language and allows you to write classes, it doesn’t require you to write them. So I spent a little while sketching out a purely function-based API.
One immediate issue with this was how to handle the API credentials. Akismet requires you to obtain an API key and to register one or more sites which will use that API key, and most Akismet web API operations require that both the API key and the current site be sent with the request. There’s also a verify-key API operation which lets you submit a key and site and tells you if they’re valid; if you don’t use this, and accidentally start trying to use the rest of the Akismet API with an invalid key and/or site, the other Akismet API operations send back responses with a body of invalid.
As noted above, the 1.0 release already nudged users of akismet in the direction of putting config in the environment, so reading the key and site from env variables was already well-supported. But some people probably can’t, or won’t want to, use environment variables for configuration. For example: they might have multiple sets of Akismet credentials in a multi-tenant application, and need to explicitly pass different sets of credentials depending on which site they’re performing checks for. So in any function-based interface, all the functions would not only need to be able to read configuration from the environment (which at least could be factored out into a helper function), they’d also need to explicitly accept credentials as optional arguments. That complicates the argument signatures (which are already somewhat gnarly because of all the optional information you can provide to Akismet to help with spam determinations), and makes the API start to look cumbersome.
This was a clue that the function-based approach was probably not the right one: if a bunch of functions all have to accept extra arguments for a common piece of data they all need, it’s a sign that they may really want to be a class which just has the necessary data available internally.
The other big sticking point was how to handle credential verification. It requires an HTTP request/response to Akismet, so ideally you’d do this once (per set of credentials per process). Say, if you’re using Akismet in a web application, you’d want to check your credentials at process startup, and then just treat them as known-good for the lifetime of the process after that. Which is what the the existing class-based code did: it performed a verify-key on instantiation and then could re-use the verified credentials after that point (or raise an immediate exception if the credentials were missing or invalid). I really like the ergonomics of that, since it makes it much more difficult to create an Akismet client in an invalid/misconfigured state, but it basically requires some sort of shared state. Even if the API key and site URL are read from the environment or passed as arguments every time, there needs to be some sort of additional information kept by the client code to indicate they’ve been validated.
It still would be possible to do this in a function-based interface. It could implicitly verify each new key/site pair on first use, and either keep a full list of ones that had been verified or maybe some sort of LRU cache of them. Or there could be an explicit function for introducing a new key/site pair and verifying them. But the end result of that is a secretly-stateful module full of functions that rely on (and in some cases act on) the state; at that point the case for it being a class is pretty overwhelming.
As an aside, I find that spending a bit of time thinking about, or perhaps even writing sample documentation for, how to use a hypothetical API often uncovers issues like this one. Also, for a lot of people it’s seemingly a lot easier, psychologically, to throw away documentation than to throw away even barely-working code.
One class or two?
Another idea that I rejected pretty quickly was trying to stick to a single Akismet client class. There is a trend of libraries and frameworks providing both sync and async code paths in the same class, often using a naming scheme which prefixes the async versions of the methods with an a (like method_name() for the sync version and amethod_name() for async), but it wasn’t really compatible with what I wanted to do. As mentioned above, I liked the ergonomics of having the client automatically validate your API key and site URL, but doing that in a single class supporting both sync and async has a problem: which code path to use to perform the automatic credential validation? Users who want async wouldn’t be happy about a synchronous/blocking request being automatically issued. And trying to choose the async path by default would introduce issues of how to safely obtain a running event loop (and not just any event loop, but an instance of the particular event loop implementation the end user of the library actually wants).
So I made the decision to have two client classes, one sync and one async. As a nice bonus, this meant I could do all the work of rewriting in new classes with new names. That would let me mark the old Akismet class as deprecated but not have to immediately remove it or break its API, giving users of akismet plenty of notice of what was going on and a chance to migrate to the new clients. So I started working on the new client classes, calling them akismet.SyncClient and akismet.AsyncClient to be as boringly clear as possible about what they’re for.
How to handle async, part one
Unfortunately, the two-class solution didn’t fully solve the issue of how to handle the automatic credential validation. On the old Akismet client class it had been easy, and on the new SyncClient class it would still be easy, because the __init__() method could perform a verify-key operation before returning, and raise an exception if the credentials weren’t found or were invalid.
But in Python, __init__() cannot be (usefully) async, which posed the tricky question of how to perform automatic credential validation at instantiation time for AsyncClient.
As I dug into this I considered a few different options, and at one point even thought about going back to the one-class approach just to be able to issue a single HTTP request at instantiation without needing an event loop. But I wanted AsyncClient to be truly and thoroughly async, so I ended up settling for a compromise solution, implemented in two phases:
- Both
SyncClientandAsyncClientwere given an alternate constructor method namedvalidated_client(). Alternate constructors can be usefully async, so theAsyncClientversion could be implemented as an async method. I documented that if you’re directly constructing a client instance you intend to keep around for a while, this is the preferred constructor since it will perform automatic credential validation for you (direct instantiation via__init__()will not, on either class). And then… - I implemented the context-manager protocol for
SyncClientand the async context-manager protocol forAsyncClient. This allows constructing the sync client in awithstatement, or anasync withstatement forAsyncClient. And sinceasync withis an async execution context, it can issue an async HTTP request for credential validation.
So you can get automatic credential validation from either approach, depending on your needs:
import akismet


# Long-lived client object you'll keep around:
sync_client = akismet.SyncClient.validated_client()
async_client = await akismet.AsyncClient.validated_client()

# Or for the duration of a "with" block, cleaned up at exit:
with akismet.SyncClient() as sync_client:
    # Do things...

async with akismet.AsyncClient() as async_client:
    # Do things...
Most Python libraries can benefit from these sorts of conveniences, so I’d recommend investing time into learning how to implement them. If you’re looking for ideas, Lynn Root’s “The Design of Everyday APIs” covers a lot of ways to make your own code easier to use.
How to handle async, part deux
The other thing about writing code that supports both sync and async operations is how to handle the things they have in common. There are a few different ways to do this: you can write one implementation and have the other one call it. Or you can write two full implementations and live with the duplication. Or you can try to separate the I/O and the pure logic as much as possible, and reuse the logic while duplicating only the I/O code (or, since the two implementations aren’t perfect duplicates, writing two I/O implementations which heavily rhyme).
For akismet, I went with a hybrid of the last two of these approaches. I started out with my two classes each fully implementing everything they needed, including a lot of duplicate code between them (in fact, the first draft was just one class which was then copy/pasted and async-ified to produce the other). Then I gradually extracted the non-I/O bits into a common module they could both import from and use, building up a library of helpers for things like validating arguments, preparing requests, processing the responses, and so on.
One final object-oriented design decision here (or, I guess, not object-oriented decision): that common code is a set of functions in a module. It’s not a class. It’s not stateful the way the clients themselves are: turning an Akismet web API response into the desired Python return value, or validating a set of arguments and turning them into the correct request parameters (to pick a couple examples) are literally pure functions, whose outputs are dependent solely on their inputs.
And the common code also isn’t some sort of abstract base class that the two concrete clients would inherit from. An akismet.SyncClient and an akismet.AsyncClient are not two different subtypes of a parent “Akismet client” class or interface! Because of the different calling conventions of sync and async Python, there is no public parent interface that they share or could be substitutable for.
The current code of akismet still has some duplication, primarily around error handling since the try/except blocks need to wrap the correct version of their respective I/O operations, and I might be able to achieve some further refactoring to reduce that to the absolute minimum (for example, by splitting out a bunch of duplicated except clauses into a single common pattern-matching implementation now that Python 3.10 is the minimum supported version). But I’m not in a big hurry to do that; the current code is, I think, in a pretty reasonable state.
Enumerating the options
As I mentioned back at the start of this post, the akismet library historically used a Python bool to indicate the result of a spam-checking operation: either the content was spam (True) or it wasn’t (False). Which makes a lot of sense at first glance, and also matches the way the Akismet web service behaves: for content it thinks is spam, the HTTP response has a body consisting of the string true, and for content that it doesn’t think is spam the response body is the string false.
But for many years now, the Akismet web service has actually supported three possible values, with the third option being “blatant” spam, spam so obvious that it can simply be thrown away with no further human review. Akismet signals this by returning the true response body, and then adding a custom HTTP header to the response: X-Akismet-Pro-Tip, with a value of discard.
Python has had support for enums (via the enum module in the standard library) since Python 3.4, so that seemed the most natural way to represent the possible results. The enum module lets you use lots of different data types for enum values, but I went with an integer-valued enum (enum.IntEnum) for this, because it lets developers still work with the result as a pseudo-boolean type if they don’t care about the extra information from the third option (since in Python 0 is false and all other integers are true).
Python historical trivia
Originally, Python did not have a built-in boolean type, and the typical convention was similar to C, using the integers 0 and 1 to indicate false/true.
Python phased in a real boolean type early in the Python 2 days. First, the Python 2.2 release series (technically, Python 2.2.1) assigned the built-in names False and True to the integer values 0 and 1, and introduced a built-in bool() function which returned the integer truth value of its argument. Then in Python 2.3, the bool type was formally introduced, and was implemented as a subclass of int, constrained to have only two instances. Those instances are bound to the names False and True and have the integer values 0 and 1.
That’s how Python’s bool still works today: it’s still a subclass of int, and so you can use a bool anywhere an int is called for, and do arithmetic with booleans if you really want to, though this isn’t really useful except for writing deliberately-obfuscated code.
For more details on the history and decision process behind Python’s bool type, check out PEP 285 and this blog post from Guido van Rossum.
The only tricky thing here was how to name the third enum member. The first two were HAM and SPAM to match the way Akismet describes them. The third value is described as “blatant spam” in some documentation, but is represented by the string “discard” in responses, so BLATANT_SPAM and DISCARD both seemed like reasonable options. I ended up choosing DISCARD; it probably doesn’t matter much, but I like having the name match the actual value of the response header.
The enum itself is named CheckResponse since it represents the response values of the spam-checking operation (Akismet actually calls it comment-check because that’s what its original name was, despite the fact Akismet now supports sending other types of content besides comments).
Bring your own HTTP client
Back when I put together the 1.0 release, akismet adopted the requests library as a dependency, which greatly simplified the process of issuing HTTP requests to the Akismet web API. As part of the more recent rewrite, I switched instead to the Python HTTPX library, which has an API broadly compatible with requests but also, importantly, provides both sync and async implementations.
Async httpx requires the use of a client object (the equivalent of a requests.Session), so the Akismet client classes each internally construct the appropriate type of httpx object: httpx.Client for akismet.SyncClient, and httpx.AsyncClient for akismet.AsyncClient.
And since the internal usage was switching from directly calling the function-based API of requests to using HTTP client objects, it seemed like a good idea to also allow passing in your own HTTP client object in the constructors of the Akismet client classes. These are annotated as httpx.Client/httpx.AsyncClient, but as a practical matter anything with a compatible API will work.
One immediate benefit of this is it’s easier to accommodate situations like HTTP proxies, and server environments where all outbound HTTP requests must go through a particular proxy. You can just create the appropriate type of HTTP client object with the correct proxy settings, and pass it to the constructor of the Akismet client class:
import akismet
import httpx

from your_app.config import settings

akismet_client = akismet.SyncClient.validated_client(
    http_client=httpx.Client(
        proxy=settings.PROXY_URL,
        headers={"User-Agent": akismet.USER_AGENT}
    )
)
But an even bigger benefit came a little bit later on, when I started working on improvements to akismet‘s testing story.
Testing should be easy
Right here, right now, I’m not going to get into a deep debate about how to define “unit” versus “integration” tests or which types you should be writing. I’ll just say that historically, libraries which make HTTP requests have been some of my least favorite code to test, whether as the author of the library or as a user of it verifying my usage. Far too often this ends up with fragile piles of patched-in mock objects to try to avoid the slowdowns (and other potential side effects and even dangers) of making real requests to a live, remote service during a test run.
I do think some fully end-to-end tests making real requests are necessary and valuable, but they probably should not be used as part of the main test suite that you run every time you’re making changes in local development.
Fortunately, httpx offers a feature that I wrote about a few years ago, which greatly simplifies both akismet‘s own test suite, and your ability to test your usage of it: swappable HTTP transports which you can drop in to affect HTTP client behavior, including a MockTransport that doesn’t make real requests but lets you programmatically supply responses.
So akismet ships with two testing variants of its API clients: akismet.TestSyncClient and akismet.TestAsyncClient. They’re subclasses of the real ones, but they use the ability to swap out HTTP clients (covered above) to plug in custom HTTP clients with MockTransport and hard-coded stock responses. This lets you write code like:
import akismet


class AlwaysSpam(akismet.TestSyncClient):
    comment_check_response = akismet.CheckResponse.SPAM
and then use it in tests. That test client above will never issue a real HTTP request, and will always label any content you check with it as spam. You can also set the attribute verify_key_response to False on a test client to have it always fail API key verification, if you want to test your handling of that situation.
This means you can test your use of akismet without having to build piles of custom mocks and patch them in to the right places. You can just drop in instances of appropriately-configured test clients, and rely on their behavior.
If I ever became King of Programming, with the ability to issue enforceable decrees, requiring every network-interacting library to provide this kind of testing-friendly version of its core constructs would be among them. But since I don’t have that power, I do what I can by providing it in my own libraries.
(py)Testing should be easy
In the Python ecosystem there are two major testing frameworks:
- The
unittestmodule in the Python standard library, which is a direct port to Python of the xUnit style of test frameworks seen in many other languages (including xUnit style naming conventions, which don’t match typical Python naming conventions). - The third-party
pytestframework, which aims to be a more natively “Pythonic” testing framework and encourages function- rather than class-based tests and heavy use of dependency injection (which it calls fixtures).
For a long time I stuck to unittest, or unittest-derived testing tools like the ones that ship with Django. Although I understand and appreciate the particular separation of concerns pytest is going for, I found its fixture system a bit too magical for my taste; I personally prefer dependency injection to use explicit registration so I can know what’s available, versus the implicit way pytest discovers fixtures based on their presence or absence in particularly-named locations.
But pytest pretty consistently shows up as more popular and more broadly used in surveys of the Python community, and every place I’ve worked for the last decade or so has used it. So I decided to port akismet’s tests to pytest, and in the process decided to write a pytest plugin to help users of akismet with their own tests.
That meant writing a pytest plugin to automatically provide a set of dependency-injection fixtures. There are four fixtures: two sync and two async, with each flavor getting a fixture to provide a client class object (which lets you test instantiation-time behavior like API key verification failures), and a fixture to provide an already-constructed client object. Configuration is through a custom pytest mark called akismet_client, which accepts arguments specifying the desired behavior. For example:
import akismet
import pytest

@pytest.mark.akismet_client(comment_check_response=akismet.CheckResponse.DISCARD)
def test_akismet_discard_response(akismet_sync_client: akismet.SyncClient):
    # Inside this test, akismet_sync_client's comment_check() will always
    # return DISCARD.

@pytest.mark.akismet_client(verify_key_response=False)
def test_akismet_fails_key_verification(akismet_sync_class: type[akismet.SyncClient]):
    # API key verification will always fail on this class.
    with pytest.raises(akismet.APIKeyError):
        akismet_sync_class.validated_client()
Odds and ends
Python has had the ability to add annotations to function and method signatures since 3.0, and more recently gained the ability to annotate attributes as well; originally, no specific use case was mandated for this feature, but everybody used it for type hints, so now that’s the official use case for annotations. I’ve had a lot of concerns about the way type hinting and type checking have been implemented for Python, largely around the fact that idiomatic Python really wants to be a structurally-typed language, or as some people have called it “interfacely-typed”, rather than nominally-typed. Which is to say: in Python you almost never care about the actual exact type name of something, you care about the interfaces (nowadays, called “protocols” in Python typing-speak) it implements. So you don’t care whether something is precisely an instance of list, you care about it being iterable or indexable or whatever.
On top of which, some design choices made in the development of type-hinted Python have made it (as I understand it) impossible to distribute a single-file module with type hints and have type checkers actually pick them up. Which was a problem for akismet, because traditionally it was a single-file module, installing a file named akismet.py containing all its code.
But as part of the rewrite I was reorganizing akismet into multiple files, so that objection no longer held, and eventually I went ahead and began running mypy as a type checker as part of the CI suite for akismet. The type annotations had been added earlier, because I find them useful as inline documentation even if I’m not running a type checker (and the Sphinx documentation tool, which all my projects use, will automatically extract them to document argument signatures for you). I did have to make some changes to work around mypy, though It didn’t find any bugs, but did uncover a few things that were written in ways it couldn’t handle, and maybe I’ll write about those in more detail another time.
As part of splitting akismet up into multiple files, I also went with an approach I’ve used on a few other projects, of prefixing most file names with an underscore (i.e., the async client is defined in a file named _async_client.py, not async_client.py). By convention, this marks the files in question as “private”, and though Python doesn’t enforce that, many common Python linters will flag it. The things that are meant to be supported public API are exported via the __all__ declaration of the akismet package.
I also switched the version numbering scheme to Calendar Versioning. I don’t generally trust version schemes that try to encode information about API stability or breaking changes into the version number, but a date-based version number at least tells you how old something is and gives you a general idea of whether it’s still being actively maintained.
There are also a few dev-only changes:
* Local dev environment management and packaging are handled by PDM and its package-build backend. Of the current crop of clean-sheet modern Python packaging tools, PDM is my personal favorite, so it’s what my personal projects are using.
* I added a Makefile which can execute a lot of common developer tasks, including setting up the local dev environment with proper dependencies, and running the full CI suite or subsets of its checks.
* As mentioned above, the test suite moved from unittest to pytest, using AnyIO’s plugin for supporting async tests in pytest. There’s a lot of use of pytest parametrization to generate test cases, so the number of test cases grew a lot, but it’s still pretty fast—around half a second for each Python version being tested, on my laptop. The full CI suite, testing every supported Python version and running a bunch of linters and packaging checks, takes around 30 seconds on my laptop, and about a minute and a half on GitHub CI.
That’s it (for now)
In October of last year I released akismet 25.10.0 (and then 25.10.1 to fix a documentation error, because there’s always something wrong with a big release), which completed the rewrite process by finally removing the old Akismet client class. At this point I think akismet is feature-complete unless the Akismet web service itself changes, so although there were more frequent releases over a period of about a year and a half as I did the rewrite, it’s likely the cadence will settle down now to one a year (to handle supporting new Python versions as they come out) unless someone finds a bug.
Overall, I think the rewrite was an interesting process, because it was pretty drastic (I believe it touched literally every pre-existing line of code, and added a lot of new code), but also… not that drastic? If you were previously using akismet with your configuration in environment variables (as recommended), I think the only change you’d need to make is rewriting imports from akismet.Akismet to akismet.SyncClient. The mechanism for manually passing in configuration changed, but I believe that and the new client class names were the only actual breaking changes in the entire rewrite; everything else was adding features/functionality or reworking the internals in ways that didn’t affect public API.
I had hoped to write this up sooner, but I’ve struggled with this post for a while now, because I still have trouble with the fact that Michael’s gone, and every time I sat down to write I was reminded of that. It’s heartbreaking to know I’ll never run into him at a conference again. I’ll miss chatting with him. I’ll miss his energy. I’m thankful for all he gave to the Python community over many years, and I wish I could tell him that one more time. And though it’s a small thing, I hope I’ve managed to honor his work and to repay some of his kindness and his trust in me by being a good steward of his package. I have no idea whether Akismet the service will still be around in another 20 years, or whether I’ll still be around or writing code or maintaining this Python package in that case, but I’d like to think I’ve done my part to make sure it’s on sound footing to last that long, or longer.
Real Python
How to Use Note-Taking to Learn Python
Learning Python can be genuinely hard, and it’s normal to struggle with fundamental concepts. Research has shown that note-taking is invaluable when learning new things. This guide will help you get the most out of your learning efforts by showing you how to take better notes as you walk through an existing tutorial and keep handwritten notes on the side:

In this guide, you’ll begin by briefly learning about the benefits of note-taking. Then, you’ll follow along with an existing Real Python tutorial as you perform note-taking steps to help make the information in the tutorial really stick. To help you stay organized as you practice, download the Python Note-Taking Worksheet below. It outlines the process you’ll learn here and provides a repeatable framework you can use with future tutorials:
Get Your PDF: Click here to download your free Python Note-Taking Worksheet that outlines that note-taking process.
Take the Quiz: Test your knowledge with our interactive “How to Use Note-Taking to Learn Python” quiz. You’ll receive a score upon completion to help you track your learning progress:

Interactive Quiz
How to Use Note-Taking to Learn PythonTest your understanding of note-taking techniques that help you learn Python more effectively and retain what you study.
What Is Python Note-Taking?
In the context of learning, note-taking is the process of recording information from a source while you’re consuming it. A traditional example is a student jotting down key concepts during a lecture. Another example is typing out lines of code or unfamiliar words while watching a video course, listening to a presentation, or reading a learning resource.
In this guide, Python note-taking refers to taking notes specific to learning Python.
People take notes for a variety of reasons. Usually, the intent is to return to the notes at a later time to remind the note-taker of the information covered during the learning session.
In addition to the value of having a physical set of notes to refer back to, studies have found that the act of taking notes alone improves a student’s ability to recall information on a topic.
This guide focuses on handwritten note-taking—that is, using a writing utensil and paper. Several studies suggest that this form of note-taking is especially effective for understanding a topic and remembering it later. If taking notes by hand isn’t viable for you, don’t worry! The concepts presented here should be applicable to other forms of note-taking as well.
Prerequisites
Since this guide focuses on taking notes while learning Python programming, you’ll start by referencing the Real Python tutorial Python for Loops: The Pythonic Way. This resource is a strong choice because it clearly explains a fundamental programming concept that you’ll use throughout your Python journey.
Once you have the resource open in your browser, set aside a few pieces of paper and have a pen or pencil ready. Alternatively, you can take notes on a tablet with a stylus or another writing tool.
Generally, taking notes by hand has a stronger impact on learning than other methods, such as typing into a text document. For more information on the effectiveness of taking notes by hand versus typing, see this article from the Harvard Graduate School of Education.
Step 1: Write Down Major Concepts
With your note-taking tools ready, start by skimming the learning resource. Usually, you want to look at the major headings to see what topics the material covers. For Real Python content, you can instead just look at the table of contents at the top of the page, since this lists the main sections.
The major headings for your example resource are as follows:
- Getting Started with the Python
forLoop - Traversing Built-In Collections in Python
- Using Advanced
forLoop Syntax - Exploring Pythonic Looping Techniques
- Understanding Common Pitfalls in
forLoops - Using
forLoops vs Comprehensions - Using
async forLoops for Asynchronous Iteration
The list above doesn’t include subheadings like “Sequences: Lists, Tuples, Strings, and Ranges” under “Traversing Built-In Collections in Python”. For now, stick to top-level headings.
Read the full article at https://realpython.com/python-note-taking-guide/ »
[ Improve Your Python With 🐍 Python Tricks 💌 – Get a short & sweet Python Trick delivered to your inbox every couple of days. >> Click here to learn more and see examples ]
Quiz: Strings and Character Data in Python
In this quiz, you’ll test your understanding of Python Strings and Character Data.
This quiz helps you deepen your understanding of Python’s string and byte data types. You’ll explore core concepts like string immutability, interpolation with f-strings, Unicode handling, key string methods, and working with bytes objects.
[ Improve Your Python With 🐍 Python Tricks 💌 – Get a short & sweet Python Trick delivered to your inbox every couple of days. >> Click here to learn more and see examples ]
PyPy
Using Claude to fix PyPy3.11 test failures securely
I got access to Claude Max for 6 months, as a promotional move Anthropic made to Open Source Software contributors. My main OSS impact is as a maintainer for NumPy, but I decided to see what claude-code could to for PyPy's failing 3.11 tests. Most of these failures are edge cases: error messages that differ from CPython, or debugging tools that fail in certain cases. I was worried about letting an AI agent loose on my development machine. I noticed a post by Patrick McCanna (thanks Patrick!) that pointed to using bubblewrap to sandbox the agent. So I set it all up and (hopefully securely) pointed claude-code at some tests.
Setting up
There were a few steps to make sure I didn't open myself up to obvious gotchas. There are stories about agents wiping out data bases, or deleting mail boxes.
Bubblewrap
First I needed to see what bubblewrap does. I followed the instructions in the blog post to set things up with some minor variations:
I couldn't run bwrap. After digging around a bit, I found I needed to add
an exception for appamor on Ubuntu 24.04:
sudo bash -c 'cat > /etc/apparmor.d/bwrap << EOF
abi <abi/4.0>,
include <tunables/global>

profile bwrap /usr/bin/bwrap flags=(unconfined) {
  userns,
}
EOF'
sudo apparmor_parser -r /etc/apparmor.d/bwrap
Then bwrap would run. It is all locked down by default, so I opened up some
exceptions. The arguments are pretty self-explanatory. Ubuntu spreads the
executables around the operating system, so I needed access to various
directories. I wanted a /tmp for running pytest. I also wanted the prompt
to reflect the use of bubblewrap, so changed the hostname:
cat << 'EOL' >> ./run_bwrap.sh
  function call_bwrap() {
    bwrap \
      --ro-bind /usr /usr \
      --ro-bind /etc /etc \
      --ro-bind /run /run \
      --symlink usr/lib /lib \
      --symlink usr/lib64 /lib64 \
      --symlink usr/bin /bin \
      --proc /proc \
      --dev /dev \
      --bind $(pwd) $(pwd) \
      --chdir $(pwd) \
      --unshare-user --unshare-pid --unshare-ipc --unshare-uts --unshare-cgroup \
      --die-with-parent \
      --hostname bwrap \
      --tmpfs /tmp \
      /bin/bash "$@"
  }
EOL

source ./run_bwrap.sh
call_bwrap
# now I am in a sandboxed bash shell
# play around, try seeing other directories, getting sudo, or writing outside
# the sandbox
exit
I did not do --unshare-network since, after all, I want to use claude and
that needs network access. I did add rw access to $(pwd) since I want it to
edit code in the current directory, that is the whole point.
Basic claude
After trying out bubblewrap and convincing myself it does actually work, I installed claude code
Really Anthropic, this is the best way to install claude? No dpkg?
I ran claude once (unsafely) to get logged in. It opened a webpage, and saved
the login to the oathAccount field in ~/.claude.json. Now I changed my
bash script to this to get claude to run inside the bubblewrap sandbox:
cat << 'EOL' >> ./run_claude.sh
  claude-safe() {
    bwrap \
      --ro-bind /usr /usr \
      --ro-bind /etc /etc \
      --ro-bind /run /run \
      --ro-bind "$HOME/.local/share/claude" "$HOME/.local/share/claude" \
      --symlink usr/lib /lib \
      --symlink usr/lib64 /lib64 \
      --symlink usr/bin /bin \
      --symlink "$HOME/.local/share/claude/versions/2.1.81" "$HOME/.local/bin/claude" \
      --proc /proc \
      --dev /dev \
      --bind $(pwd) $(pwd) \
      --bind "$HOME/.claude" "$HOME/.claude" \
      --bind "$HOME/.claude.json" "$HOME/.claude.json" \
      --chdir $(pwd) \
      --unshare-user --unshare-pid --unshare-ipc --unshare-uts --unshare-cgroup \
      --die-with-parent \
      --hostname bwrap \
      --tmpfs /tmp \
      --setenv PATH "$HOME/.local/bin:$PATH" \
      claude "$@"
  }
EOL

source ./run_claude.sh
claude-safe
Now I can use claude. Note it needs some more directories in order to run. This
script hard-codes the version, in the future YMMV. I want it to be able to look
at github, and also my local checkout of cpython so it can examine differences.
I created a read-only token by clicking on my avatar in the upper right corner
of a github we page, then going to Settings → Developer settings → Personal
access tokens → Fine-grained tokens → Generate new token. Since pypy is in the
pypy org, I used "Repository owner: pypy", "Repository access: pypy (only)" and
"Permissions: Contents". Then I made doubly sure the token permissions were
read-only. And checked again. Then I copied the token to the bash script. I
also added a ro-bind to the cpython checkout, so I could tell claude code
where to look for CPython implementations of missing PyPy functionality.
--ro-bind "$HOME/oss/cpython" "$HOME/oss/cpython" \
--setenv GH_TOKEN "hah, sharing my token would not have been smart" \
Claude /sandbox
Claude comes with its own sandbox, configured by using the /sandbox command.
I chose the defaults, which prevents malicious code in the repo from accessing
the file system and the network. I was missing some packages to get this to
work. Claude would hang until I installed them, and I needed to kill it with
kill.
Final touches
One last thing that I discovered later: I needed to give claude access to some
grepping and git tools. While git should be locked down externally so it
cannot push to the repo, I do want claude to look at other issues and pull
requests in read-only mode. So I added a local .claude/settings.json file
inside the repo (see below for which directory to do this):
{
  "permissions": {
    "allow": [
      "Bash(sed*)",
      "Bash(grep*)",
      "Bash(cat*)",
      "Bash(find*)",
      "Bash(rg*)",
      "Bash(python*)",
      "Bash(pytest*)"
    ]
  }
}
Then I made git ignore it, even when doing a git clean, in a local (not part
of the repo) configuration
What about git push?
I don't want claude messing around with the upstream repo, only read access. But
I did not actively prevent git push. So instead of using my actual pypy
repo, I cloned it to a separate directory and did not add a remote pointing to
github.com.
Fixing tests - easy
Now that everything is set up (I hope I remembered everything), I could start
asking questions. The technique I chose was to feed claude the whole test
failure from the buildbot. So starting from the buildbot py3.11 summary,
click on one of the F links and copy-paste all that into the claude prompt.
It didn't take long for claude to come up with solutions for the long-standing
ctype error missing exception which turned out to be due to an missing error
trap when already handling an error.
Also a CTYPES_MAX_ARGCOUNT check was
missing. At first, claude wanted to change the ctypes code from CPython's stdlib,
and so I had to make it clear that claude was not to touch the files in
lib-python. They are copied verbatim from CPython and should not be
modified without really good reasons.
The fix to raise TypeError rather
than Attribute Error for deleting ctype object's value was maybe a little
trickier: claude needed to create its own property class and use it in
assignments.
The fix for a failing test for a correct repr of a ctypes array was a
little more involved. Claude needed to figure out that newmemoryview was
raising an exception, dive into the RPython implementation and fix the problem,
and then also fix a pure-python __buffer__ shape edge case error.
There were more, but you get the idea. With a little bit of coaching, and by showing claude where the CPython implementation was, more tests are now passing.
Fixing tests - harder
PyPy has a HPy backend. There were some test failures that were easy to fix (a handle not being closed, an annotation warning). But the big one was a problem with the context tracking before and after ffi function calls. In debug mode there is a check that the ffi call is done using the correct HPy context. It turns out to be tricky to hang on to a reference to a context in RPython since the context RPython object is pre-built. The solution, which took quite a few tokens and translation cycles to work out, was to assign the context on the C level, and have a getter to fish it out in RPython.
Conclusion
I started this journey not more than 24 hours ago, after some successful sessions using claude to refactor some web sites off hosting platforms and make them static pages. I was impressed enough to try coding with it from the terminal. It helps that I was given a generous budget to use Anthropic's tool.
Claude seems capable of understanding the layers of PyPy: from the pure python stdlib to RPython and into the small amount of C code. I even asked it to examine a segfault in the recently released PyPy7.3.21, and it seems to have found the general area where there was a latent bug in the JIT.
Like any tool, agentic programming must be used carefully to make sure it cannot do damage. I hope I closed the most obvious foot-guns, if you have other ideas of things I should do to protect myself while using an agent like this, I would love to hear about them.
Tryton News
Release 0.8.0 of mt940
We are proud to announce the release of the version 0.8.0 of mt940.
mt940 is a library to parse MT940 files. MT940 is a specific SWIFT message type used by the SWIFT network to send and receive end-of-day bank account statements.
In addition to bug-fixes, this release contains the following improvements:
- Upgrade to pyproject
- Add fund code to transaction
- Remove support for Python older than 3.9
mt940 is available on PyPI: mt940 0.8.0.
1 post - 1 participant
Release 0.4.0 of febelfin-coda
We are proud to announce the release of the version 0.4.0 of febelfin-coda.
febelfin-coda is a library to parse CODA files. This bank standard (also called CODA) specifies the lay-out for the electronic files, by banks to customers, of the account transactions and the information concerning the enclosures in connection with the movement.
In addition to bug-fixes, this release contains the following improvements:
- Upgrade to pyproject
- Add support for Python 3.13 and 3.14
- Remove support for Python older than 3.9
febelfin-coda is available on PyPI: febelfin-coda 0.4.0.
1 post - 1 participant
Release 0.2.0 of aeb43
We are proud to announce the release of the version 0.2.0 of aeb43.
aeb43 is a library to parse AEB43 files. AEB43 is a standard, fixed-length 80-character file format used by Spanish banks for transmitting bank statements, transaction details, and account balances.
In addition to bug-fixes, this release contains the following improvements:
- Upgrade to pyproject
- Add support for Python 3.13 and 3.14
- Remove support for Python older than 3.9
aeb43 is available on PyPI: aeb43 0.2.0.
1 post - 1 participant