
Planet Python
Last update: July 20, 2026 04:47 AM UTC
July 20, 2026
Wingware
Wing Python IDE Version 12 - July 20, 2026
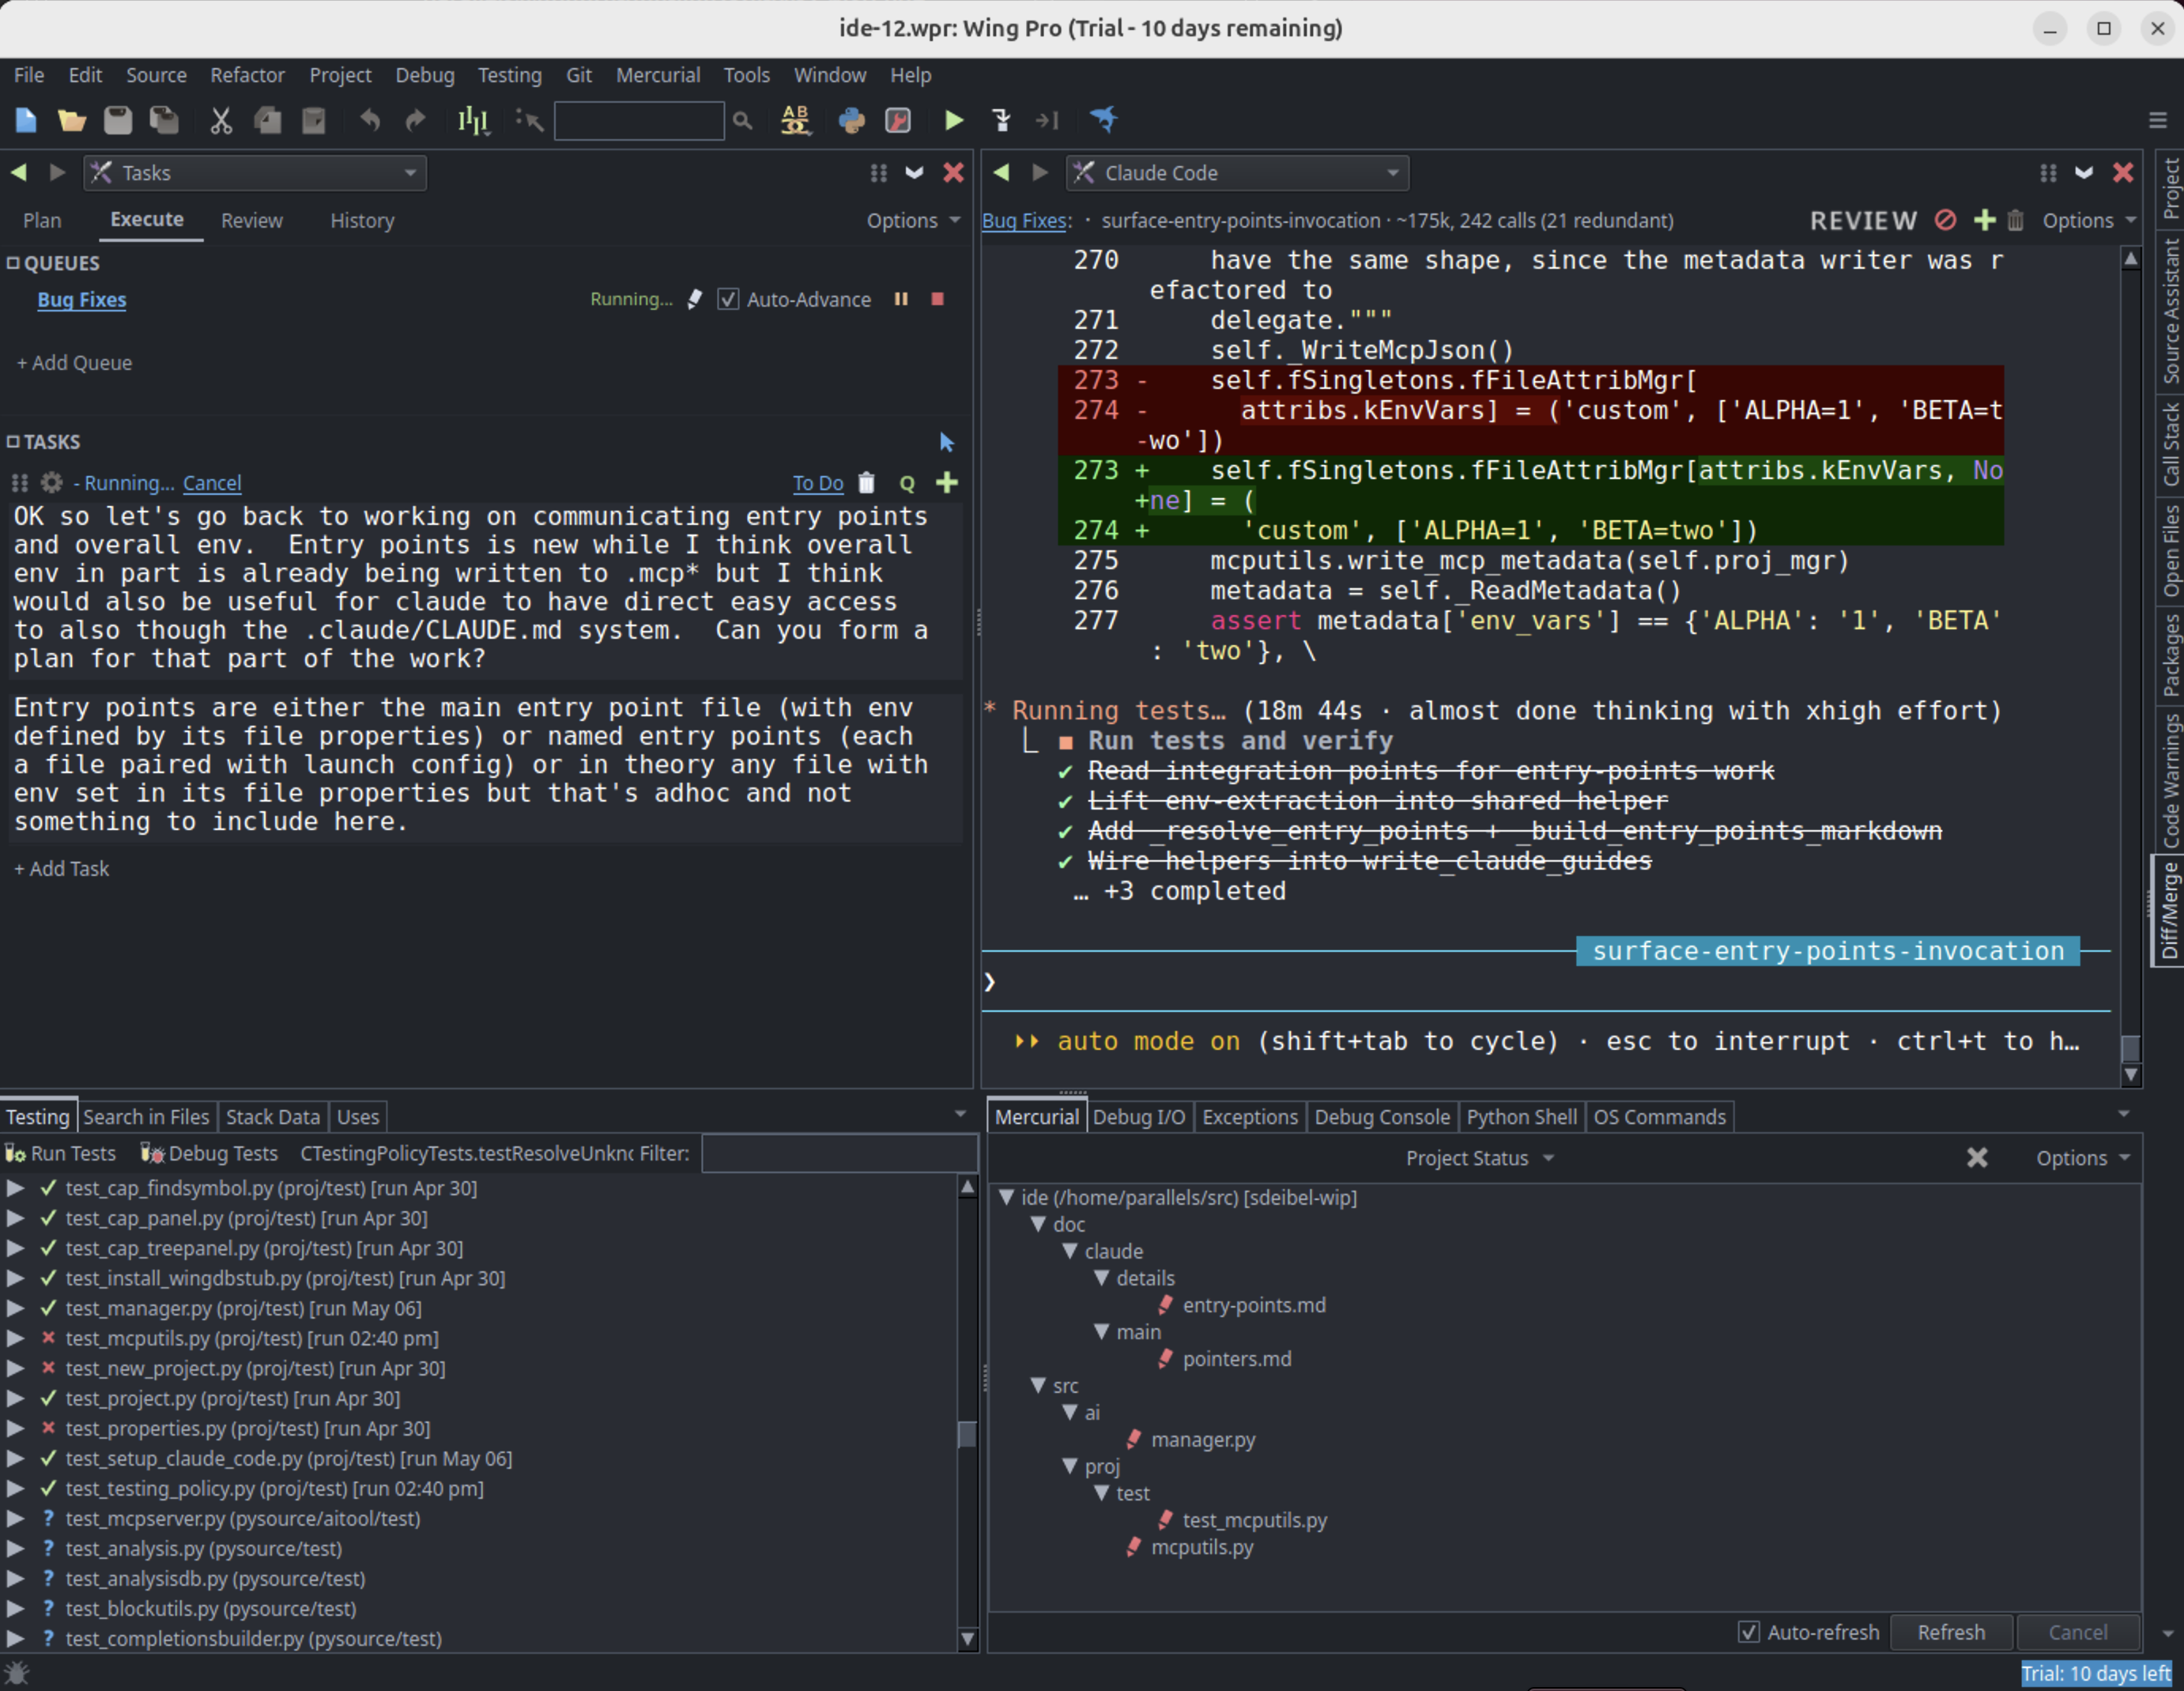
Wing Python IDE version 12 has been released. Wing 12 integrates the Claude Code AI coding agent directly into the IDE, with a new Claude Code tool, a Tasks tool for planning and reviewing AI agent work, and a set of MCP servers that give the agent access to Wing's source code analysis, unit testing, debugger, and code review features. Wing 12 makes it faster and cheaper to direct AI agents; see our benchmarks for details.
Wing 12 also adds configurable AI-driven Code Actions, code FIX actions, automated Write Tests, pseudo-terminal support for OS Commands and Debug I/O, support for tools and OS Commands in editor splits, a reorganized Tools menu, automatic test discovery, Preferences search, and more.
Downloads
Wing 12 -- the full Python IDE, available as Wing Pro (for agentic development) or Wing Classic (for manual development) depending on your license, with a free 30-day trial of Wing Pro.
Wing 101 v. 12 -- a simplified free Python IDE for teaching beginning programmers.
Wing 11 and earlier versions are not affected by installation of Wing 12 and may be installed and used independently. However, project files for Wing 11 and earlier are converted when opened by Wing 12 and should be saved under a new name, since Wing 12 projects cannot be opened by older versions of Wing.
New in Wing 12
AI Coding Agent Integration with Claude Code
Wing 12 adds a Claude Code tool that integrates the Claude Code AI coding agent with the IDE. Set Up for Claude Code in the Project menu configures the active project for AI agent development.
A set of MCP (Model Context Protocol) servers gives Claude Code access to Wing's source code analysis, testing, and debugger functionality, so the agent can more efficiently navigate and understand your code, write, run, and fix unit tests, and use the debugger to diagnose difficult runtime errors. In our benchmarks, giving Claude Code access to Wing's MCP servers made agent-driven coding tasks both faster and cheaper.
Tasks Tool
The new Tasks tool lets you plan, queue, execute, review, and audit the history of AI agent development tasks, making it easier to supervise and inspect the agent's work before committing it to revision control.
FIX Features and Write Tests
Wing 12 adds AI agent driven FIX features that hand the current debugger bug, failing unit tests, or code warnings to Claude Code for resolution. New Write Tests items in the Testing and editor context menus prompt the agent to write unit tests for selected code.
Code Actions
Wing 12 also adds AI Code Actions, accessed from the FIX icon in the editor toolbar, that operate on selected code or the enclosing scope. Built-in actions include explaining code, reviewing it for quality or security risks, fixing code warnings, optimizing for performance, and updating comments and docstrings. The action list is user-extensible, so you can add your own prompts for tasks you run often.
Pseudo-Terminal for OS Commands and Debug I/O
The OS Commands and Debug I/O tools now default to using a pseudo-terminal that implements full ANSI terminal emulation, so you can run and debug programs that use color output, cursor positioning, or full-screen TUIs.
Redesigned OS Commands Capability
The OS Commands tool has been replaced with configurable OS Commands in the Tools menu. Each OS Command acts like its own tool, for use in any tool or editor split.
Tools in Editor Splits and Reorganized Tools Menu
Tools can now also be added or dragged to editor splits, allowing for much more flexible workspace layout. The Tools menu has been reorganized into related groups, with less-user and legacy tools in an Other sub-menu, so more commonly used tools area easier to find.
Test Discovery and Preferences Search
Wing 12 adds automatic test file discovery and discovery of individual unit tests within files, so you usually don't need to specify test file patterns or add test files individually. The Preferences dialog now supports text search and back/forward navigation.
Other Minor Features and Improvements
Wing 12 also significantly speeds up source code analysis, prompts for SSH passphrases and HTTPS credentials when needed during VCS operations, detects externally modified files much more quickly and with reduced CPU load, saves and restores tool console scrollback across project close/reopen, supports clickable OSC 8 hyperlinks in OS Commands and Debug I/O tools, adds a preference to select the ssh or plink.exe SSH implementation, shows a notice on the next startup when Wing's previous session ended in an unexpected crash, and makes a number of other bug fixes and usability improvements.
Product Line Changes
Wing 12 simplifies the product line. The Commercial / Non-Commercial use distinction has been replaced by two feature-based product tiers:
- Wing Pro -- the full-featured Python IDE including AI agent development tools
- Wing Classic -- the complete traditional Python IDE for hands-on development, with no AI agent features
Anyone may purchase either tier for any purpose. Existing Commercial and Non-Commercial Use licenses both become Wing Pro. Customers who don't need the AI agent features may move to Wing Classic at renewal time, or any time sooner by contacting support@wingware.com.
Wing Personal has been discontinued. Existing Wing Personal users may continue to use Personal 11.x indefinitely, switch to free Wing 101, or purchase a Wing Classic license. See Pricing for details.
Changes and Incompatibilities
The single-LLM-query AI features originally introduced in Wing 11 (the AI Coder and AI Chat tools) are considered legacy in Wing 12 and hidden from the user interface by default. They remain available in projects that already use them and can be re-enabled with Project Properties > AI in Project Properties or in the .``Projects > AI`` preferences.
See Wing's Claude Code Agent Integration for Wing 12's AI agent approach.
If you have questions, please don't hesitate to contact us at support@wingware.com.
July 19, 2026
Peter Bengtsson
Best Django Redis configuration for speed and size
`lzma` compresses the most and `zlib` is about as fast as `zstd` in `django_redis` as compressor.
July 18, 2026
PyPy
Moving linux builds to GLIBC==2.28
A short note for visibility.
PyPy builds tarballs of the python interpreter ready for
download. These include the latest
releases and also nightly builds, fresh from our fleet of buildbots. Over the
next couple of days, the nightly builds on linux will transition from
manylinux2014 based docker images to manylinux2_28
images. The practical implication is that
nightly images, and the next releases, will require a minimum of GLIBC>=2.28,
i.e. AlmaLinux8, amanzonlinux 2023, debian 10, ubuntu 20.04. For a good
overview of how this glibc/distro/manylinux all works, see the PEP 600 compliance
page.
The next release will indicate this change by a new PyPy major version, 8.0.0. It should include a Python3.12 interpreter, in which case it will be the last release of the Python 3.11 interpreter.
Core Dispatch
Core Dispatch #8
Welcome back to Core Dispatch! This edition covers July 5 through July 18, 2026. Python 3.15.0 beta 4 landed today, July 18 (we just released it at the EuroPython sprints!), with 3.13.15, 3.14.7 and the first 3.15 release candidate following on August 4.
It's EuroPython week! Much of the core team has been gathered in one place for our annual Language Summit (blog posts to come!) and the conference. Recordings aren't up just yet, but as promised with the PyCon US talks, once they are, we'll pull talks and Language Summit coverage from the team into a future edition.
On the PEP front, discussion is lively: PEP 835
(shorthand syntax for Annotated metadata) and PEP 836
("JIT Go Brrr") are both drawing dozens of new replies, and a few fresh PEPs — including
PEP 840 on name resolution in class namespaces —
have joined the queue.
Don't miss the "One More Thing" at the bottom of this edition. This one's a little sillier (correction: more unhinged) than usual, but we think you'll enjoy it.
As always, if you maintain a package or just like living on the edge, give the final 3.15 beta a spin and file any issues you find.
Upcoming Releases
- Python 3.15.0 beta 4 — Jul 18
- Python 3.13.15 — Aug 04
- Python 3.14.7 — Aug 04
PEP Updates
- PEP 797: Shared Object Proxies
- PEP 838: Adding
python-versiontopyvenv.cfg - PEP 840: Name Resolution in Class Namespaces
Steering Council Updates
Merged PRs
- Add
next_network()to theipaddressmodule - Normalize symlink targets in
tarfile.TarFile.gettarinfo() - Add
tkinter.systray— system tray icon and notifications - Add
tkinter.fontchooser— a font selection dialog - Reject CR and LF in
email.utils.formataddr() - Add a dataclass-like decorator for
ctypesstructures - Stop exposing the internal mapping when comparing
MappingProxyTypeobjects - Fix a data race compiling
string.Templatepatterns in free-threaded builds - Make
tempfile.TemporaryFileWrapperpublic
Discussion
- PEP 835: Shorthand Syntax for
AnnotatedType Metadata — 🔥 36 new replies · 4.6k views - PEP 836: JIT Go Brrr: The Path to a Supported JIT Compiler for CPython — 🔥 28 new replies · 3.9k views
- PEP 840: Name Resolution in Class Namespaces — 🆕 🔥 10 new replies · 496 views
- PEP 822: Dedented Multiline String (d-string) — 7 new replies · 7.6k views
- PEP 832: Virtual Environment Discovery — 6 new replies · 8.8k views
- PEP 827: Type Manipulation — 3 new replies · 8.4k views
- PEP 718: Subscriptable Functions — 3 new replies · 14.3k views
Core Dev Musings
- How to publish to PyPI using GitHub Actions securely — By Brett Cannon
- Security: line goes up — By Hugo van Kemenade
- Fixing the dictionary with Python 3.14 — By Hugo van Kemenade
- EuroPython 2026: Learning from the “not-so-secret” Python security cabal — By Seth Larson
Upcoming CFPs & Conferences
- EuroSciPy 2026 — Jul 18
- PyData PyCon Armenia 2026 — Jul 24
- PyOhio 2026 — Jul 25
- 📋 Plone Conference 2026 Deadline — Aug 01
- 📋 PyCon France 2026 Deadline — Aug 01
- 📋 PyCon Ireland 2026 Deadline — Aug 01
- 📋 PyBay 2026 Deadline — Aug 01
- 📋 PyData Global 2026 Workshop Deadline — Aug 04
One More Thing
"The Meowl is a part of life."
— Ken Jin
"We're just normal men"
— Łukasz Langa
 Pablo during one of his "EuroPython 2026" talks, as hallucinated by AI.
Credits
Python Insider
Python 3.15.0 beta 4 is here!
The final 3.15 beta is out!
July 17, 2026
PyPodcats
Episode 12: With Juanita Gomez
Learn about Juanita Gomez, a Ph.D. candidate at UC Santa Cruz researching open source security. From developing the Spyder IDE to leading community efforts for Scientific Python and singing on stage at SciPy, Juanita shares her journey in open source.Learn about Juanita Gomez, a Ph.D. candidate at UC Santa Cruz researching open source security. From developing the Spyder IDE to leading community efforts for Scientific Python and singing on stage at SciPy, Juanita shares her journey in open source.
We interviewed Juanita Gomez.
Juanita is a Ph.D. candidate in Computer Science at UC Santa Cruz, where her research focuses on improving the security of scientific open source software in collaboration with the Open Source Program Office (OSPO) at UCSC. She is a former developer of the Spyder IDE, and currently one of the community managers for the Scientific Python project. She is also part of the organizing committee for the SciPy conference.
In this episode, Juanita shares how a music YouTube channel led her to open source: the video editing skills she picked up making covers helped her create friendlier documentation, tutorials, and videos for Spyder, which caught the attention of the Scientific Python project founders. She talks about bridging her security research with her passion for open source, and gives practical advice for maintainers who want to make their projects more secure, from GitHub’s built-in security features to the OpenSSF Scorecard. She also opens up about imposter syndrome, being doubly underrepresented as a woman and Latina in tech, and how surrounding herself with people who elevate her work keeps her growing. And yes, there is singing: from auditioning for The X Factor in Colombia as a kid to performing lightning talk songs with the SciPy 5 at the SciPy conference.
Be sure to listen to the episode to learn all about Juanita’s inspiring story!
Topic discussed
- Introductions
- Getting to know Juanita
- How Juanita joined Spyder and made its documentation more friendly
- Reaching new audiences through YouTube tutorials and TikTok
- Joining the Scientific Python project as a community manager
- Her Ph.D. research on open source security at UC Santa Cruz
- Actionable security tips for maintainers: GitHub security features and the OpenSSF Scorecard
- AI and open source security
- Organizing the Scientific Python summits and the SciPy conference
- Imposter syndrome and being a woman and Latina in tech
- Juanita’s music journey, from The X Factor in Colombia to singing at SciPy
Links from the show
- Scientific Python: https://scientific-python.org/
- Spyder IDE: https://www.spyder-ide.org/
- OpenSSF Scorecard: https://scorecard.dev/
- Juanita’s website: https://juanis2112.github.io/
- Juanita’s YouTube channel: https://www.youtube.com/@juanitagomezr
- Spyder YouTube channel: https://www.youtube.com/@SpyderIDE
- Scientific Python TikTok: https://www.tiktok.com/@scientific.python
- Scientific Python YouTube: https://www.youtube.com/@scientific-python
July 16, 2026
Tryton News
Release 1.0.0 of Relatorio
We are proud to announce the release of Relatorio version 1.0.0.
Relatorio is a templating library for OpenDocument using also OpenDocument as source format.
In addition to bug-fixes, this release contains the following improvements:
- Replace python-magic dependency by puremagic
- Remove support for chart template
- Remove support for PDF
The package is available at Client Challenge
The documentation is available at Relatorio — A templating library able to output odt files
1 post - 1 participant
Release 1.0.0 of GooCalendar
We are proud to announce the release 1.0.0 of GooCalendar.
GooCalendar is a Python library that implements a calendar widget for GTK+.
In addition to bug-fixes, this release contains this following improvements:
- Remove GooCanvas dependency
- Remove support for Python older than 3.9
- Upgrade to pyproject
GooCalendar is available on PyPI: GooCalendar · PyPI
The documentation is available at goocalendar — Calendar widget — A calendar widget for GTK
1 post - 1 participant
Seth Michael Larson
EuroPython 2026: Learning from the “not-so-secret” Python security cabal
I delivered this talk at EuroPython 2026, I'll update this blog post once the recording is available on EuroPython's YouTube channel. Below are the slides and full list of links and resources included. This talk is a continuation of a talk I gave a year ago: “Security Work isn’t Special” as the keynote for OpenSSF Community Day NA where I lamented on how security work didn't match other Open Source contribution models like documentation, community, or code contributions.
My work as the Security Developer-in-Residence at the Python Software Foundation is sponsored by Alpha-Omega. Thanks to Alpha-Omega for supporting security in the Python ecosystem.
Links and Resources
- Slides
- Python Software Foundation Blog
- Python Insider Blog
- Security Work isn’t Special
- Security Line Goes Up by Hugo van Kemenade
- Vulnerability Reports are not special anymore by Filippo Valsorda
- LLM generated vulnerabilities by Linus Torvalds
- Python Security Policy and Threat Model
- Python Security Response Team
- PEP 811 - Defining Python Security Response Team membership and responsibilities
Thanks for reading ♥ I would love to hear your thoughts! Contact me via Mastodon, Bluesky, or email. Browse the blog archive. Check out my blogroll.
July 15, 2026
Python Software Foundation
Affirm Your PSF Membership Voting Status
Every Python Software Foundation (PSF) voting-eligible Member (Supporting, Contributing, and Fellow) needs to affirm their membership to vote in this year’s PSF Board and Python Packaging Council (PPC) elections.
If you wish to vote in either the PSF Board or Python Packaging Council elections, you must affirm your intention to vote for each election no later than Tuesday, August 25th, 2:00 pm UTC, to participate in this year’s elections. This year’s election votes begin Tuesday, September 1st, 2:00 pm UTC, and close on Tuesday, September 15th, 2:00 pm UTC.
Election communications from psfmember.org
You should have received an email from "psf@psfmember.org <Python Software Foundation>" with the subject "[Action Required] Affirm your PSF Membership voting intention for the 2026 PSF Board Election" and/or “2026 Python Packaging Council Inaugural Election Information & Schedule” that contains information on how to affirm your voting status. If you were expecting to receive the email but have not (make sure to check your spam!), please email psf-elections@pyfound.org for the PSF Board election or pc-elections@python.org, and we’ll assist you. Please note: If you opted out of emails related to your membership, you did not receive these emails.
PSF Members should review their communication preferences on psfmember.org if you would like to opt in or out of receiving emails about the PSF Board, PPC elections, or both. Here’s how:
- Login to psfmember.org
- Navigate to your “Profile” page
- Click the “Name and Address” tab
- Scroll down, designate your preferences
- Click submit
If you had previously opted out of communications from the PSF through psfmember.org and would like to review or change your preference, we encourage you to update them using the instructions above. The PSF only sends a handful of election and fundraising related communications every year via psfmember.org. The PSF newsletter runs through a separate mailing list (and we welcome you to sign up!).
How to affirm your intention to vote
You can affirm your voting intention by following the steps in our video tutorial:
- Log in to psfmember.org
- Choose “Your Memberships” page at the top right to check your eligibility to vote (You must be a Contributing, Supporting, or Fellow member)
- Choose “Voting Affirmation” page at the top right
- Select your preferred intention for voting in 2026 (which now includes a second affirmation regarding your intention to vote in the Python Packaging Council election)
- Click the “Submit” button
Need to check your membership status?
Log on to psfmember.org and visit your PSF Member User Information page to see your membership record and status. If you are a voting-eligible member (active Supporting, Contributing, and Fellow members of the PSF) and do not already have a login, please create an account on psfmember.org and then email psf-elections@pyfound.org so we can link your membership to your account. Please ensure you have an account linked to your membership so that we can have the most up-to-date contact information for you in the future.
PSF Bylaws
Section 4.2 of the PSF Bylaws requires that “Members of any membership class with voting rights must affirm each year to the corporation in writing that such member intends to be a voting member for such year.”
Our motivation is to ensure that our elections can meet quorum as required by Section 3.9 of our bylaws. As our membership has grown, we have seen that an increasing number of Contributing and Fellow members with indefinite membership do not engage with our annual election, making quorum difficult to reach.
An election that does not reach quorum is invalid. This would cause the whole voting process to be re-held, resulting in fewer voters and an undue amount of effort on the part of the PSF Staff.
Reminders about membership and voting
Reminder: If you were formerly a Managing member, your membership type was changed last year to Contributing per 2024’s Bylaw change that merged Managing and Contributing memberships.
Per another recent Bylaw change that allows for simplifying the voter affirmation process by treating past voting activity as intent to continue voting, if you voted last year, you will automatically be added to the 2026 voter roll. Please note: If you removed or changed your email on psfmember.org, you may not automatically be added to this year's voter roll.
What happens next?
You’ll get an email from OpaVote with a ballot (or two!) on or right before September 1st, and then you can vote!
Check out our PSF Membership page to learn more. If you have questions about membership, nominations, or this year’s Board election, please email psf-elections@pyfound.org or join the PSF Discord for the upcoming Board Office Hours on August 11th, 9 PM UTC. You are also welcome to join the discussion about the PSF Board election on the Python Discuss forum.
Django Weblog
Supporting the Triptych Project
The Django Steering Council — in its role as the DSF's arm for technical governance — has provided a Letter of Collaboration in support of a funding application by Carson Gross and Alex Petros to advance the Triptych Project: three proposals to make HTML itself more expressive, in every browser, by default.
Here's why, and how you can help.
HTML over the wire, and Django
The last few years have seen a move back towards serving multipage applications, with server-rendered templates. The HTMX library has probably had the biggest impact in the Django space, but Unpoly, Turbo, and others are part of the same story: send HTML over the wire, let the browser do what browsers do, and skip the client-side application layer where you don't really need it. It's a simpler model of the web — and it's one that speaks to Django's heart.
This isn't a movement Django has watched from the sidelines. Template partials, added in Django 6.0, were directly inspired by the patterns these libraries make natural.
The Triptych Project
The Triptych Project takes the core insights from HTMX (and the related libraries) and proposes them for the HTML standard itself. Three small additions:
- PUT, PATCH, and DELETE methods for forms — completing HTML's HTTP vocabulary.
- Button actions — buttons that make HTTP requests without a wrapping form. This is the current focus.
- Partial page replacement — links, forms, and buttons that target part of the DOM.
Together these aim to make it possible to build far more of the web with plain HTML — no JavaScript dependency, no library, nothing to ship or maintain.
Button actions
The current proposal (WHATWG #12330, full proposal) adds the action and method attributes to <button>. The canonical example is logout. Today there's no semantic way to write a logout button; you have to wrap it in a form:
<form action=/logout method=POST>
  <button>Logout</button>
</form>
Every Django developer has written this kind of thing. With button actions we could write the simpler single line:
<button action=/logout method=POST>Logout</button>
This isn't abstract for us. The Django admin's submit row holds multiple buttons, and a link disguised as a button:
<div class="submit-row">
  <input type="submit" value="Save" class="default" name="_save">
  <input type="submit" value="Save and add another" name="_addanother">
  <input type="submit" value="Save and continue editing" name="_continue">
  <a href="/admin/auth/user/.../delete/" class="deletelink">Delete</a>
</div>
Here, all the save inputs lead to the same action URL from the wrapping form. The view then branches on the submitted name value. That, of course, works, but we can imagine simpler, more flexible ideas being enabled via the Multi-Action Pages examples in the proposal.
The disguised submit link leads to the deletion confirmation page, where we then submit a form to confirm the action. That's the correct behaviour, but the markup confuses the intent: this isn't (really) a navigation to a new page, it's the first step of an action — deleting the object. The proposal's discussion of Buttons vs Links describes situations we come up against writing applications regularly.
The goal here is simpler patterns that will help us write better markup.
Why we're supporting this
The Django Software Foundation's mission includes a commitment to "advance the state of the art in Web development". Standards work is that in its purest form: an improvement to HTML lands for everyone, in every framework, in every browser, indefinitely.
It's also slow, painstaking work — specification, implementer engagement, web platform tests — that needs sustained attention. Carson and Alex are applying for funds so that people can devote real time to it. Our Letter of Collaboration is a concrete contribution to that application.
How you can help
If your company builds on Django, or indeed any other framework — with HTMX, Unpoly, Turbo, or plain HTML forms — this work benefits you directly. Carson and Alex are seeking non-binding letters of support on official letterhead for the funding application. Details and contacts are on the Triptych Project site.
Individually, do read the proposals, weigh in constructively on the WHATWG issues, and spread the word.
A simpler web is a better web. We're glad to support work that moves HTML in that direction.
July 14, 2026
PyCoder’s Weekly
Issue #743: Stacks & Queues, Django F-Expressions, MCP Clients, and More (2026-07-14)
#743 – JULY 14, 2026
View in Browser »

Stacks and Queues in Python
This post shows you how to use a Python list for stack operations (last-in, first-out) and a deque from the collections module for queue operations (first-in, first-out).
TREY HUNNER
Nifty Django Feature: F Expressions
Django’s F-Expression provides a way of querying fields from the ORM. They’re particularly handy to traverse relationships in more complex queries.
TIM SCHILLING
Secure Your Code, Wherever, or However You Write It

AI coding agents have blind spots, they reproduce patterns but struggle with security context. AURI by Endor Labs plugs into your editor via MCP, catching flaws, signaling exposed secrets, and spotting malicious dependencies. Ship secure by default. Try AURI Free →
ENDOR LABS sponsor
Testing MCP Servers With a Python MCP Client
Learn how to build a Python MCP client that tests MCP servers from your terminal. List their tools, prompts, and resources, then call each one.
REAL PYTHON course
Articles & Tutorials
Constructing and Judging Modern Agentic Workflows
How can you improve your LLM agent systems through specification enrichment? What are the advantages of having an LLM act as a judge within an agent system? This week on the show, Senior IEEE Member and Quality Engineer Suneet Malhotra joins us to discuss building and evaluating agentic architecture.
REAL PYTHON podcast
What for x in y Hides From You
An explanation of how Python’s for x in y syntax is a thin wrapper around the iterator protocol: iter(...), next(...), and StopIteration. Using examples from Memphis, a Python interpreter written in Rust, it shows how this design makes lists, ranges, and generators feel unified rather than magical.
TYLER GREEN • Shared by Tyler Green
Stop stitching 5 different systems together for your agents.
Dev teams spend weeks fitting together vector DBs, graph DBs, relational stores, filesystem primitives and optimizing cache. How about everything via a single API? P90 sub-200ms recall - the fastest graph database to unlock true agent memory, knowledge graphs and user-personalization. Click Here to Try HydraDB Out for Free
HYDRADB sponsor
Building a Fast HTML Toolkit in C for Python
turbohtml began as a patch to speed up html.escape and html.unescape in CPython. When the core team declined to maintain SIMD in the standard library, it became a third party library instead. This post is its story.
BERNÁT GÁBOR • Shared by Bernát Gábor
How to Publish to PyPI Using GitHub Actions Securely
If you’re using GitHub Actions to publish your Python libraries, this article is for you. Learn what are the best practices to ensure the process is secure and what tools you can use to validate it.
BRETT CANNON
Python 3.15’s Ultra-Low Overhead Interpreter Profiling Mode
Ken is one of the key contributors to the experimental JIT. This post talks about how Python 3.15’s interpreter profiling mode is helping them figure out what is working with the JIT and what isn’t.
KEN JIN
PEP 814: Add Frozendict Built-in Type
Victor has been involved in multiple attempts to add a frozen dict type to Python. His latest PEP has been accepted and frozen dictionaries will be added to Python 3.15. This post is his story.
VICTOR STINNER
How to Clean Messy CSV Files With Python
This introductory article shows you how to do data cleaning on CSV files using pandas, including dealing with duplicate rows, missing values, mixed date formats, and more.
ABID ALI AWAN,
PSF News: Security, Elections, and PyCon US 2026
This post is the monthly news round up of all things PSF. It covers a re-cap of PyCon US, several security fixes, updates from the PSF board, and more.
PYTHON SOFTWARE FOUNDATION
How to Use GitHub
Learn how to use GitHub step by step to create a remote repository, push your local Python project, and collaborate with others using GitHub Issues.
REAL PYTHON
Projects & Code
pyStrich: 1D and 2D Barcode Generator Library
GITHUB.COM/MMULQUEEN • Shared by Michael Mulqueen
envgap: Find Gaps Between .env, Shell Env, and Python Code
GITHUB.COM/PINAK-DATTA • Shared by Pinak Datta
Events
Weekly Real Python Office Hours Q&A (Virtual)
July 15, 2026
REALPYTHON.COM
PyData Bristol Meetup
July 16, 2026
MEETUP.COM
PyLadies Dublin
July 16, 2026
PYLADIES.COM
DjangoGirls Tamale 2026
July 17 to July 19, 2026
DJANGOGIRLS.ORG
EuroSciPy 2026
July 18 to July 24, 2026
EUROSCIPY.ORG
PyData PyCon Armenia 2026
July 24 to July 26, 2026
PYCON.AM
Happy Pythoning!
This was PyCoder’s Weekly Issue #743.
View in Browser »
[ Subscribe to 🐍 PyCoder’s Weekly 💌 – Get the best Python news, articles, and tutorials delivered to your inbox once a week >> Click here to learn more ]
Peter Bengtsson
How to use a list/tuple/array in Django with a raw SQL cursor
This does not work:
from django.db import connection

list_of_values = [1, 2, 3]
with connection.cursor() as cursor:
    cursor.execute("""
        SELECT *
        FROM my_model_table
        WHERE some_value IN %s
    """, [
        tuple(list_of_values),
    ])
    results = cursor.fetchall()
It will give you:
django.db.utils.ProgrammingError: syntax error at or near "'(1,2,3)'"
LINE 4:         WHERE id IN '(1,2,3)'
It used to work with psycopg v2. Now, in psycopg v3, you have to use the ANY operator. See "You cannot use IN %s with a tuple"
This will work:
from django.db import connection

list_of_values = [1, 2, 3]
with connection.cursor() as cursor:
    cursor.execute(
        """
        SELECT *
        FROM my_model_table
        WHERE some_value = ANY(%s)
    """,
        [
            list_of_values,
        ],
    )
    results = cursor.fetchall()
Note the ANY(%s), and instead of a list that has a tuple, it's a list that has a list.
What About a List of Strings
Consider...
from django.db import connection

-list_of_values = [1, 2, 3]
+list_of_values = ['foo', 'bar', 'fiz']
with connection.cursor() as cursor:
    cursor.execute(
        """
        SELECT *
        FROM my_model_table
        WHERE some_value = ANY(%s)
    """,
        [
            list_of_values,
        ],
    )
    results = cursor.fetchall()
That will result in:
django.db.utils.DataError: invalid input syntax for type integer: "foo"
LINE 4:         WHERE some_value = ANY('{foo,bar,fiz}')
My solution was to rewrite the SQL string itself and treat each value as a parameter each. In other words, the SQL string, before being sent to cursor.execute(...) will contain something like this:
AND (
  some_value = % OR
  some_value = % OR
  some_value = % OR
  some_value = % OR
  -- ...etc...
  some_value = %
)
This will work and is safe:
from django.db import connection

list_of_values = ["foo", "bar", "fiz"]
with connection.cursor() as cursor:
    cursor.execute(
        f"""
        SELECT *
        FROM my_model_table
        WHERE ({" OR ".join(["some_value = %s" for _ in list_of_values])})
    """,
        list_of_values,
    )
    results = cursor.fetchall()
Mike Driscoll
Python 101 3rd Edition Kickstarter Launch
Learn Python with a Book Designed for Beginners
Hello! I’m Michael Driscoll, and I’m excited to announce the third edition of Python 101.

For years, Python 101 has helped readers take their first steps into programming. Whether you’re a complete beginner, a student, or someone looking to learn Python for work or personal projects, the goal has always been the same: make learning Python approachable, practical, and enjoyable.
Python has continued to evolve, and it’s time for the book to evolve with it. This Kickstarter will help fund the writing, editing, production, and publication of the fully updated third edition.
Why a Third Edition?
Python has changed significantly since the previous edition. New language features, updated best practices, and improvements throughout the ecosystem make this the right time for a comprehensive update.
The third edition will include:
- Updated examples compatible with modern versions of Python
- New coverage of current Python features and best practices
- Improved code samples and exercises (when applicable)
- Corrections and refinements based on reader feedback
The goal isn’t simply to revise the previous edition—it’s to create the best beginner-focused version of Python 101 yet.
Who Is This Book For?
This book is designed for:
- Complete beginners with no programming experience
- Students learning Python
- Self-taught developers
- Professionals transitioning into software development
- Anyone looking for a clear, practical introduction to Python
No prior programming knowledge is required.
Why Kickstarter?
Kickstarter allows readers to directly support the creation of the book while helping ensure it receives the time and attention needed for a high-quality release.
Funding will help cover:
- Writing
- Ebook production
- Print preparation
- Kickstarter fulfillment and shipping materials
- Any cover refinements
Most importantly, it allows me to focus on creating the strongest edition possible.
Rewards
Depending on your pledge level, rewards may include:
- DRM-free PDF edition
- EPUB and Kindle editions
- Printed paperback
- Signed copies
- Early access to chapters during development
- Exclusive Kickstarter updates
Project updates will be shared throughout the process so backers can follow the book’s progress.
Thank You
Whether you back this project or simply share it with others, your support means a great deal.
Writing technical books is a collaborative effort between authors and readers. Your encouragement has helped make previous editions successful, and I’m excited to bring an updated Python 101 to the next generation of Python learners.
Thank you for helping make the third edition possible.
Back the project
The post Python 101 3rd Edition Kickstarter Launch appeared first on Mouse Vs Python.
PyPodcats
Trailer: Episode 12 With Juanita Gomez
A preview of our chat with Juanita Gomez. Watch the full episode on July 17, 2026A preview of our chat with Juanita Gomez. Watch the full episode on July 17, 2026
Sneak Peek of our chat with Juanita Gomez, hosted by Cheuk Ting Ho and Mariatta Wijaya.
Juanita is a Ph.D. candidate in Computer Science at UC Santa Cruz, where her research focuses on improving the security of scientific open source software. She is a former developer of the Spyder IDE, one of the community managers for the Scientific Python project, and part of the organizing committee for the SciPy conference.
In this episode, Juanita shares how she went from making music videos on YouTube to creating friendlier documentation for Spyder, her research on open source security, practical security tips for maintainers, and her journey navigating imposter syndrome as a woman and Latina in tech. Plus: The X Factor, Shakira, and singing on stage at SciPy.
Full episode is coming on July 17th, 2026! Subscribe to our podcast now!
Python Bytes
#488 tau - it's 2pi and it writes code
<strong>Topics covered in this episode:</strong><br> <ul> <li><strong>The trusted-publishing debate: how to do it right vs. why you shouldn't trust it</strong></li> <li><strong><a href="https://link.mail.beehiiv.com/ss/c/u001.nhis-D9RLtwtIum5I0BjhZ22Z4E_bpBKQN-16RenQ3ws2TZPhzEfwjZMSGiGAQx3p407RO5QUnbYLEGjQnorGAGD5oCA5TGTjsy6RbCrTYDXJN8BUDTRz-W0ZLYlAKrwzGPByECjf7lwVCl3nZRCGXvvhp8TvBLNfJRgnY-wJ9ktogLFr2YqqQyXhwmgzpa-6HsPhylQ_9BWTK3teRtSwrRXrLfxrVWwQXEG6Zbqaz5nRGc6xNV7pMdWvEGpfoBMUwbGl0aGZ40ZX_cYbR-sgKDJdl0v95gGqtcySNXfNgokF54k8Xao40CrloFhcFtX/4s6/5odqdEikSeKZEjId8lTcSg/h29/h001.6m_9ZXKKfEi-Sx1OcsN8EInQX8eEjhrHaS4h_Yo0T7o?featured_on=pythonbytes">JupyterLab 4.6 and Notebook 7.6 are out!</a></strong></li> <li><strong><a href="https://twotimespi.dev/?featured_on=pythonbytes">Tau</a> – new small, readable terminal coding agent</strong></li> <li><strong><a href="https://docs.djangoproject.com/en/6.0/topics/tasks/?featured_on=pythonbytes">Django Tasks and Django 6.1</a></strong></li> <li><strong>Extras</strong></li> <li><strong>Joke</strong></li> </ul><a href='https://www.youtube.com/watch?v=lJpOzcVTlho' style='font-weight: bold;'data-umami-event="Livestream-Past" data-umami-event-episode="488">Watch on YouTube</a><br> <p><strong>About the show</strong></p> <p>Sponsored by us! Support our work through:</p> <ul> <li>Our <a href="https://training.talkpython.fm/?featured_on=pythonbytes"><strong>courses at Talk Python</strong></a></li> <li>Consulting from <a href="https://sixfeetup.com/?featured_on=pythonbytes"><strong>Six Feet Up</strong></a></li> </ul> <p><strong>Connect with the hosts</strong></p> <ul> <li>Michael: <a href="https://fosstodon.org/@mkennedy">Mastodon</a> / <a href="https://bsky.app/profile/mkennedy.codes?featured_on=pythonbytes">BlueSky</a> / <a href="https://x.com/mkennedy?featured_on=pythonbytes">X</a> / <a href="https://www.linkedin.com/in/mkennedy/?featured_on=pythonbytes">LinkedIn</a></li> <li>Calvin: <a href="https://sixfeetup.social/@calvin?featured_on=pythonbytes">Mastodon</a> / <a href="https://bsky.app/profile/calvinhp.com?featured_on=pythonbytes">BlueSky</a> / <a href="https://x.com/calvinhp?featured_on=pythonbytes">X</a> / <a href="https://www.linkedin.com/in/calvinhp/?featured_on=pythonbytes">LinkedIn</a></li> <li>Show: <a href="https://fosstodon.org/@pythonbytes">Mastodon</a> / <a href="https://bsky.app/profile/pythonbytes.fm">BlueSky</a> / <a href="https://x.com/PythonBytes?featured_on=pythonbytes">X</a></li> </ul> <p>Join us on YouTube at <a href="https://pythonbytes.fm/stream/live"><strong>pythonbytes.fm/live</strong></a> to be part of the audience. Usually <strong>Tuesday at 7am PT</strong>. Older video versions available there too.</p> <p>Finally, if you want an artisanal, hand-crafted digest of every week of the show notes in email form? Add your name and email to <a href="https://pythonbytes.fm/friends-of-the-show">our friends of the show list</a>, we'll never share it.</p> <p><strong>Calvin #1:</strong> The trusted-publishing debate: how to do it right vs. why you shouldn't trust it</p> <p>https://snarky.ca/how-to-publish-to-pypi-using-github-actions-securely/ (Brett Cannon) and https://blog.yossarian.net/2026/07/07/You-shouldnt-trust-trusted-publishing (W<strong>illiam Woodruff</strong>)</p> <ul> <li>Trusted Publishing (PyPI's OIDC-based auth scheme, also now used by npm, RubyGems, <a href="http://crates.io?featured_on=pythonbytes">crates.io</a>, NuGet) replaces long-lived API tokens with short-lived, auto-scoped credentials tied to CI/CD machine identity.</li> <li>Yossarian's post: it's purely an <em>authentication</em> mechanism between a machine identity and a package — it says nothing about package safety or quality. PyPI deliberately avoids any "verified/trusted" badge for it, unlike its verified-URL checkmarks.</li> <li>Same logic applies to PyPI attestations: anyone can sign with any machine identity they control, so an attestation's presence isn't itself a trust signal.</li> <li>Bottom line from that post: don't confuse "trusted" (machine-to-machine) with "trustworthy" (human judgment about the package).</li> <li><a href="http://Snarky.ca?featured_on=pythonbytes">Snarky.ca</a>'s companion piece is more practical: given GitHub Actions compromises in the news, the real fix is 3 concrete steps — run zizmor to lock down workflow permissions/checkout credentials and pin actions to commit hashes, adopt Trusted Publishing to eliminate stored PyPI tokens, and require manual approval via a GitHub environment before any publish job runs.</li> <li>Takeaway for listeners: Trusted Publishing is good hygiene for <em>how</em> you authenticate to PyPI, but it's not a substitute for securing your CI pipeline itself — or for actually vetting the packages you install.</li> </ul> <p><strong>Michael #2: <a href="https://link.mail.beehiiv.com/ss/c/u001.nhis-D9RLtwtIum5I0BjhZ22Z4E_bpBKQN-16RenQ3ws2TZPhzEfwjZMSGiGAQx3p407RO5QUnbYLEGjQnorGAGD5oCA5TGTjsy6RbCrTYDXJN8BUDTRz-W0ZLYlAKrwzGPByECjf7lwVCl3nZRCGXvvhp8TvBLNfJRgnY-wJ9ktogLFr2YqqQyXhwmgzpa-6HsPhylQ_9BWTK3teRtSwrRXrLfxrVWwQXEG6Zbqaz5nRGc6xNV7pMdWvEGpfoBMUwbGl0aGZ40ZX_cYbR-sgKDJdl0v95gGqtcySNXfNgokF54k8Xao40CrloFhcFtX/4s6/5odqdEikSeKZEjId8lTcSg/h29/h001.6m_9ZXKKfEi-Sx1OcsN8EInQX8eEjhrHaS4h_Yo0T7o?featured_on=pythonbytes">JupyterLab 4.6 and Notebook 7.6 are out!</a></strong></p> <p>Michał Krassowski's rundown - a chunky minor release: 68 features, 97 bug fixes, 95 contributors, one of the biggest ever.</p> <ul> <li><strong>Scratchpad console</strong> (Notebook 7.6 headliner) - a console next to your notebook sharing its kernel, for throwaway experiments. Ctrl+B.</li> <li><strong>Jump to last-edited cell</strong> - new commands hop through recently edited cells.</li> <li><strong>File browser glow-up</strong> - Date Created column, editable breadcrumbs with Tab-completion, and Open in Terminal.</li> <li><strong>Debugger</strong> - sources open in the main area, floating step/continue overlay, live kernel-sources filter.</li> <li><strong>Custom layouts (Lab)</strong> - activity bar top/bottom, draggable panels, four-way tab splits, per-panel Ctrl+scroll zoom.</li> <li><strong>~5x faster extension builds</strong> - webpack → Rspack, and <code>jupyter-builder</code> means no full Lab install needed to build extensions.</li> <li><strong>Keyboard/a11y</strong> - add shortcuts from the UI (no JSON), Find & Replace in Edit menu (Ctrl+H).</li> </ul> <p><strong>Calvin #3: <a href="https://twotimespi.dev/?featured_on=pythonbytes">Tau</a></strong> – new small, readable terminal coding agent</p> <ul> <li><strong>Tau</strong> – new small, readable terminal coding agent (Python 3.12+), built as both a working tool and a teaching project for how coding agents work under the hood</li> <li>Install via <code>uv tool install tau-ai</code>, <code>pipx</code>, or <code>pip</code>; ships a <code>tau</code> CLI</li> <li>Three-layer architecture: <code>tau_ai</code> (provider-neutral model layer) → <code>tau_agent</code> (reusable "brain": messages, tools, events, loop) → <code>tau_coding</code> (CLI/TUI, file & shell tools, sessions)</li> <li>Supports OpenAI, Anthropic, OpenAI Codex, OpenRouter, Hugging Face, and custom/local OpenAI-compatible endpoints</li> <li>Built-in tools (read/write/edit/bash), durable JSONL sessions with resume/branching, project instructions via <code>AGENTS.md</code>, and context compaction</li> <li>Core harness is UI-agnostic — same brain can power the TUI, print mode, or a custom frontend — usable as a standalone library too</li> </ul> <p><strong>Michael #4: <a href="https://docs.djangoproject.com/en/6.0/topics/tasks/?featured_on=pythonbytes">Django Tasks and Django 6.1</a></strong></p> <ul> <li><strong>Django 6.0 finally ships first-party background tasks</strong> (<code>django.tasks</code>) - out of Jake Howard's DEP 14, accepted May 2024, after two decades of everyone bolting on Celery/RQ/Huey.</li> <li><strong>It's an API, not a worker.</strong> Django handles task definition, validation, queuing, and result storage - it does not execute them. You bring the backend.</li> <li><strong>The default backend traps people.</strong> <code>ImmediateBackend</code> runs tasks inline on the request thread and blocks until done - so out of the box <code>.enqueue()</code> backgrounds nothing (a 5-second task means a 5-second response). The other built-in, <code>DummyBackend</code>, runs nothing at all. Both are dev/test only.</li> <li><strong>Nice API otherwise:</strong> slap <code>@task</code> on a function, call <code>.enqueue()</code>, get back a <code>TaskResult</code> you look up later by id - with async twins like <code>aenqueue()</code>. Gotcha: args and return values must survive a JSON round-trip, so a tuple sneakily comes back as a list.</li> <li><strong>The community local backend to know: <code>django-tasks-local</code></strong> by Chris Beaven (SmileyChris). A <code>ThreadPoolExecutor</code> backend that gives real background threads with zero infrastructure - no Redis, no Celery, no database - plus a <code>ProcessPoolBackend</code> for CPU-bound work → <a href="http://github.com/lincolnloop/django-tasks-local?featured_on=pythonbytes">github.com/lincolnloop/django-tasks-local</a></li> <li><strong>Its catch:</strong> results live in memory, so pending tasks vanish on restart or deploy. Great for dev and low-traffic production; for persistence, drop to Jake Howard's <code>django-tasks</code> (DatabaseBackend + worker command).</li> </ul> <p><strong>Extras</strong></p> <p>Calvin:</p> <ul> <li><a href="https://hugovk.dev/blog/2026/fixing-dict/?featured_on=pythonbytes">Fixing the dictionary with Python 3.14</a> — Hugo van Kemenade stumbled on - and got fixed - a markup bug in the OED's own citation of a 1706 use of the pi symbol.</li> </ul> <p>Michael:</p> <ul> <li><a href="https://bunny.net/blog/were-making-bunny-dns-free/?featured_on=pythonbytes">Bunny DNS is now free</a></li> </ul> <p><strong>Jokes:</strong></p> <ul> <li><strong>What's the object-oriented way to become wealthy?</strong> Inheritance</li> <li><strong>To understand what recursion is...</strong> You must first understand what recursion is</li> <li><strong>3 SQL statements walk into a NoSQL bar.</strong> Soon, they walk out They couldn't find a table.</li> </ul>
July 13, 2026
Django Weblog
Explore the DjangoCon US 2026 Speaker Lineup and Reserve Your Spot
DjangoCon US 2026 is just around the corner, and now is the perfect time to start planning your conference experience.
Our speaker lineup is now available, featuring talks from Django contributors, maintainers, educators, and community members covering everything from web development and APIs to deployment, security, testing, AI, and the future of the Django ecosystem.
Whether you're attending your first DjangoCon US or returning to reconnect with friends and colleagues, you'll find opportunities to learn, share ideas, and meet people from across the global Django community.
Beyond the talks, your conference registration includes access to tutorials, Open Spaces, community sprints, hallway conversations, and social events that make DjangoCon US a unique experience.
If you haven't registered yet, there's still time to join us in Chicago, August 24–28.
Register for DjangoCon US 2026: https://2026.djangocon.us
Browse the speaker lineup: https://2026.djangocon.us/news/announcing-lineup/
We'll be sharing more updates in the coming weeks, including the full conference schedule, travel reminders, and everything you need to make the most of your time at DjangoCon US.
We look forward to seeing you in Chicago this August!
Hugo van Kemenade
Security: line goes up
Like many other projects, CPython is experiencing a huge increase in security reports.
CVEs per year #
Last month, PSF Security Developer-in-Residence Seth Larson posted a chart of CVEs per year, showing a large increase in 2026:
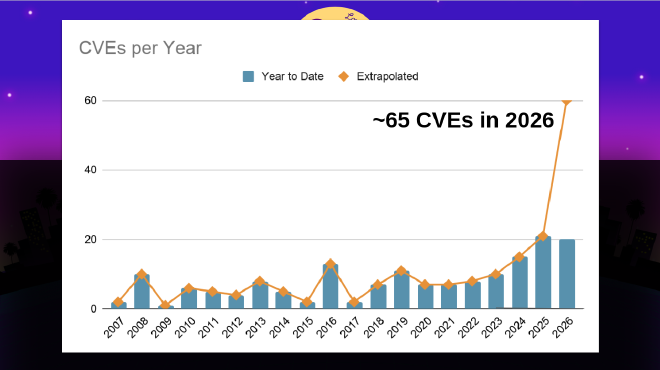
But this only represents the output of security work, and doesn’t show all the work dealing with incoming reports. Many are closed and dealt with as non-security bug reports instead; many are closed as neither security nor bug reports.
Let’s reveal some of this unseen work by the Python Security Response Team (PSRT).
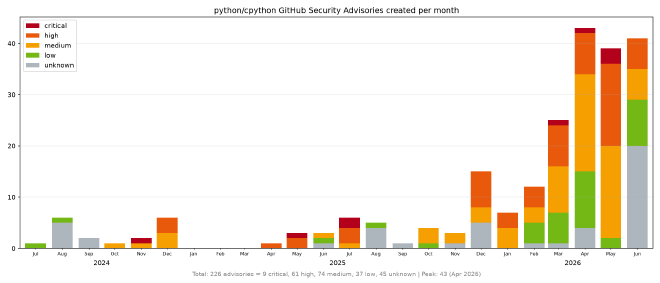
GHSAs by month #
Here are the number of incoming GitHub Security Advisories (GHSA) reports created since July 2024:
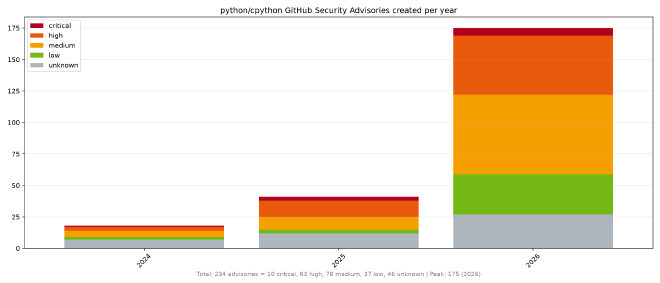
GHSAs by year #
Here is the same thing by year, and remembering we’re only halfway through 2026:
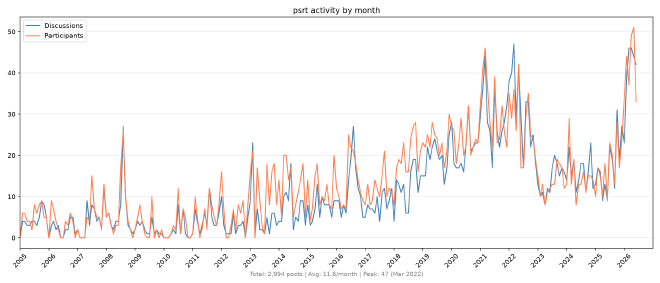
Email reports by month #
We’ve only fairly recently been encouraging new reports be made via GHSA. Before this, they were usually made by email. The next chart is the number of email discussions (or threads) and participants by month:
Thanks #
Big thanks to Seth for all his work as Security Developer-in-Residence: helping shepherd all these reports, developing a security policy to improve the quality of incoming reports and help us assess them, and defining PSRT membership and responsibilities via PEP 811 to build an active team. All this would be much harder without his guidance! And thanks to Alpha-Omega for sponsoring his position at the PSF.
Talk Python to Me
#555: Marimo Pair - A Canvas for Agent + Developers Collaboration
Coding agents have gotten really good at one kind of work. You scope a feature, edit some files, run the tests, ship it. It all happens on disk. But that is not how data work feels. You load something, you look at it, you run a cell, you watch how it responds, and you decide the next move from whatever is sitting in memory. And until now, your agent couldn't see any of that. It only saw the files. Never the live state. <br/> <br/> This episode, that wall comes down. marimo pair drops a coding agent right inside a running notebook, with full access to every variable Python is holding in memory. The notebook becomes a shared canvas. You point, it runs the code. You tell it to zoom in on the Picasso paintings, and the chart just updates. No MCP tools to wire up, no schema to describe. Just Python, and an agent that can finally see what you see. Trevor Manz is back to walk us through it.<br/> <br/> <strong>Episode sponsors</strong><br/> <br/> <a href='https://talkpython.fm/sentry'>Sentry Error Monitoring, Code talkpython26</a><br> <a href='https://talkpython.fm/training'>Talk Python Courses</a><br/> <br/> <h2 class="links-heading mb-4">Links from the show</h2> <div><strong>marimo pair</strong>: <a href="https://marimo.io/pair?featured_on=talkpython" target="_blank" >marimo.io/pair</a><br/> <br/> <strong>Course transcripts announcement</strong>: <a href="https://talkpython.fm/blog/posts/announcing-german-subtitles-on-courses/" target="_blank" >talkpython.fm/blog</a><br/> <br/> <strong>anywidget: Jupyter Widgets made easy</strong>: <a href="https://talkpython.fm/episodes/show/530/anywidget-jupyter-widgets-made-easy" target="_blank" >talkpython.fm</a><br/> <strong>marimo</strong>: <a href="https://marimo.io/?featured_on=talkpython" target="_blank" >marimo.io</a><br/> <strong>blog</strong>: <a href="https://marimo.io/blog/marimo-pair?featured_on=talkpython" target="_blank" >marimo.io</a><br/> <strong>GitHub</strong>: <a href="https://github.com/marimo-team/marimo-pair?featured_on=talkpython" target="_blank" >github.com</a><br/> <strong>given this</strong>: <a href="https://martinalderson.com/posts/wall-street-lost-285-billion-because-of-13-markdown-files/?featured_on=talkpython" target="_blank" >martinalderson.com</a><br/> <strong>llms.txt</strong>: <a href="https://talkpython.fm/llms.txt" target="_blank" >talkpython.fm</a><br/> <strong>mcp</strong>: <a href="https://talkpython.fm/ai-integration" target="_blank" >talkpython.fm</a><br/> <strong>cli</strong>: <a href="https://talkpython.fm/blog/posts/talk-python-now-has-a-cli/" target="_blank" >talkpython.fm</a><br/> <strong>open issues</strong>: <a href="https://github.com/marimo-team/marimo-pair/issues?featured_on=talkpython" target="_blank" >github.com</a><br/> <strong>Discord</strong>: <a href="https://marimo.io/discord?featured_on=talkpython" target="_blank" >marimo.io</a><br/> <strong>Marimo Pair</strong>: <a href="https://marimo.io/pair?featured_on=talkpython" target="_blank" >marimo.io</a><br/> <strong>OpenCode</strong>: <a href="https://opencode.ai?featured_on=talkpython" target="_blank" >opencode.ai</a><br/> <strong>AI Tooling for Software Engineers in 2026</strong>: <a href="https://newsletter.pragmaticengineer.com/p/ai-tooling-2026?featured_on=talkpython" target="_blank" >newsletter.pragmaticengineer.com</a><br/> <br/> <strong>Watch this episode on YouTube</strong>: <a href="https://www.youtube.com/watch?v=6LAQnnW-gTY" target="_blank" >youtube.com</a><br/> <strong>Episode #555 deep-dive</strong>: <a href="https://talkpython.fm/episodes/show/555/marimo-pair-a-canvas-for-agent-developers-collaboration#takeaways-anchor" target="_blank" >talkpython.fm/555</a><br/> <strong>Episode transcripts</strong>: <a href="https://talkpython.fm/episodes/transcript/555/marimo-pair-a-canvas-for-agent-developers-collaboration" target="_blank" >talkpython.fm</a><br/> <br/> <strong>Theme Song: Developer Rap</strong><br/> <strong>🥁 Served in a Flask 🎸</strong>: <a href="https://talkpython.fm/flasksong" target="_blank" >talkpython.fm/flasksong</a><br/> <br/> <strong>---== Don't be a stranger ==---</strong><br/> <strong>YouTube</strong>: <a href="https://talkpython.fm/youtube" target="_blank" ><i class="fa-brands fa-youtube"></i> youtube.com/@talkpython</a><br/> <br/> <strong>Bluesky</strong>: <a href="https://bsky.app/profile/talkpython.fm" target="_blank" >@talkpython.fm</a><br/> <strong>Mastodon</strong>: <a href="https://fosstodon.org/web/@talkpython" target="_blank" ><i class="fa-brands fa-mastodon"></i> @talkpython@fosstodon.org</a><br/> <strong>X.com</strong>: <a href="https://x.com/talkpython" target="_blank" ><i class="fa-brands fa-twitter"></i> @talkpython</a><br/> <br/> <strong>Michael on Bluesky</strong>: <a href="https://bsky.app/profile/mkennedy.codes?featured_on=talkpython" target="_blank" >@mkennedy.codes</a><br/> <strong>Michael on Mastodon</strong>: <a href="https://fosstodon.org/web/@mkennedy" target="_blank" ><i class="fa-brands fa-mastodon"></i> @mkennedy@fosstodon.org</a><br/> <strong>Michael on X.com</strong>: <a href="https://x.com/mkennedy?featured_on=talkpython" target="_blank" ><i class="fa-brands fa-twitter"></i> @mkennedy</a><br/></div>
Rodrigo Girão Serrão
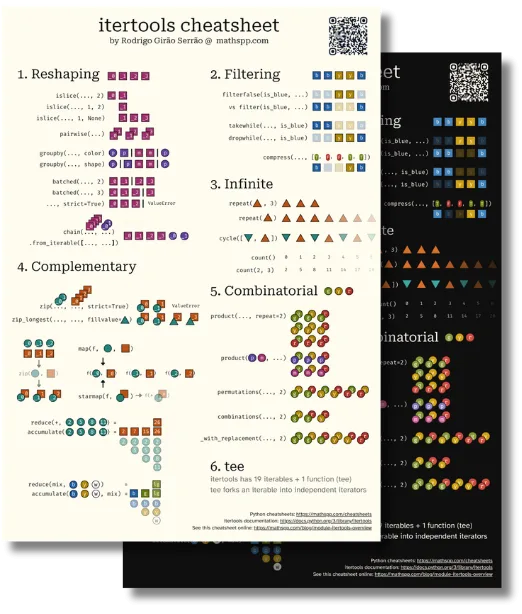
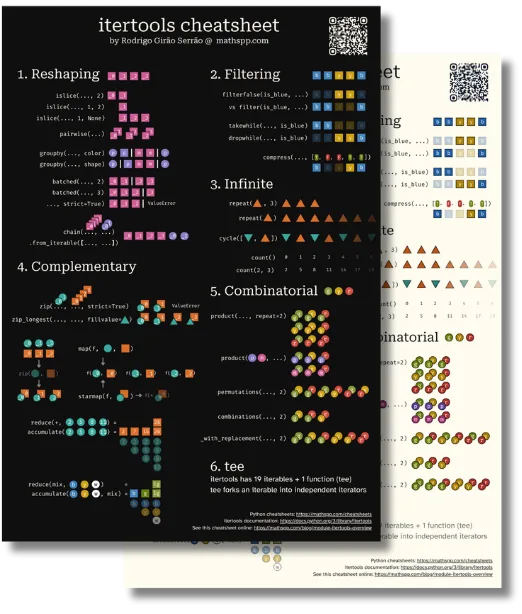
itertools cheatsheet

Cheatsheet with visual diagrams that explain how the iterables from itertools work.
This cheatsheet contains diagrams that explain how the iterables from the module itertools work in a visual way.
Mike C. Fletcher
PyVRML97 2.3.4b1
Continuing on with the Open Source work. PyVRML97 2.3.4b1 is almost all build and CI process updates. There are a few minor fixes for modern Python's where bool can't be used as a list index and a change for NumPy 2.x array comparison failures. This beta is mostly just so that we can pull it from OpenGLContext's alpha when it's released.
Bob Belderbos
Learning New Skills in the AI Era (vBrownBag)
I joined the vBrownBag podcast with Damian to talk about how to actually learn a new language or skill when an agent can write the code before you finish typing the prompt.
Keep the friction in
The thread running through the whole conversation is friction. Agents are close to slot machines: a bit of dopamine, the path of least resistance, and suddenly you are delegating the thinking, not just the typing. The weeks where I hand off the most are the weeks I come out least happy with my own skills.

So I keep deliberate friction in the loop. I built coding platforms for Python and Rust with no AI in them, on purpose, so you still write the code in the browser without assistance.
When you are learning something, you have to go through the cycles at least once before you let an agent do it for you.
That is also why I can lean on agents more in Python (20 years of programming in, I can smell-test the output) than in a language I am still new to.
The litmus test is simple: how well do I understand the thing I am shipping?
AI to explain, not AI to do
AI is remarkable at explaining a specific concept. It is dangerous as a crutch for deeper understanding. The distinction I keep drawing: use it to explain, not to do the work you signed up to learn.
We got into where the silent errors hide. Reviewed code can look completely plausible and still be only 70% right, because you never went deep enough to feel the wrong part (I also discussed this recently on complexity.fm).
On a recent project the app worked and returned good results, but it was silently never searching the second half of every chunk (see here).
That is the failure mode I see most with students shipping AI-built code, which is why I keep coming back to rubber-stamping AI PRs as the real risk.
Learn by building, with tests as the guide
When people ask how to learn Rust (or anything) without losing ownership, the shape is always the same:
- Read enough to get the concepts (the first six to eight chapters of the Rust book, not all 600 pages).
- Pick a real project you have a stake in, then break it into digestible pieces.
- Write the tests first so you have a definition of done that guides each step.
- Contrast sources: read the reference in parallel, and compare answers across models.
In the Rust cohort we build a JSON parser this way: tokenizer first, then bindings with PyO3, then benchmarking. Several students beat the C parser on performance (see here and here).
This only happens because they owned every line instead of having an agent generate it.
Watch the full conversation:
The line I keep repeating: AI is an accelerator, not a compass. Start with your own thinking, then let it help, and keep a high enough bar that you never accept the first draft.
Keep reading
- The AI accelerator needs direction
- AI Doesn't Change What Software Engineering Is
- Learning Rust made me a better Python developer
Thanks Damian / vBrownBag for having me on. If you want to stay technical without outsourcing the thinking, that is exactly what we work on in the Rust and agentic AI cohorts.
Armin Ronacher
The Tower Keeps Rising
I feel that some vibecoded software changes somewhat randomly and unexpectedly. That made me think about Bruegel’s “The Tower of Babel” which shows an already quite chaotic depiction of the Tower of Babel. The story is usually told as one about pride and ambition and ultimately why people no longer speak the same language. But it is also a story about the unity that makes technological progress work.
The text begins with a technology upgrade:
And they said one to another, Go to, let us make brick, and burn them thoroughly. And they had brick for stone, and slime had they for morter.
They use it for a civilizational project:
let us build us a city and a tower, whose top may reach unto heaven
But when God assesses the situation the bricks are not what concern him:
the people is one, and they have all one language, […] and now nothing will be restrained from them.1
The source of their power is coordination. They share a language and with that shared language they can combine their work into something no one of them could build alone. God does not take away the bricks or their knowledge of how to make them. He takes away their ability to understand one another, and construction stops.
There is the appealing idea that AI-assisted programming means better tools which lets us build more ambitious software. That is certainly true at the level of the individual and without doubt a developer with an agent will be dramatically more capable of changing a codebase. But large software projects have never been limited only by how quickly an individual can produce code. They are limited by how well people can coordinate their understanding of the system they are changing.
The shared language of a software project is not English or Python but it is the common understanding of what its concepts mean, where the boundaries are, which invariants matter, who owns what, and why the system has the shape it does. This language is rarely written down in one place. It lives partly in documentation and code, but also in code review, conversations, arguments, and the experience of having to explain a change to somebody else.
Before agents, some of this shared understanding was maintained by friction. If I wanted to change your storage layer, I usually had to read your code, ask you questions, and perhaps coordinate with another team whose service depended on it. This was slow, and much of that slowness was waste but not all of it was. Some of it was the process by which your understanding became mine, and by which both of us discovered whether we still agreed about how the system worked. This friction synchronizes people.
Agents remove much of that friction. I can ask an agent to add OAuth, you can ask one to add caching, and somebody else can ask one to rebuild the database from first principles and make the UI pink. Each change can be reasonable in isolation. The code can compile, the tests can pass, and the explanations can be generated on demand. None of us necessarily has to talk to the others, or even acquire the part of the shared model that the change once would have forced us to learn.
As I said many times before: agents do not feel pain, only humans do. Agents now let us act in parts of the system where we would previously have needed other people and in code bases where the people would have revolted.
When I look at some vibecoded scaled-up projects the codebases become Babel not because nobody can communicate, but because nobody needs to. Every developer has a tireless translator that can explain a corner of the tower and make whatever local alteration they ask of it. The changes keep landing, even as the architectural language that would let the humans reason about them together disappears.
But it’s not the biblical story. At Babel, the loss of common language stops construction whereas in AI-assisted engineering, construction can continue after shared understanding has already collapsed. The lack of an immediate failure is what makes it curious and a bit disorienting. The tower does not fall, and so we do not notice what was lost. It just keeps rising.
July 12, 2026
Christian Ledermann
Buzzword Bingo: An Experiment in Spec-Driven AI Development
This is a submission for Weekend Challenge: Passion Edition
What I Built
I built Buzzword Bingo, a multiplayer bingo game for conferences, webinars and meetings where players mark off the inevitable buzzwords as they appear.
The application allows someone to create a game, share a link with participants, and let everyone play along on their own unique bingo board. The first player to complete a row, column or diagonal wins.
Under the hood, though, the game itself was almost secondary.
The real goal was to answer a question I had been wondering about for a while:
How far can I push Claude with specification-driven development while still achieving reliable type coverage and maintaining the coding standards I expect from a production Python project?
The project became an experiment in AI-assisted software engineering, strict typing, and how much guidance modern coding agents actually need to produce maintainable software.
Demo
There is no live demo, but you can have a look at the screenshots taken by playwright during testing
Code
Repository:
How I Built It
Specification Driven Development
The project followed a specification-driven approach using Speckit.
Rather than iterating directly in code, I created specifications describing what the system should do and allowed Claude to implement them.
A big accelerator for the project was using scaf for the initial bootstrap. Rather than spending the first few hours wiring together repository structure, CI, containerization, infrastructure, and developer tooling, I started from a production-oriented foundation and focused on shaping it to match my own preferences. Having Kubernetes manifests, Terraform, deployment pipelines, and modern Python tooling available from day one made it much easier to concentrate on the actual experiment: how far specification-driven development and AI coding agents could take the application.
I ended up needing three major specifications:
- Project scaffolding
- Starting from a project generated with
scaf. - Refining the generated structure to match my personal preferences.
- Adding all the infrastructure and tooling I typically expect in a modern project.
- Backend implementation
- Django models and business logic.
- Server-rendered templates.
- HTMX interactions.
- Capability URL based authorization.
- Frontend implementation
- Visual styling and user experience.
- Responsive layouts.
- End-to-end testing using Playwright.
Django Without the JavaScript Framework
The application uses:
- Django
- HTMX
- Django templates
- PostgreSQL
HTMX turned out to be an excellent fit for this type of application.
Most interactions consist of:
- clicking a square,
- sending a POST request,
- returning an updated HTML fragment,
- swapping it into the page.
No client-side state management was required.
Capability URLs
One design decision I particularly liked was using capability URLs instead of authentication.
Each board receives a unique UUID:
/board/5b97b663-1f2f-4e54-8d2f-f45f3272f870/
Possession of the URL grants access to that board.
This removes the need for:
- user accounts,
- sessions,
- authentication,
- authorization logic.
For a lightweight conference game this felt like the right trade-off.
Going All-In On Type Safety
I care a lot about clean code and strong typing in Python, so I decided to push the type system as far as possible.
Instead of relying on a single type checker, I combined:
This was paired with a strict ruff configuration with almost every rule enabled.
One of the goals of the experiment was to see whether Claude could operate effectively within these constraints.
What Worked
This instruction worked well:
Prefer precise, narrow types (
Enum,NewType,TypedDict, dataclasses withFinalorLiteralfields) overAny, untypeddictorlist, or stringly-typed values. Illegal states should be unrepresentable in the type system rather than guarded against only at runtime.
Once Claude had a few examples to follow, it started producing significantly better type annotations and more expressive domain models.
Pre-commit hooks proved to be the first line of defence, catching issues before they ever reached CI. Linters, formatters, and all three type checkers ran automatically on every commit, providing rapid feedback and keeping the codebase consistent throughout the experiment.
To avoid spending time hand-crafting the configuration, I used pc-init to generate a strict .pre-commit-config.yaml tailored for modern Python projects. This ensured that formatting, linting, and type checking became part of the development workflow rather than an afterthought.
What Didn't Work
Claude struggled with this instruction:
All Python code MUST be fully type-annotated; untyped function signatures and untyped module-level values are not permitted.
Instead of fixing missing annotations, it occasionally attempted to disable checks in pyproject.toml.
Some manual intervention and code review were required to steer it back towards the desired standards.
The experience reinforced an observation I've made repeatedly with coding agents:
Agents optimize for making the error disappear, not necessarily for preserving your engineering constraints.
If you care about those constraints, you still need strong feedback loops.
Type Checker Observations
Running all three type checkers together was still faster than a single mypy run.
Interestingly, they complemented each other rather than duplicating effort:
-
tyfound some issues the others missed. -
pyreflyfound different classes of problems. -
zubanfelt the closest tomypyand was by far the easiest to configure.
The newer type-checking ecosystem is still catching up with mypy in terms of documentation and examples, so reaching the level of strictness I wanted involved a fair amount of experimentation.
Prize Categories
Not submitting for any specific prize category.
The real prize was finding out how far AI-assisted, specification-driven development can be pushed before human review becomes the limiting factor. 😉️
Mike C. Fletcher
PyOpenGL 4.0.0a1
I've been trying to make some time for Open Source projects again. I've been using LLMs for much of the coding because the vast bulk of it at this point is just grunt work. First up is PyOpenGL. The tests the LLM produced turned up a bunch of bugs in the core that have lain dormant for years because the endpoints weren't getting used. The LLM tests are not particularly fun or interesting, but they did a pretty good job of finding wrapping errors. They also exercised GLES and EGL enough to make it far more reasonable to actually use those two interfaces.
Shout out to glfw python library for working cleanly on the Wayland only environment. Definitely helped to find the hidden GLX dependencies we had throughout the Linux platform implementation. One of the biggest ones there was the GLUT library. The other thing that came out was the GLE library being legacy (compatibility) OpenGL.
PyOpenGL 4.0.0a1 is classified as a major release mostly because of the abandonment of old Pythons (<3.9) and old Numpy (<2). Other than that there's mostly just bug-fixes that came from the new test suites.
GLU
* gluUnProject4 missing arguments
* gluNewQuadric/gluQuadricCallback fix the callback mechanism to work like Nurbs code
* gluTessVertex/gluTessBeginPolygon and combine callback, original object return fixes
* gluGetNurbsProperty added, allocates the output
* gluNurbsCallbackData(EXT) argtype fix
glGet Sizes
* sizing tables regenerated based on results from size probing, lots of incorrect sizes fixed; note that these fixes are constrained to extensions I happen to have access to on my platforms
* fix the code generator's constant generation
* glGetPolygonStipple fixed size output
* glGetCompressedTexImage glGetTexImageCompressed was ignoring level and using an ARB constant
Wrappers
* remove double wrapping on glGetHistogramParameter{f,i}vEXT, glGenVertexArrays, glDrawBuffersEXT (which was also mis-named glDrawBuffers)
* glHistogram double wrapped as well, which was crashing vertex_array_object on import which was then causing higher level code to treat the extension as unsupported
64-bit Integer Arrays
* GL_INT64 / GL_UNSIGNED_INT64 new array types for all of the array handlers
No-Numpy Operation
* ctypesarrays zeros/ones handler
* a few spots where GLchar arrays were needed as return types
* gl(Get)ProgramNamedParameter*NV input size fix
* glGetActiveAttribARB optional bufSize parameter added
* ARB.vertex_shader allow passign in size parameter
* allow passing a ctypes char_p as shader-text
GLES
* images module for GLES
* friendly wrappers mimicing the GL ones for lots of endpoints
* glGetString/glGetStringi restype fix
* Normalising of GLES extension names to the GL_* form (same as GL)
General Bug Fixes
* Large constant wrapping fix
* Caching of extension/version data per-context
* Core/version extension handles cases where "VERSION" is not the *first* token
* ShaderProgram.retrieve() fix for unpacking glGetProgramBinary
* input-or-output converter for args that can be either
* ArrayDatatype.get_ffi_argtype etc PyPy specific mechanisms for array interactions
Logging
* make the log decorator more type-check friendly
Packaging
* License declaration fixes for more modern packaging tools
There shouldn't be many significant regressions, as almost everything is a correctness fix, but there's a lot of new code, particularly for the GLES improvements. The alpha is up now for those who want to test the changes against their codebase, but this is an alpha release, so there may be more significant code changes as we move toward a 4.0.0 final release.
There's still some work to do on the OpenGLContext release, but the teaser image above should give you an idea where it's going. It's a direct render of the Khronos sample asset A Beautiful Game