
Planet Python
Last update: July 26, 2026 04:47 PM UTC
July 26, 2026
Ned Batchelder
Acidica
My latest fun project is a BASIC interpreter called Acidica. Classic BASIC is an old-school language first developed in 1964 that saw an explosion of implementations on microcomputers in the ‘70s and ‘80s. It’s much more primitive than the Visual Basic that you might be familiar with.
A simple BASIC program:
10 INPUT "What is your name"; U$

20 PRINT "Hello "; U$

30 INPUT "How many stars do you want"; N

40 S$ = ""

50 FOR I = 1 TO N

60 S$ = S$ + "*"

70 NEXT I

80 PRINT S$

90 INPUT "Do you want more stars"; A$

100 IF LEN(A$) = 0 THEN 90

110 A$ = LEFT$(A$, 1)

120 IF A$ = "Y" OR A$ = "y" THEN 30

130 PRINT "Goodbye ";U$

140 END
Run it, and you get this:
What is your name? Ned

Hello Ned

How many stars do you want? 10

**********

Do you want more stars? y

How many stars do you want? 20

********************

Do you want more stars? n

Goodbye Ned
The wide variety of BASIC flavors meant I first had to decide what to implement. I found Vintage BASIC and used its spec, both because it is concisely described, and because it has an implementation I could run to double-check behavior when I had questions. The site also has a collection of runnable games from Creative Computing magazine, which I remember fondly.
This was a perfect vacation-week project. It has no real-world consequences. It had some interesting problems to puzzle through. It was testable. It satisfied some nostalgia for my earlier computing days. It was bounded enough to be “done”.
In those ways, it’s very similar to a vacation project of mine from four years ago: Stilted, an implementation of PostScript.
Acidica is not useful for writing new programs, only because BASIC itself is so difficult. There is no scoping beyond single-line functions, variables names can be as long as you want but only the first two letters and first digit are significant. Keywords are recognized anywhere, so FACTOR can’t be variable name because it has TO in the middle. The only control structures are FOR, IF, and GOTO. It’s something of a testament to human persistence that programs like three-dimensional tic-tac-toe can be written in it.
As a side project, I could choose my development style: no real type checking (partly because BASIC’s values would be awkward to squeeze into static typing), and very few docstrings. There are lots of tests, but only integration tests: every test is a BASIC program to run, with a check for the correct output and/or the expected error.
To be honest, the “only integration tests” approach was kind of a pain, but I stuck with it and resisted the temptation to add unit tests along the way.
Another choice I made: no AI. I like writing programs. I get a deeper sense of the thing I am building when I have my fingers in the clay. Since there was no deadline, or even any reason to ever finish the project, I could take my time and not be rushed.
But I like the result. I enjoyed the time I spent working on it. I liked being able to stop and devote pure thinking time while doing other things when I got to the next hurdle. The next steps here might be to use this project as a test bed for some development ideas. Or maybe add a BASIC-to-Python transpiler. Or maybe it’s done.
EuroPython Society
EuroPython 2026 Code of Conduct Transparency Report
The 2026 edition of the EuroPython conference took place both online and in person in July 2026. This was the fourth conference under our current Code of Conduct (CoC), and we had Code of Conduct working group members continuously available both online and in person.
Reports
Over the course of
July 24, 2026
Peter Bengtsson
Claude Opus is 10x faster than OpenAI GPT 5 at non-streaming completions
Claude is much faster than OpenAI gpt-5 and also faster than gpt-5-mini
Django Weblog
See You in Chicago in One Month!
In just one month, developers, maintainers, educators, and Django enthusiasts from around the world will gather in Chicago for DjangoCon US 2026.
DjangoCon US is more than a conference, it's a place to learn from the community, share ideas, contribute to Django, and make connections that last long after the event ends. Whether you're attending your first DjangoCon US or you've been coming for years, we're excited to welcome you.
Over five days, attendees will have the opportunity to:
- Learn from expert speakers and community members
- Participate in hands-on tutorials
- Collaborate during Django sprints
- Join Open Spaces and informal discussions
- Meet fellow Django developers from across the globe
If you're planning to join us, tickets are still available, and there's still time to reserve your stay at the conference hotel. The hotel room block deadline is August 3, so be sure to book your room before then.
August 24–28, 2026
Chicago, Illinois
We can't wait to see you in Chicago!
Armin Ronacher
Codeberg Divides
July 23, 2026
Python Software Foundation
Get Ready: PSF Board Nominations Opening Soon!
Get Ready: Python Packaging Council Nominations Opening Soon!
Python Insider
Get Ready: 2026 Python Packaging Council Nominations Opening Soon!
The inaugural Python Packaging Council election nomination period opens on Tuesday, July 28th, 2:00 pm UTC and closes on Tuesday, August 11th, 2:00 pm UTC.
July 22, 2026
Django Weblog
Django 6.1 release candidate 1 released
Django 6.1 release candidate 1 is now available. It represents the final opportunity for you to try out the version that offers a harmonious mélange of new features and usability improvements, before Django 6.1 final is released.
The release candidate stage marks the string freeze and the call for translators to submit translations. Provided no major bugs are discovered that can't be solved in the next two weeks, Django 6.1 will be released on or around August 5. Any delays will be communicated on the Django forum.
Please use this opportunity to help find and fix bugs (which should be reported to the issue tracker), you can grab a copy of the release candidate package from our downloads page or on PyPI.
The PGP key ID used for this release is Jacob Walls: 131403F4D16D8DC7
Python Software Foundation
The PSF D&I Workgroup is Starting Office Hours in July!
Python GUIs
Constantly Print Subprocess Output While Process is Running — How to stream live output from a subprocess into your PyQt6 GUI without freezing the interface
I need to call a legacy Bash program and display the results in a Qt window. The problem is the subprocess doesn't return each output line as it happens — it waits until the entire command is finished, then dumps everything to the window at once. If the command takes a long time, the user thinks the system is frozen. How can I get live, line-by-line output from a subprocess into my Qt application?
Mike C. Fletcher
OMI Physics Extension for glTF
I had Claude code up an OMI Physics package using Numpy. It's up on pypi as omi_physics. This follows the OMI extensions to glTF pretty closely to create an engine with the common features you need. It's not trying to be real-world physics, it's just a game engine style simulation.
The core is GL-free, with a few GPGPU kernels to optimise certain bits over 10,000 objects, but in testing any more than about 300 objects brings the rendering below 60fps in OpenGLContext. To get around that we'd need to move the whole physics process into the GPU with a very different solver, and I don't currently need that.
License is MIT, though most of the code is written by Claude, so arguably it's non-copyright.
Seth Michael Larson
PAL GameCube haul from Kraków, Poland (EuroPython 2026)
July 21, 2026
PyCoder’s Weekly
Issue #744: CPython ABI, CLAUDE.md, Itertools Cheatsheet, and More (2026-07-21)
PyCharm
What’s New in PyCharm 2026.2
In PyCharm 2026.2, you can build Python extensions with the new Rust plugin and debug them using debugpy, which is now the default engine. Running external utilities is now managed through a redesigned settings UI for uvx, while multi-project setups are supported out of the box for uv, Poetry, and Hatch workspaces. This release also […]
Rodrigo Girão Serrão
Python quiz: EuroPython 2026 edition
Replay the EuroPython 2026 Python quiz.
These are the questions asked during the EuroPython 2026 quiz. They will test your knowledge of the Python language, the community, and of EuroPython 2026. Since we were celebrating 25 years of EuroPython at EuroPython 2026, some questions also touched on that theme. (Unless explicitly stated, questions refer to CPython 3.14.)
Note that the version of the quiz presented here is less interactive than the one presented at the conference.
Questions
In 25 years of conference, which of these European cities never hosted EuroPython?

- Bilbao
- Birmingham
- Lisbon
- Prague
This year's conference programme has it all. This quiz. Talks. Lightning talks. Tutorials. Summits. Open spaces. Talks. And posters during lunch breaks. How many posters are scheduled to be presented at EP 2026?
- 4
- 6
- 12
- 15
Which of the following Python-related projects has the FEWEST stars on GitHub?
- CPython
- Django
- FastAPI
- uv
The Python repo has over 130,000 commits made by more than 3,500 contributors over the past 35+ years. The Python core developers are the people with permissions to commit directly to the CPython GitHub repo and plenty of them were at the conference. Out of the following 4 core devs, who were all at the conference, who's made the fewest commits?
- Guido van Rossum, the creator of Python
- Hugo van Kemenade, Python 3.14 and 3.15 release manager
- Łukasz Langa, Python Developer in Residence for ~5 years
- Pablo Galindo Salgado, Python 3.10 and 3.11 release manager
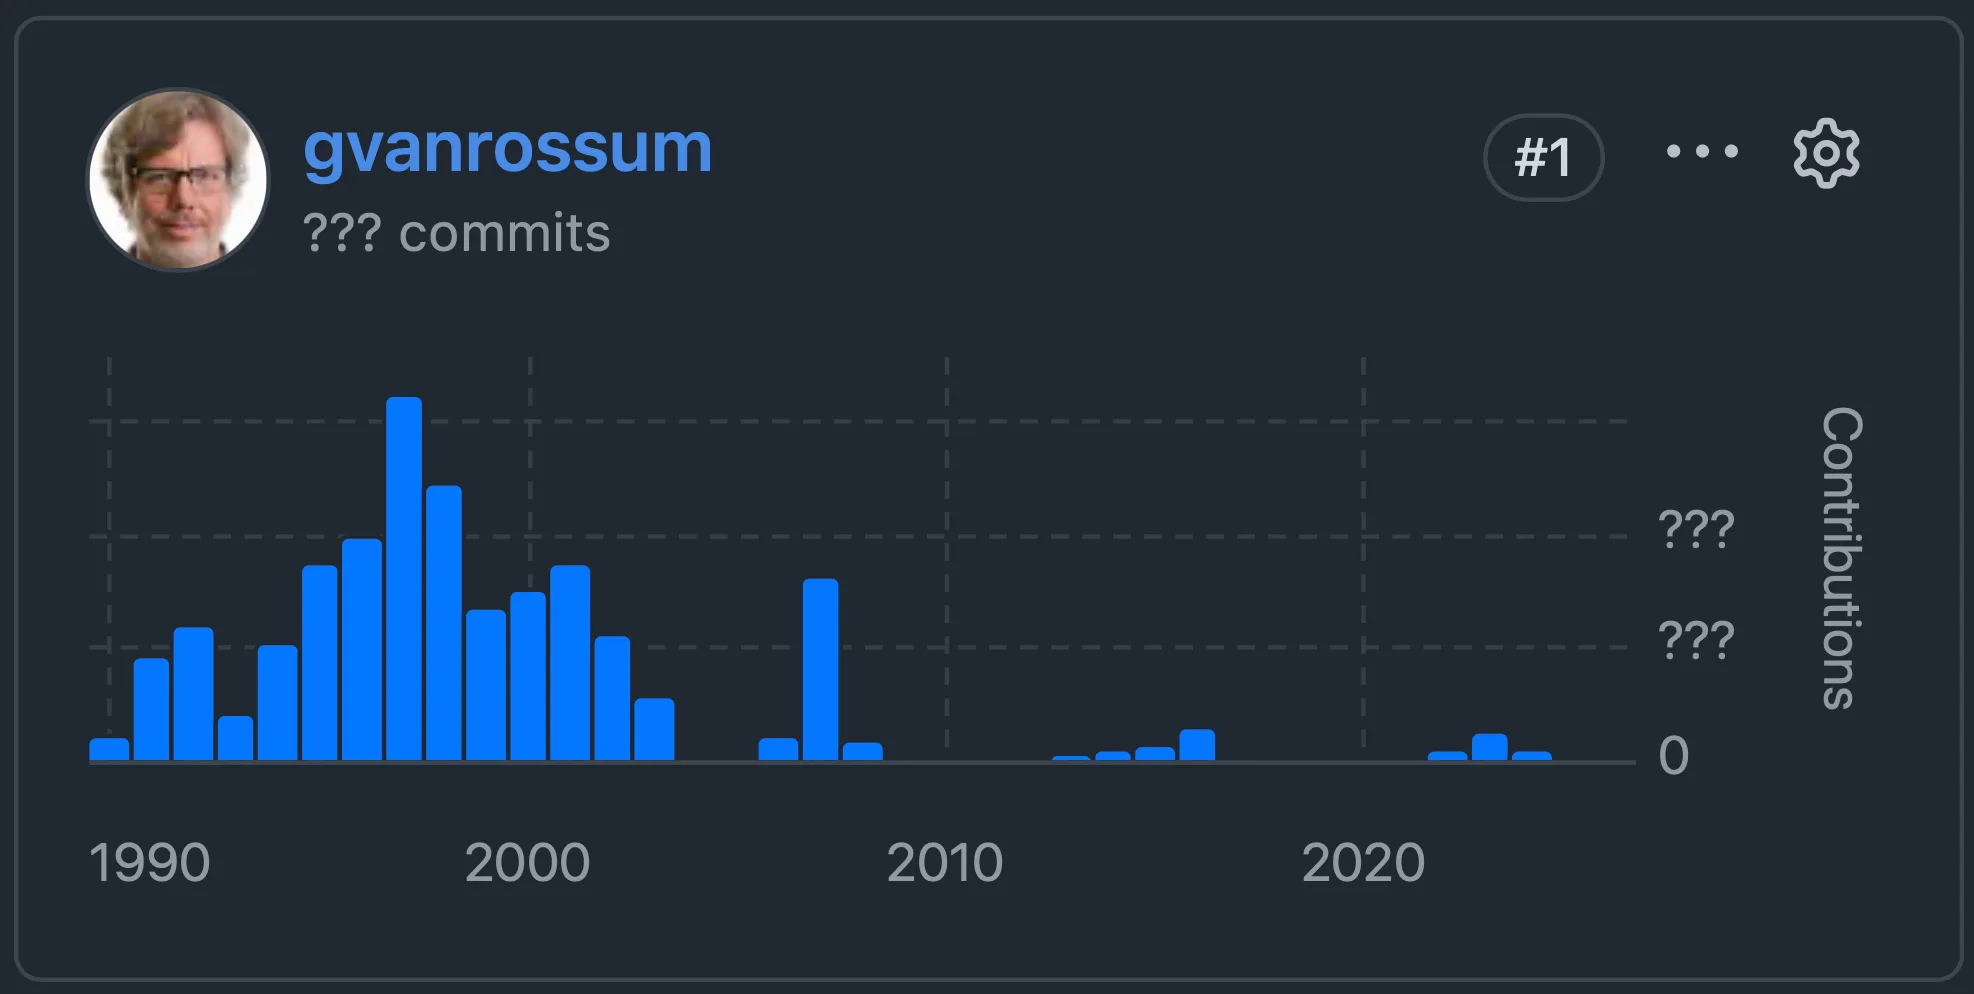
Speaking of commits, how many commits did Guido van Rossum make?
Since we're celebrating 25 years of EuroPython, which of the following expressions does not evaluate to 25?
0x190b110010o3325
3.15 comes with two new built-in functions. Before that, the previous Python version that got new built-ins was 3.10, with also TWO new built-ins. What two built-ins were introduced in 3.10?
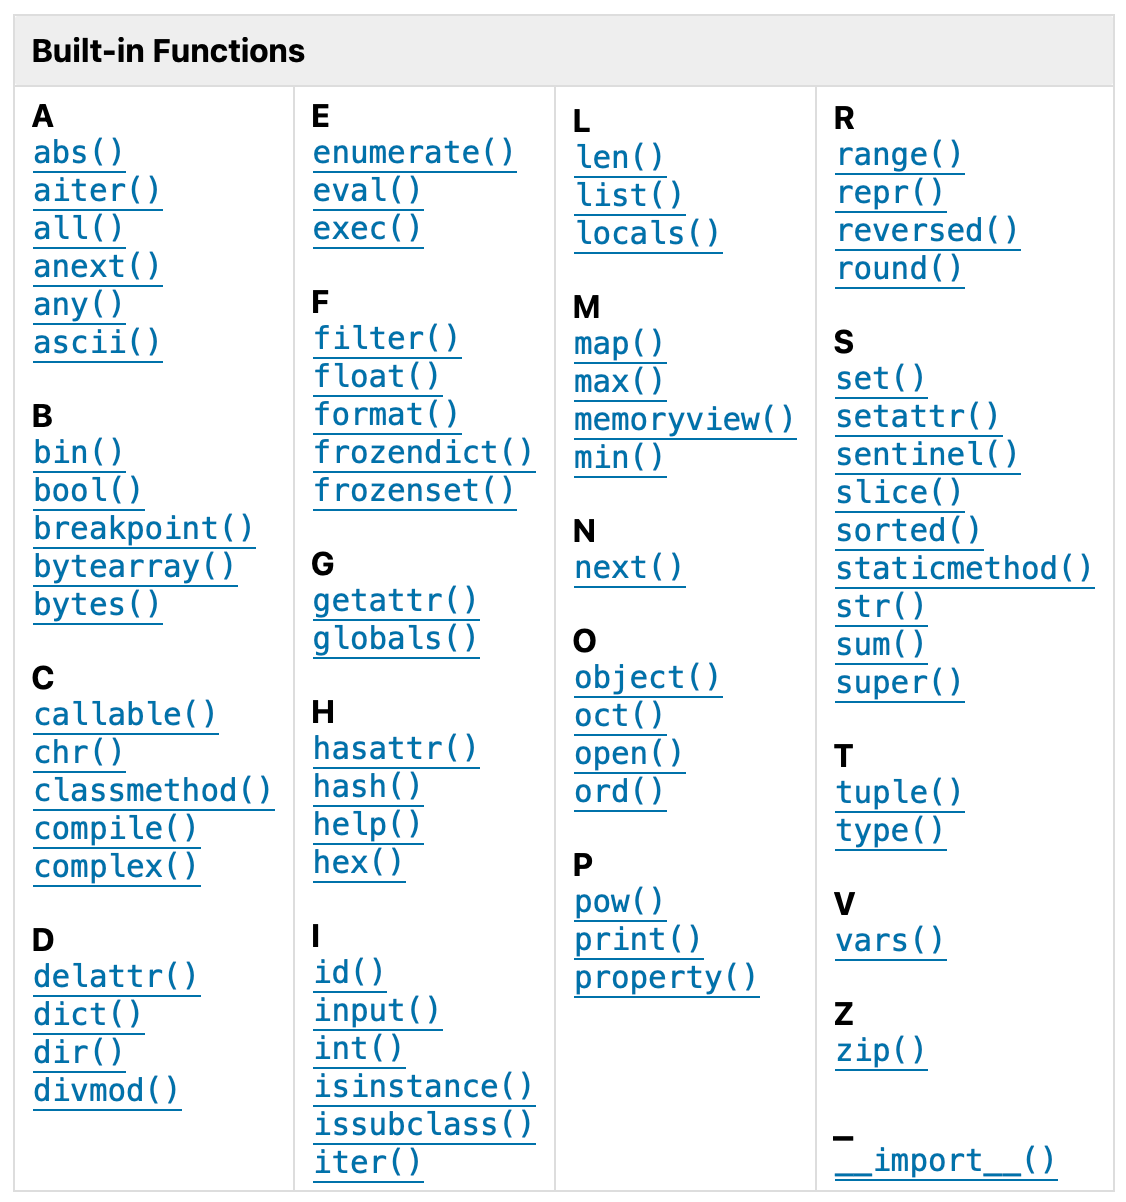
-
aiterandanext -
breakpointandcompile -
frozendictandsentinel -
frozensetandmemoryview
What's printed by the second print if you run this code?
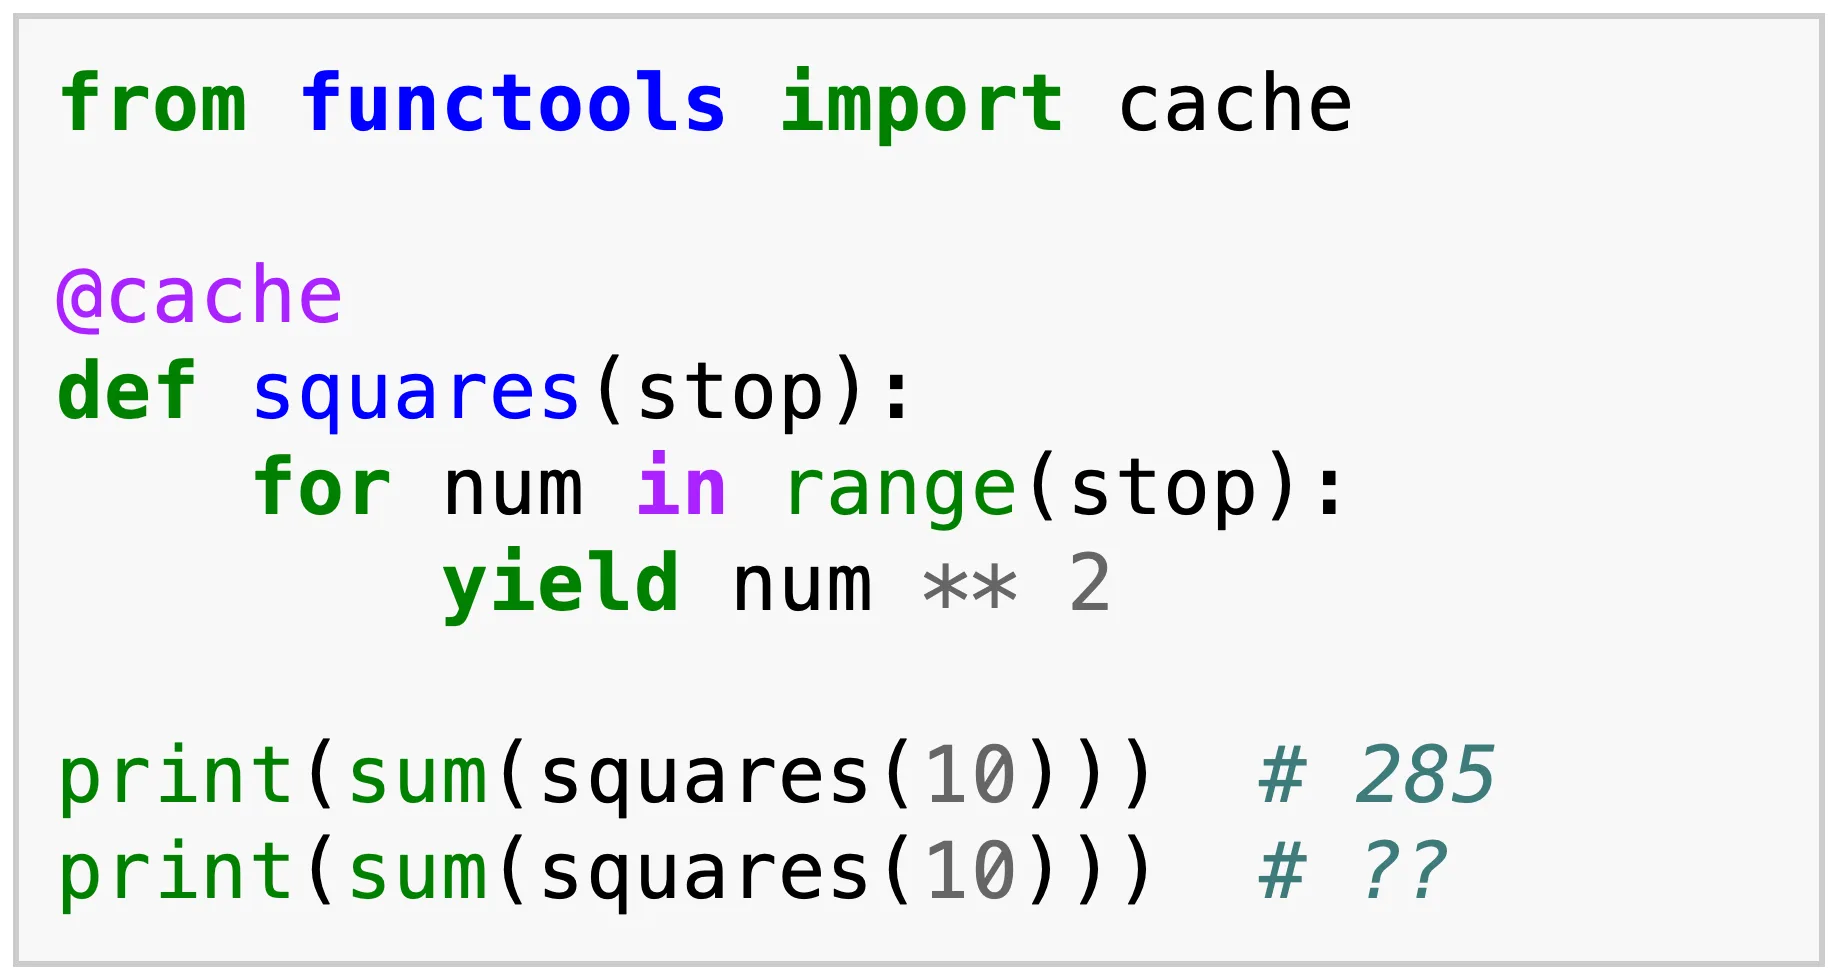
0285KeyErrorValueError
By the way, speaking of commits, do you still remember how many commits Guido van Rossum made?
What does the following cursed Python 2 code print?

'a'25TrueSyntaxError
Explanations
Question 1 — Hosting EuroPython
EuroPython 2009 and 2010 was hosted in Birmingham. EuroPython 2015 and 2016 was hosted in Bilbao. EuroPython 2023, 2024, and 2025 was hosted in Prague. Of the four options, Lisbon is the only European city that never hosted an EuroPython.
Question 2 — poster presentations
Originally, 9 poster presentations were scheduled. After a mixup and a couple cancellations we ended with only 6.
Question 3 — GitHub stars
The official quiz asked you to order all four projects, from most stars to least stars. Can you do it?
On the 15th of July of 2026, this would be the correct ordering:
- FastAPI, 101k
- Django, 88.2k
- uv, 87.5k
- CPython, 73.8k
Question 4 — commits
On the 15th of July of 2026, GitHub reported the following number of all-time...
Python Bytes
#489 Or JSON?
Topics include django-orjson, Best Django Redis configuration for speed and size, puts the foot down, and Django Steering Council backs the Triptych Project.
Talk Python Blog
Calvin Hendryx-Parker joins Python Bytes as Co-Host

TL;DR: Calvin Hendryx-Parker is the new permanent co-host of Python Bytes, starting with episode 483 on June 9th, 2026. After almost 10 years, Brian Okken, who founded the show with me back in 2016, has decided it’s time for him to move on.
We have some major news to announce over at Python Bytes. We are welcoming a new co-host to the show: Calvin Hendryx-Parker. After almost 10 years, Brian Okken who founded the show with me, Michael back in 2016 has decided it’s time for him to move on. On the air I called it the next generation of Python Bytes.
July 20, 2026
Wingware
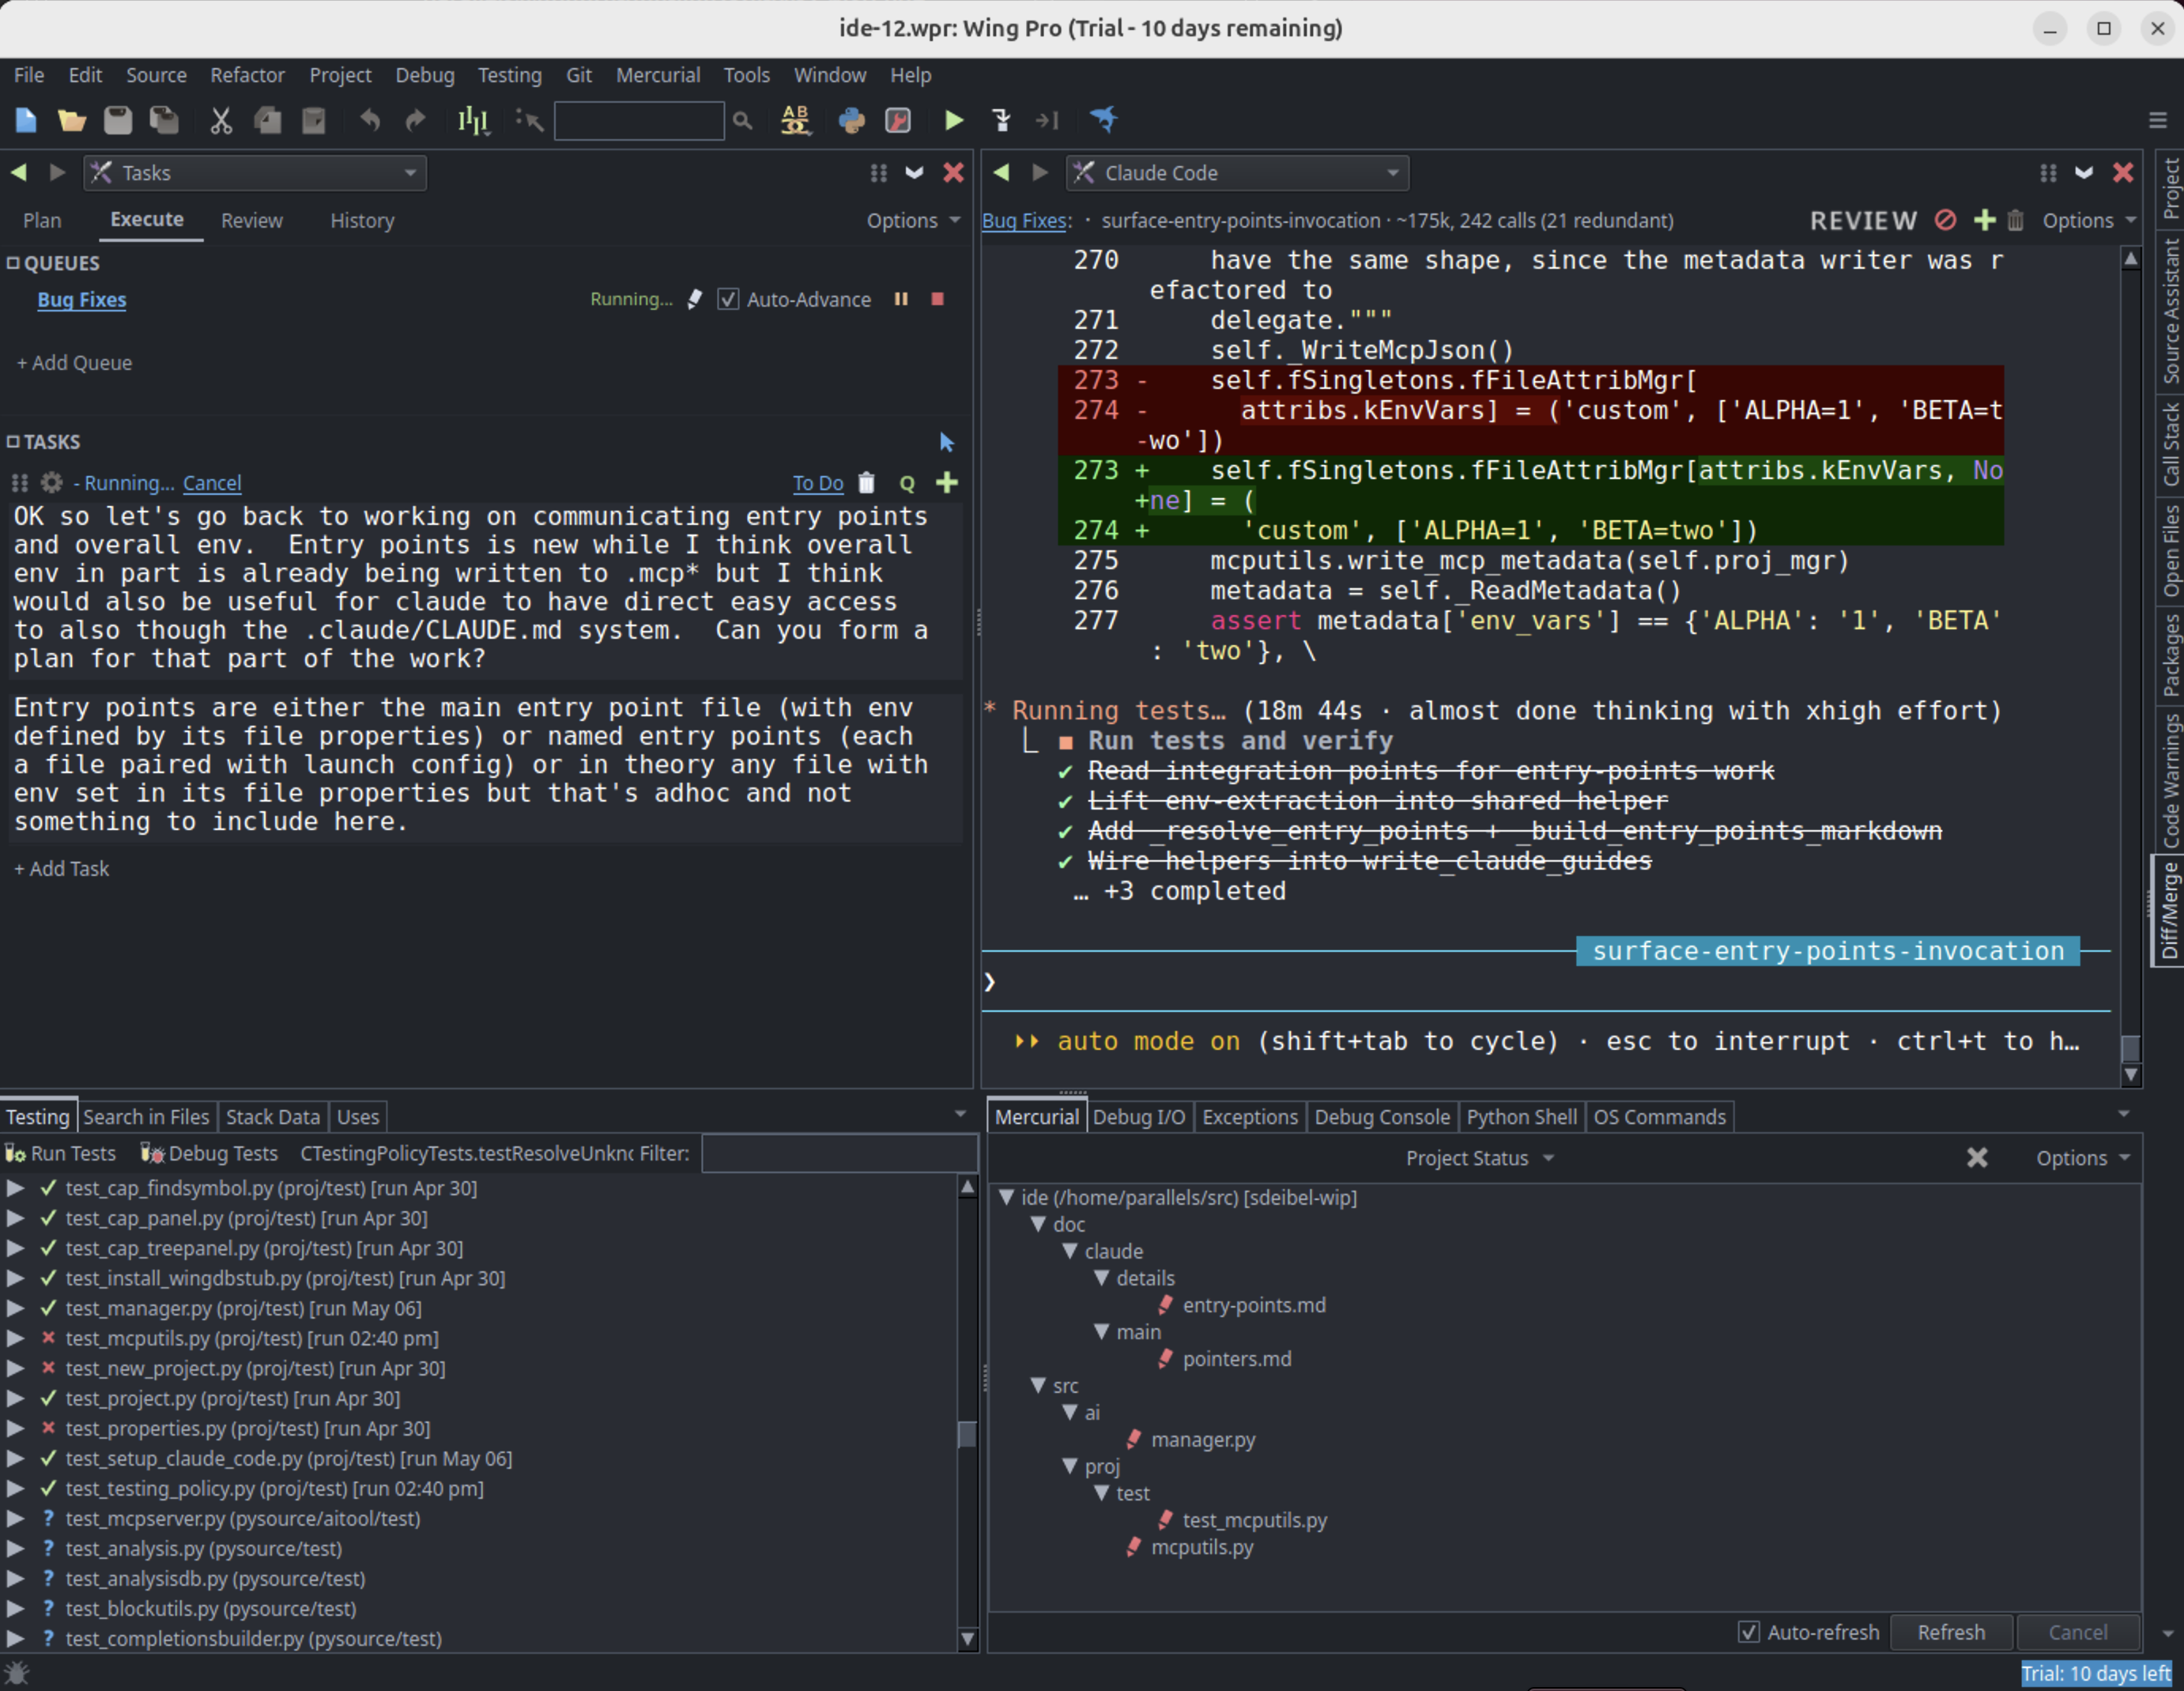
Wing Python IDE Version 12 - July 20, 2026
Wing Python IDE version 12 has been released. Wing 12 integrates the Claude Code AI coding agent directly into the IDE, with a new Claude Code tool, a Tasks tool for planning and reviewing AI agent work, and a set of MCP servers that give the agent access to Wing's source code analysis, unit testing, debugger, and code review features. Wing 12 makes it faster and cheaper to direct AI agents; see our benchmarks for details.
Wing 12 also adds configurable AI-driven Code Actions, code FIX actions, automated Write Tests, pseudo-terminal support for OS Commands and Debug I/O, support for tools and OS Commands in editor splits, a reorganized Tools menu, automatic test discovery, Preferences search, and more.
Downloads
Wing 12 -- the full Python IDE, available as Wing Pro (for agentic development) or Wing Classic (for manual development) depending on your license, with a free 30-day trial of Wing Pro.
Wing 101 v. 12 -- a simplified free Python IDE for teaching beginning programmers.
Wing 11 and earlier versions are not affected by installation of Wing 12 and may be installed and used independently. However, project files for Wing 11 and earlier are converted when opened by Wing 12 and should be saved under a new name, since Wing 12 projects cannot be opened by older versions of Wing.
New in Wing 12
AI Coding Agent Integration with Claude Code
Wing 12 adds a Claude Code tool that integrates the Claude Code AI coding agent with the IDE. Set Up for Claude Code in the Project menu configures the active project for AI agent development.
A set of MCP (Model Context Protocol) servers gives Claude Code access to Wing's source code analysis, testing, and debugger functionality, so the agent can more efficiently navigate and understand your code, write, run, and fix unit tests, and use the debugger to diagnose difficult runtime errors. In our benchmarks, giving Claude Code access to Wing's MCP servers made agent-driven coding tasks both faster and cheaper.
Tasks Tool
The new Tasks tool lets you plan, queue, execute, review, and audit the history of AI agent development tasks, making it easier to supervise and inspect the agent's work before committing it to revision control.
FIX Features and Write Tests
Wing 12 adds AI agent driven FIX features that hand the current debugger bug, failing unit tests, or code warnings to Claude Code for resolution. New Write Tests items in the Testing and editor context menus prompt the agent to write unit tests for selected code.
Code Actions
Wing 12 also adds AI Code Actions, accessed from the FIX icon in the editor toolbar, that operate on selected code or the enclosing scope. Built-in actions include explaining code, reviewing it for quality or security risks, fixing code warnings, optimizing for performance, and updating comments and docstrings. The action list is user-extensible, so you can add your own prompts for tasks you run often.
Pseudo-Terminal for OS Commands and Debug I/O
The OS Commands and Debug I/O tools now default to using a pseudo-terminal that implements full ANSI terminal emulation, so you can run and debug programs that use color output, cursor positioning, or full-screen TUIs.
Redesigned OS Commands Capability
The OS Commands tool has been replaced with configurable OS Commands in the Tools menu. Each OS Command acts like its own tool, for use in any tool or editor split.
Tools in Editor Splits and Reorganized Tools Menu
Tools can now also be added or dragged to editor splits, allowing for much more flexible workspace layout. The Tools menu has been reorganized into related groups, with less-user and legacy tools in an Other sub-menu, so more commonly used tools area easier to find.
Test Discovery and Preferences Search
Wing 12 adds automatic test file discovery and discovery of individual unit tests within files, so you usually don't need to specify test file patterns or add test files individually. The Preferences dialog now supports text search and back/forward navigation.
Other Minor Features and Improvements
Wing 12 also significantly speeds up source code analysis, prompts for SSH passphrases and HTTPS credentials when needed during VCS operations, detects externally modified files much more quickly and with reduced CPU load, saves and restores tool console scrollback across project close/reopen, supports clickable OSC 8 hyperlinks in OS Commands and Debug I/O tools, adds a preference to select the ssh or plink.exe SSH implementation, shows a notice on the next startup when Wing's previous session ended in an unexpected crash, and makes a number of other bug fixes and usability improvements.
Product Line Changes
Wing 12 simplifies the product line. The Commercial / Non-Commercial use distinction has been replaced by two feature-based product tiers:
- Wing Pro -- the full-featured Python IDE including AI agent development tools
- Wing Classic -- the complete traditional Python IDE for hands-on development, with no AI agent features
Anyone may purchase either tier for any purpose. Existing Commercial and Non-Commercial Use licenses both become Wing Pro. Customers who don't need the AI agent features may move to Wing Classic at renewal time, or any time sooner by contacting support@wingware.com.
Wing Personal has been discontinued. Existing Wing Personal users may continue to use Personal 11.x indefinitely, switch to free Wing 101, or purchase a Wing Classic license. See Pricing for details.
Changes and Incompatibilities
The single-LLM-query AI features originally introduced in Wing 11 (the AI Coder and AI Chat tools) are considered legacy in Wing 12 and hidden from the user interface by default. They remain available in projects that already use them and can be re-enabled with Project Properties > AI in Project Properties or in the .``Projects > AI`` preferences.
See Wing's Claude Code Agent Integration for Wing 12's AI agent approach.
If you have questions, please don't hesitate to contact us at support@wingware.com.
July 19, 2026
Paolo Melchiorre
My EuroPython 2026
My EuroPython 2026 experience in Krakow, captured through Mastodon posts about talks, community, people, and moments along the way.
Peter Bengtsson
Best Django Redis configuration for speed and size
`lzma` compresses the most and `zlib` is about as fast as `zstd` in `django_redis` as compressor.
July 18, 2026
PyPy
Moving linux builds to GLIBC==2.28
A short note for visibility.
PyPy builds tarballs of the python interpreter ready for
download. These include the latest
releases and also nightly builds, fresh from our fleet of buildbots. Over the
next couple of days, the nightly builds on linux will transition from
manylinux2014 based docker images to manylinux2_28
images. The practical implication is that
nightly images, and the next releases, will require a minimum of GLIBC>=2.28,
i.e. AlmaLinux8, amanzonlinux 2023, debian 10, ubuntu 20.04. For a good
overview of how this glibc/distro/manylinux all works, see the PEP 600 compliance
page.
The next release will indicate this change by a new PyPy major version, 8.0.0. It should include a Python3.12 interpreter, in which case it will be the last release of the Python 3.11 interpreter.
Core Dispatch
Core Dispatch #8
Welcome back to Core Dispatch! This edition covers July 5 through July 18, 2026. Python 3.15.0 beta 4 landed today, July 18 (we just released it at the EuroPython sprints!), with 3.13.15, 3.14.7 and the first 3.15 release candidate following on August 4. It's EuroPython week! Much of the core team
Python Insider
Python 3.15.0 beta 4 is here!
The final 3.15 beta is out!
July 17, 2026
PyPodcats
Episode 12: With Juanita Gomez
Learn about Juanita Gomez, a Ph.D. candidate at UC Santa Cruz researching open source security. From developing the Spyder IDE to leading community efforts for Scientific Python and singing on stage at SciPy, Juanita shares her journey in open source.